LG LDCS24223S Owners Manual - Page 24
Carefully lift up the freezer door. Remove
 |
View all LG LDCS24223S manuals
Add to My Manuals
Save this manual to your list of manuals |
Page 24 highlights
ENGLISH 23 INSTALLATION 4 Remove the four screws 1 , the hinge pin insert 2 and the hinge pin brackets 3 from the bottom right side of the door. 3 NOTE Before removing the freezer door, make sure you completely remove the refrigerator door. 6 Use a ¼ in. (6.35 mm) hex socket wrench to loosen the hinge pin 1 and remove it. Remove the two bolts 2 , the screw 3 and the hinge 4 . Remove the washer. 3 4 5 Reinstall the hinge pin brackets 1 , screws 2 and hinge pin insert 3 on the bottom left side of the door. 7 Carefully lift up the freezer door. Remove and place it on a non-scratching surface. Bottom Hinge Pin 3 8 Using a ¼" (6.35 mm) socket wrench, loosen and remove the hinge pin from the bottom hinge. Bottom Hinge Pin
-
 1
1 -
2
-
3
-
4
-
5
-
6
-
7
-
8
-
9
-
10
-
11
-
12
-
13
-
14
-
15
-
16
-
17
-
18
-
 19
19 -
 20
20 -
 21
21 -
 22
22 -
 23
23 -
 24
24 -
 25
25 -
 26
26 -
 27
27 -
 28
28 -
 29
29 -
30
-
31
-
32
-
33
-
34
-
35
-
36
-
37
-
38
-
39
-
40
-
41
-
42
-
43
-
44
-
45
-
46
-
47
-
48
-
49
-
50
-
51
-
52
-
53
-
54
-
55
-
56
 |
 |

23
INSTALLATION
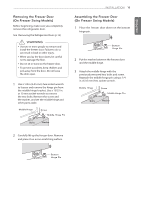
4
Remove the four screws
1
, the hinge
pin insert
2
and the hinge pin brackets
3
from the bottom right side of the door.
5
Reinstall the hinge pin brackets
1
, screws
2
and hinge pin insert
3
on the bottom
left side of the door.
3
3
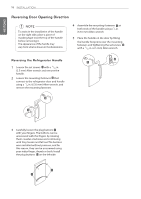
6
Use a ¼ in. (6.35 mm) hex socket wrench to
loosen the hinge pin
and remove it. Remove
1
the two bolts
2
, the screw
3
and the
hinge
4
. Remove the washer.
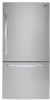
7
Carefully lift up the freezer door. Remove
and place it on a non-scratching surface.
8
Using a ¼” (6.35 mm) socket wrench, loosen
and remove the hinge pin from the bottom
hinge.
NOTE
Before removing the freezer door,
make sure you completely remove the
refrigerator door.
Bottom
Hinge Pin
Bottom Hinge Pin
3
4
ENGLISH