LG LSE4615ST Owners Manual
LG LSE4615ST Manual
 |
View all LG LSE4615ST manuals
Add to My Manuals
Save this manual to your list of manuals |
LG LSE4615ST manual content summary:
- LG LSE4615ST | Owners Manual - Page 1
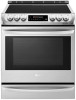
ENGLISH Español OWNER'S MANUAL ELECTRIC RANGE Read this owner's manual thoroughly before operating the appliance and keep it handy for reference at all times. LSE4615** LSE4613** LSE4611** MFL68881511_10 www.lg.com Copyright © 2017 - 2019 LG Electronics Inc. All Rights Reserved. - LG LSE4615ST | Owners Manual - Page 2
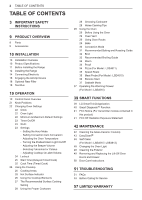
: LSE4615 / LSE4613) 48 Changing the Oven Light 48 Cleaning the Exterior 49 Removing and Replacing the Lift-Off Oven Doors and Drawer 50 Door Care Instructions 51 TROUBLESHOOTING 51 FAQs 53 Before Calling for Service 57 LIMITED WARRANTY - LG LSE4615ST | Owners Manual - Page 3
all instructions when using the range to prevent the risk of fire, electric shock, personal injury, or damage. This guide does not cover all possible conditions that may occur. Always contact your service agent or manufacturer about problems that you do not understand. Download this owner's manual - LG LSE4615ST | Owners Manual - Page 4
4 IMPORTANT SAFETY INSTRUCTIONS SAFETY PRECAUTIONS ••DO NOT TOUCH HEATING ELEMENTS OR INTERIOR SURFACES food in the oven. ••Do not repair or replace any part of the appliance unless specifically recommended in the manual. All other servicing should be performed by a qualified technician. ••Do not use - LG LSE4615ST | Owners Manual - Page 5
from the appliance before operating. Keep plastic, clothes, paper, and other flammable materials away from parts of the appliance that may become hot. ••Always disconnect power from the appliance before servicing. ••Do not use aluminum foil or any other material to line the oven bottom. Improper - LG LSE4615ST | Owners Manual - Page 6
INSTRUCTIONS children. ••Children should not be allowed to play with controls or other parts of the appliance. GLASS-CERAMIC COOKING SURFACE ••Surface units may be hot earthenware, or other glazed cookware are suitable for range-top service without breaking due to the sudden change in temperature. - LG LSE4615ST | Owners Manual - Page 7
SAFETY INSTRUCTIONS 7 one oven. ••For optimal performance and energy savings, follow the guides on page 31 for proper rack and pan placements. ••Match the . Eating spoiled food can result in sickness from food poisoning. ••Accessible parts may become hot when the grill is in use. ••Do not place - LG LSE4615ST | Owners Manual - Page 8
clean cycle only parts listed in this manual. Before self- Instruction. The oven displays an F error code and sounds three long beeps during the self-cleaning process if it malfunctions in the self-clean mode. Switch off the electrical power to the main fuse or breaker and have the oven serviced - LG LSE4615ST | Owners Manual - Page 9
Accessories Non-scratch scouring pad (1ea) Grid Broiler pan NOTE •• Contact LG Customer Service at 1-800-243-0000 (1-888-542-2623 in Canada) if any accessories use of separately purchased, unauthorized components or parts. •• The images in this guide may be different from the actual components - LG LSE4615ST | Owners Manual - Page 10
Installation Overview Please read the following installation instructions first after purchasing this product or transporting it Test run Product Specifications The appearance and specifications listed in this manual may vary due to constant product improvements. Oven Range Models Description - LG LSE4615ST | Owners Manual - Page 11
tip bracket in place. Failure to follow these instructions can result in death or serious burns to one at no cost. Warning •• The information in this manual should be followed exactly. Failure to do so may Level Parts Provided Adjustable wrench Drill Safety glasses Parts not service technician. - LG LSE4615ST | Owners Manual - Page 12
or pull the range during installation or when moving the range out for cleaning or service. Doing so can result in serious damage to the door of the range. Remove , Title 24 CFR, Part 3280 (formerly the Federal Standard for Mobile Home Construction and Safety, Title 24, HUD Part 280), or when such - LG LSE4615ST | Owners Manual - Page 13
ENGLISH Dimensions and Clearances NOTE Save for the use of the local electrical inspector. INSTALLATION 13 3" (7.6 cm) 24" (60.9 cm) Acceptable electrical outlet area 3" (7.6 cm) 25" (63.5 cm) Normal counter top depth A Cabinet opening 36" Counter (91.4 cm) top height 36" (91.4 cm) 29.8" - LG LSE4615ST | Owners Manual - Page 14
-tip bracket is engaged when the range is moved. Do not operate the range without the anti-tip bracket in place. Failure to follow these instructions can result in death or serious burns to children and adults. To check that leveling leg is inserted into anti-tip bracket, grasp the top - LG LSE4615ST | Owners Manual - Page 15
ENGLISH Warning •• Allow 2 to 3 ft (61.0 cm to 91.4 cm) of slack in the line so that the range can be moved if servicing is ever necessary. •• The power supply cord and plug should not be modified. If it will not fit the outlet, have a proper outlet Installed by a - LG LSE4615ST | Owners Manual - Page 16
16 INSTALLATION 3-Wire Connection : Power Cord Warning •• The middle (neutral or ground) wire, which is white, of a 3-wire power cord or a 3-wire conduit has to be connected to the middle post of the main terminal block. The remaining two wires of the power cord or conduit have to be connected to - LG LSE4615ST | Owners Manual - Page 17
of the range with the ground screw. Failure to do so can result in electrical shock, severe personal injury or death. 1 Follow the instructions for installing the conduit under 3-Wire Connection: Conduit until the strain relief and bracket are installed. Do not install the conduit without a strain - LG LSE4615ST | Owners Manual - Page 18
18 INSTALLATION Engaging the Anti-tip Device •• Move the range close enough to the opening to plug into the receptacle. •• Slide the range into position ensuring that the back leg slides under the anti-tip bracket. The range should sit flush against the back wall when properly installed. •• - LG LSE4615ST | Owners Manual - Page 19
ENGLISH OPERATION Control Panel Overview For Model : LSE4615 1 OPERATION 19 seconds 2 3 4 5 6 7 8 9 For Model : LSE4613 / LSE4611 1 10 For Model : LSE4613 11 12 13 5 6 14 seconds 8 9 For Model : LSE4611 10 - LG LSE4615ST | Owners Manual - Page 20
20 OPERATION 1 Smart DiagnosisTM Use during the Smart Diagnosis feature. 2 Cook Time / Clock •• Press the button to set the desired amount of time for food to cook. The oven shuts off when the set cooking time runs out. •• Press and hold button for three seconds to set the time of day. 3 Start Time - LG LSE4615ST | Owners Manual - Page 21
ENGLISH OPERATION 21 Knob Positions After cleaning the oven knobs, make sure to replace each knob in the correct position. Failure to do so can result in improper operation of the burners. LSE4615 Dual LSE4613 Single Single Mode Single Triple Dual LSE4611 Single Single Mode Single Dual - LG LSE4615ST | Owners Manual - Page 22
may have experienced a power failure. Reset the time. Oven Light The interior oven light automatically turns on when the door is opened. Press Light to manually turn the oven light on. NOTE The oven light cannot be turned on if the Self Clean function is active. (For Model : LSE4615, LSE4613 - LG LSE4615ST | Owners Manual - Page 23
in the app. NOTE See the Smart Functions section in the owner's manual for more details. OPERATION 23 Settings Set the oven mode knob to the Convection Auto Conversion is enabled by default. To change the setting, follow these instructions. 1 Set the oven mode knob to the Off position. 2 Press and - LG LSE4615ST | Owners Manual - Page 24
24 OPERATION Adjusting the Oven Temperature Your new oven may cook differently from the one it replaced. Use your new oven for a few weeks to become more familiar with it before changing the temperature settings. If after familiarizing yourself with the new oven, you still think that it is too hot - LG LSE4615ST | Owners Manual - Page 25
Start Time (Delayed Timed Cook) The automatic timer of the Delayed Timed Cook function turns the oven on and off at the time you select. This feature can be used with the Bake, Conv. Bake and Conv. Roast modes. Setting a Delayed Timed Cook For example, to bake at 300 °F and delay the start of baking - LG LSE4615ST | Owners Manual - Page 26
26 OPERATION Using the Cooktop Cooking Areas The cooking areas on your range are identified by permanent circles on the glass cooktop surface. For the most efficient cooking, fit the pan size to the element size. Pans should not extend more than 1/2 to 1-inch beyond the cooking area. When a control - LG LSE4615ST | Owners Manual - Page 27
ENGLISH Turning on the Dual Element There is one dual element located in the left front position. Use the dual element as a dual or single element. 1 Push in the appropriate knob. 2-A Turn the knob counterclockwise to use it as a Single element. 2-B Turn the knob clockwise to use it as a Dual - LG LSE4615ST | Owners Manual - Page 28
or foil-type containers. Foil may melt onto the glass. Do not use the cooktop if metal has melted on it. Call an authorized LG Service Center. Choosing Cookware The cookware material determines how evenly and quickly heat is transferred from the surface element to the pan bottom. The most popular - LG LSE4615ST | Owners Manual - Page 29
out until it stops. 2 Lift up the front of the rack and pull it out. Replacing Racks 1 Place the end of the rack on the support. 2 Tilt the front end up and push the rack in. CAUTION •• Replace oven racks before turning the oven on to prevent burns. •• Do not cover - LG LSE4615ST | Owners Manual - Page 30
30 OPERATION Baking Tips •• Baking time and temperature will vary depending on the characteristics, size, and shape of the baking pan used. •• Check for food doneness at the minimum recipe time. •• Use metal bakeware (with or without a nonstick finish), heatproof glass-ceramic, ceramic or other - LG LSE4615ST | Owners Manual - Page 31
Rack and Pan Placement Multiple rack baking Rack (Position 3) Rack (Position 5) Single rack baking Rack OPERATION 31 Baking rack guide Food •• Layer cakes Cakes •• Bundt cakes •• Angel food cake •• Sugar cookies Cookies •• Chocolate chips •• Brownies Pizza •• Fresh •• Frozen Pastry - LG LSE4615ST | Owners Manual - Page 32
32 OPERATION Broil The Broil function uses intense heat from the upper heating element to cook food. Broiling works best for tender cuts of meat, fish, and thinly cut vegetables. Some models may feature a hybrid broiler consisting of an inner broiler that utilizes a carbon heating element which - LG LSE4615ST | Owners Manual - Page 33
time 5 to 10 minutes per side for 11/2" thick or home-cured ham. 4-7 5-8 2-5 4-7 7-9 7-9 3-5 Grease pan. Brush steaks with melted butter. 4-6 •• This guide is only for reference. Adjust cook time according to your preference. NOTE The USDA advises that consuming raw or undercooked fish, meat, or - LG LSE4615ST | Owners Manual - Page 34
34 OPERATION Tips for Broiling Beef •• Steaks and chops should always be allowed to rest for five minutes before being cut into and eaten. This allows the heat to distribute evenly through the food and creates a more tender and juicy result. •• Pieces of meat that are thicker than two inches should - LG LSE4615ST | Owners Manual - Page 35
proofing. Always unplug and remove the meat probe from the oven when removing food. Before using, insert the probe into the center of the thickest part of the meat or into the inner thigh or breast of poultry, away from fat or bones. Place food in the oven and connect the - LG LSE4615ST | Owners Manual - Page 36
on the network, "OFF" appears in the display. Follow the instructions on page 39 to register the appliance on the network. Set the Remote Start status is "OFF" or "door". •• Remote Start experiences a problem during operation. •• The Remote Start function cannot be started when the oven door - LG LSE4615ST | Owners Manual - Page 37
be off. •• During Sabbath mode, the upper oven functions are blocked and Wi-Fi network cannot be connected. Use the included wok grate to safely support a 12" to 14" round-bottomed wok to stir-fry or saute meats, fish, or vegetables. •• Please always close the oven door first before engaging Sabbath - LG LSE4615ST | Owners Manual - Page 38
element which may damage any items not specifically designed to be used with it and should only be used to store cookware specifically supplied by LG with your range. •• Do not put food or foil directly on the surface or base of the warming drawer. This may result in damage to - LG LSE4615ST | Owners Manual - Page 39
control panel is lit. •• The appliance supports 2.4 GHz Wi-Fi networks only. To check your network frequency, contact your Internet service provider or refer to your wireless router manual. •• LG SmartThinQ is not responsible for any network connection problems or any faults, malfunctions, or errors - LG LSE4615ST | Owners Manual - Page 40
service provider, or password, delete the registered appliance from the LG SmartThinQ problems with the appliance, it has the capability of transmitting data via your telephone to the LG Call the LG call center at: (LG U.S.) 1-800-2430000 (LG Canada) 1-888-542-2623. 2 When instructed to do so - LG LSE4615ST | Owners Manual - Page 41
be turned on, troubleshooting must be done without not receive the best Smart Diagnosis™ service. Open Source Software Notice Information To are available for download. LG Electronics will also provide open with the instructions, may cause help. This device complies with part 15 of the FCC Rules. - LG LSE4615ST | Owners Manual - Page 42
cooktop surface. •• For your safety, wear an oven mitt or pot holder while using a scraper on the hot cooking surface. •• Read and follow all instructions and warnings on the cleaning cream label. Use ceramic cooktop cleaner on the glass cooktop. Other creams may not be as effective or may scratch - LG LSE4615ST | Owners Manual - Page 43
burnt-on food For additional product information, visit our website at www.lg.com Metal Marks and Scratches 1 Be careful not to slide pots windows to provide ventilation. Compared to the more intense Self Clean process, your LG oven gives you the option of cleaning with LESS HEAT, LESS TIME, and - LG LSE4615ST | Owners Manual - Page 44
reach areas such as the back surface of the oven, it is better to use the Self Clean cycle. (For Model : LSE4615, LSE4613) EasyClean® Instruction Guide 1 Remove oven racks and accessories from the oven. 2 Scrape off and remove any burnt-on debris with a plastic scraper. Suggested plastic scrapers - LG LSE4615ST | Owners Manual - Page 45
and other accessories, and that the oven cavity surface is dry before running the Self Clean cycle. Consult the Self Clean section of your owner's manual for further details. NOTE •• If you forget to saturate the inside of the oven with water before starting EasyClean®, turn the Oven mode knob to - LG LSE4615ST | Owners Manual - Page 46
range. •• Do not line the oven walls, racks, bottom or any other part of the range with aluminum foil or any other material. Doing so will destroy has cycle times of 3, 4, or 5 hours. Self Clean Soil Guide Soil Level Cycle Setting Lightly Soiled Oven Cavity 3-Hour Self Clean Moderately - LG LSE4615ST | Owners Manual - Page 47
heavily soiled. •• As the oven heats, you may hear sounds of metal parts expanding and contracting. This is normal and will not damage the oven. •• and do not slide smoothly after a self-clean cycle, wipe racks and rack supports with a small amount of vegetable oil to make them glide more easily. •• - LG LSE4615ST | Owners Manual - Page 48
48 MAINTENANCE Changing the Oven Light The oven light is a standard 40-watt appliance bulb. It turns on when the oven door is open. When the oven door is closed, press Light to turn it on or off. 1 Unplug the range or disconnect power. 2 Turn the glass bulb cover in the back of the oven - LG LSE4615ST | Owners Manual - Page 49
Broiler Pan and Grid •• Do not store a soiled broiler pan or grid anywhere in the range. •• Do not clean the broiler pan or grid in a self-cleaning mode. (For Model : LSE4615, LSE4613) •• Remove the grid from the pan. Carefully pour out the grease from the pan into a proper container. •• Wash and - LG LSE4615ST | Owners Manual - Page 50
Push the drawer into the range until levers click (approximately 2 inch). 4 Pull the drawer open again to seat bearing glides into position. Door Care Instructions Most oven doors contain glass that can break. CAUTION •• Do not close the oven door until all the oven racks are fully in place. •• Do - LG LSE4615ST | Owners Manual - Page 51
cooking needs. Refer to the Oven Temperature Adjustment section in this manual for easy instructions on how to adjust your thermostat. Is it normal to is opened, the convection fan will stop until the door is closed. TROUBLESHOOTING 51 Can I use aluminum foil to catch drippings in my oven cavity? - LG LSE4615ST | Owners Manual - Page 52
52 TROUBLESHOOTING My range is still dirty after running the EasyClean® cycle. What others. For these stubborn soils, the Self Clean cycle is recommended. Consult the Self Clean section of your owner's manual for details. Do I need to use all 1¼ cups (10 oz or 300 ml) of water for EasyClean®? Yes - LG LSE4615ST | Owners Manual - Page 53
TROUBLESHOOTING 53 ENGLISH Before Calling for Service Before you call for service, review this list. It may save rack is level. •• Be sure floor is level and strong and stable enough to adequately support range. •• If floor is sagging or sloping, contact a carpenter to correct the situation. - LG LSE4615ST | Owners Manual - Page 54
54 TROUBLESHOOTING Symptoms Oven company for service. •• Replace or tighten bulb. See Changing the Oven Light section in this Owner's Manual. •• Control not set properly. Follow instructions under being used. - See the Broiling Guide. •• Cookware not suited for broiling. - Use broiling pan and grid. - LG LSE4615ST | Owners Manual - Page 55
TROUBLESHOOTING 55 ENGLISH Symptoms Food does not broil properly Oven areas the power voltage may be low. - Preheat the broil element for 5-7 minutes. - See the Broiling Guide. •• Oven sensor needs to be adjusted. - See Oven Temperature Adjustment in the Features section. •• Coarse particles - LG LSE4615ST | Owners Manual - Page 56
TROUBLESHOOTING sounds when surface elements are turned on. Trouble connecting appliance and smartphone to Wi-Fi - Only a 2.4 GHz router frequency is supported. Set the wireless router to 2.4 GHz and the router frequency, check with your Internet service provider or the router manufacturer. •• The - LG LSE4615ST | Owners Manual - Page 57
date of original retail purchase Scope of Warranty Parts and Labor (internal / functional parts only) HOW SERVICE IS HANDLED LG will provide, free of charge, all labor and in-home service to replace defective part(s). •• Replacement products and parts are warranted for the remaining portion of - LG LSE4615ST | Owners Manual - Page 58
manual. •• Costs associated with removal and reinstallation of your Product for repairs. •• Shelves, drawers and accessories, except for internal/functional parts covered under this limited warranty. Not Covered by this Limited Warranty Problem board before calling for service. •• Match power cord - LG LSE4615ST | Owners Manual - Page 59
ENGLISH Problem •• Oven or racks are stained after using aluminum foil •• Surface our website at http://www.lg.com Or by mail: LG Electronics Customer Service P.O. Box 240007 Huntsville, AL 35813 ATTN: CIC PROCEDURE FOR RESOLVING DISPUTES: ALL DISPUTES BETWEEN YOU AND LG ARISING OUT OF OR RELATING - LG LSE4615ST | Owners Manual - Page 60
foregoing, any dispute between you and LG shall not under any circumstances proceed as part of a class or representative action. Instead on the product; or (ii) online by accessing https://www.lg.com/us/support/repair-service/schedule-repaircontinued and clicking on "Find My Model & Serial Number"). - LG LSE4615ST | Owners Manual - Page 61
COCINA ELÉCTRICA Lea detenidamente el manual del propietario antes de poner el aparto en funcionamiento y consérvelo a mano en todo momento para su referencia. LSE4615** LSE4613** LSE4611** MFL68881511_10 www.lg.com Copyright © 2017 - 2019 LG Electronics Inc. Todos los Derechos Reservados - LG LSE4615ST | Owners Manual - Page 62
remoto) 37 Sabbath Mode (Modo Sabático) 37 Funcionamiento del cajón de calentamiento (Para los modelos: LSE4615) 39 FUNCIONES INTELIGENTES 39 Aplicación LG SmartThinQ 40 Función Smart Diagnosis™ (Diagnóstico Inteligente) 41 Aviso de la FCC (para el módulo transmisor contenido en este producto) 41 - LG LSE4615ST | Owners Manual - Page 63
. Siempre comuníquese con su agente de servicio técnico o con el fabricante cuando haya problemas que no comprenda. Descargue este manual del propietario en: http://www.lg.com Este es el símbolo de alerta de seguridad. Este símbolo le advierte sobre posibles riesgos que pueden ocasionar daños - LG LSE4615ST | Owners Manual - Page 64
del horno antes de sacar o colocar nuevamente la comida en el horno. •• No repare ni reemplace ninguna parte del electrodoméstico, excepto en caso de que haya recomendaciones específicas en el manual. Un técnico calificado debe estar a cargo de todas las demás tareas de mantenimiento. •• No utilice - LG LSE4615ST | Owners Manual - Page 65
retirar todos los materiales del embalaje antes de la puesta en funcionamiento. Mantenga el plástico, telas, papel y otros materiales inflamables lejos de las partes del electrodoméstico que se podrían calentar. •• No almacene ni utilice material inflamable en el horno ni cerca de la placa de cocci - LG LSE4615ST | Owners Manual - Page 66
lugar seguro, fuera del alcance de los niños. •• No debe permitir que los niños jueguen con los controles ni con ninguna otra parte del electrodoméstico. SUPERFICIES DE COCCIÓN DE VITROCERÁMICA •• Las hornallas superficiales podrían estar calientes incluso cuando presenten un color oscuro. Las áreas - LG LSE4615ST | Owners Manual - Page 67
y se los debe retirar rápidamente una vez que la cocción haya terminado. Ingerir alimentos en mal estado puede producir intoxicaciones alimentarias. •• Las partes accesibles podrían calentarse cuando se utiliza la parrilla. •• No coloque alimentos ni batería de cocina en el fondo de la cavidad del - LG LSE4615ST | Owners Manual - Page 68
ían ser nocivos o fatales para las aves. Traslade las aves a un ambiente bien ventilado. •• Limpie con el ciclo de autolimpieza solo las partes indicadas en este manual. Antes de realizar la autolimpieza del horno, retire la asadera, todos los estantes del horno, la sonda para carne y cualquier otro - LG LSE4615ST | Owners Manual - Page 69
Botella rociadora (1 c/u) Accesorios opcionales Esponja limpiadora que no raya (1 c/u) Rejilla Asadera NOTA •• Comuníquese con el Servicio de atención al cliente de LG al 1-800-243-0000 (1-888-542-2623 en Canadá) si faltara algún accesorio. •• Para su seguridad y para extender la vida útil del - LG LSE4615ST | Owners Manual - Page 70
de alimentación Conecte el dispositivo antivuelco Prueba de funcionamiento Especificaciones del producto La apariencia y las especificaciones detalladas en este manual podrían variar debido a mejoras constantes en el producto. Modelos de cocinas con horno LSE4615, LSE4613, LSE4611 Descripci - LG LSE4615ST | Owners Manual - Page 71
al 1-800-243-0000 (1-888-542-2623 en Canadá) para recibir uno sin costo. Advertencia •• Debe seguir con exactitud la información de este manual. No hacerlo podría causar un incendio, descarga eléctrica, daños a la propiedad, lesiones personales o la muerte. •• Use guantes durante el procedimiento de - LG LSE4615ST | Owners Manual - Page 72
la cocina, antes de usarla. No retire las etiquetas de advertencia, la etiqueta de modelo y número de serie ni la hoja técnica ubicada en la parte posterior de la cocina. Para quitar la cinta o el pegamento restantes, frote el área con fuerza utilizando el dedo pulgar. También es sencillo retirar el - LG LSE4615ST | Owners Manual - Page 73
,2 cm) *30" (76,2 cm) Mínimo **15" (38,1 cm) 36" (91,4 cm) Dimensiones mínimas * 30" (76,2 cm) de espacio mínimo entre la parte superior de la superficie de cocción y la parte inferior de un gabinete de madera o metal no protegido; o 24" (60,9 cm) de espacio mínimo cuando el fondo del gabinete de - LG LSE4615ST | Owners Manual - Page 74
14 INSTALACIÓN Instalación del dispositivo antivuelco Advertencia Riesgo de vuelco Es posible que un niño o un adulto inclinen la cocina y el vuelco consecuente les produzca la muerte. Verifique que se haya instalado el soporte antivuelco. Asegúrese de que el soporte antivuelco esté conectado - LG LSE4615ST | Owners Manual - Page 75
con cable de alimentación, enganche el pasacables sobre el orificio para cable de alimentación de 13/8 pulgadas (3,5 cm), ubicado por debajo de la parte posterior del horno. Inserte el cable de alimentación a través del pasacables y ajústelo. Placa de conexión del conducto Cable de alimentaci - LG LSE4615ST | Owners Manual - Page 76
: Para instalaciones con cable de alimentación, enganche el pasacables sobre el orificio para cable de alimentación de 13/8" ubicado por debajo de la parte posterior del horno. Inserte el cable de alimentación a través del pasacables y ajústelo. No instale el cable de alimentación sin un pasacables - LG LSE4615ST | Owners Manual - Page 77
Español Conexión con cable de 3 hilos: Conducto Instale el conducto de la siguiente manera: Retire la placa de conexión de conductos de la parte posterior del horno y gírela. Se debe utilizar el orificio para conductos (11/8"). En primer lugar, prepare los hilos del conducto como se indica a - LG LSE4615ST | Owners Manual - Page 78
18 INSTALACIÓN Colocación del dispositivo antivuelco •• Mueva la cocina para que quede cerca de la abertura para enchufar en el receptáculo. •• Deslice la cocina en su posición y asegúrese de que la pata trasera se deslice por debajo del soporte antivuelco. La cocina debe quedar bien apoyada contra - LG LSE4615ST | Owners Manual - Page 79
FUNCIONAMIENTO Descripción general del panel de control Para los modelos : LSE4615 1 FUNCIONAMIENTO 19 Español seconds 2 3 4 5 6 7 8 9 Para los modelos : LSE4613 / LSE4611 1 10 Para los modelos : LSE4613 11 12 13 5 6 14 seconds 8 9 Para los modelos : LSE4611 10 - LG LSE4615ST | Owners Manual - Page 80
20 FUNCIONAMIENTO 1 Smart DiagnosisTM •• Uso durante la función Smart Diagnosis. 2 Cook Time (Tiempo de cocción) / Clock (Reloj) •• Presione el botón para configurar la cantidad de tiempo que se desea cocinar la comida. El horno se apaga cuando se agota el tiempo de cocción establecido. •• Mantenga - LG LSE4615ST | Owners Manual - Page 81
FUNCIONAMIENTO 21 Posición de la perilla Después de limpiar las perillas del horno, asegúrese de volver a colocarlas en la posición correcta; de lo contrario podría ocasionar un mal funcionamiento de los quemadores. Español Triple LSE4615 Doble Simple Doble Simple LSE4613 Doble Simple - LG LSE4615ST | Owners Manual - Page 82
luz interior del horno se enciende de forma automática cuando se abre la puerta. Presione Light para encender la luz del horno de forma manual. NOTA La luz del horno no se puede encender si la función Self Clean está activa. (Para los modelos : LSE4615, LSE4613) Configuraciones mínimas y máximas - LG LSE4615ST | Owners Manual - Page 83
el artefacto de la red, elimínelo de los artefactos registrados en la aplicación. NOTa Consulte la sección de Funciones Inteligentes en el manual del usuario para obtener más detalles. FUNCIONAMIENTO 23 Settings (Ajustes) Coloque la perilla de modo del horno en la posición Off. Mantenga presionado - LG LSE4615ST | Owners Manual - Page 84
24 FUNCIONAMIENTO Ajuste de temperatura del horno El horno nuevo podría cocinar de manera diferente a su horno anterior. Use el horno nuevo durante algunas semanas para familiarizarse con él antes de cambiar los ajustes de temperatura. Si, después de familiarizarse con el horno, sigue pensando que - LG LSE4615ST | Owners Manual - Page 85
Start Time [Hora de inicio] (Delayed Timed Cook [Cocción temporizada retardada]) El temporizador automático de la función Cocción temporizada retardada enciende y apaga el horno a la hora que usted seleccione. Esta función puede usarse junto con los modos Bake, Conv. Bake y Conv. Roast. Configuraci - LG LSE4615ST | Owners Manual - Page 86
26 FUNCIONAMIENTO Uso de la placa de cocción Áreas de cocción Las áreas de cocción de la cocina están identificadas por círculos permanentes en la superficie de vidrio de la placa de cocción. Para una cocción más eficiente, utilice el tamaño correcto de batería de cocina para el tamaño de cada - LG LSE4615ST | Owners Manual - Page 87
hornalla triple. Simple Single Doble Dual Triple Encendimiento de la Zona de calentamiento La Zona de calentamiento, ubicada en el centro de la parte trasera de la superficie de vidrio, mantiene caliente la comida cocida a la temperatura adecuada para servir. Use la Zona de calentamiento para - LG LSE4615ST | Owners Manual - Page 88
del área de cocción. No utilice la placa de cocción si se ha derretido metal sobre ella. Llame a un Centro de servicio al cliente de LG autorizado. Elección de la batería de cocina El material de la batería de cocina determina la uniformidad y la rapidez en que se transfiere el calor - LG LSE4615ST | Owners Manual - Page 89
Uso del horno Antes de usar el horno NOTA •• Como la temperatura del horno es cíclica, el termómetro que esté dentro de la cavidad del horno podría no indicar la misma temperatura que está configurada. •• Es normal que el ventilador de convección funcione durante el precalentamiento en un ciclo - LG LSE4615ST | Owners Manual - Page 90
por convección. La asadera recibe los derrames de grasa y la rejilla ayuda a evitar salpicaduras de grasa. 1 Coloque el estante del horno en la parte inferior. 2 Coloque la rejilla en la asadera. 3 Coloque la asadera sobre el estante del horno. Rejilla (se vende por separado) Asadera (se vende - LG LSE4615ST | Owners Manual - Page 91
Guía de recomendaciones para hornear y rostizar Los resultados del horneado serán mejores si las bandejas están centradas en el horno lo mejor posible. Si se cocina en varios estantes del horno, colóquelos en la posición que se ilustra. Colocación de estantes y bandejas Horneado en varios estantes - LG LSE4615ST | Owners Manual - Page 92
32 FUNCIONAMIENTO Broil (Asar) La función Asar utiliza el calor intenso de los quemadores superiores para cocinar la comida. Este método de cocción es ideal para cortes de carne tiernos, pescados y verduras finamente cortadas. Algunos modelos pueden contar con un asador híbrido formado por un asador - LG LSE4615ST | Owners Manual - Page 93
aprox. 7-9 9-11 11-13 0,5-1 8-10 4-6 6-8 8-10 0,5 4-6 Ase primero con el lado de la piel hacia abajo. 8-10 5-7 9-12 No voltee Corte la parte trasera del caparazón. Abra bien. Pincele con mantequilla derretida antes de asar y a la mitad de la cocción. 2-4 2-4 Mueva y voltee con mucho cuidado - LG LSE4615ST | Owners Manual - Page 94
Cuadro para asar. •• En el caso de bistecs con hueso o chuletas cortadas a la francesa (se retira toda la carne alrededor del hueso), envuelva las partes expuestas del hueso en papel de aluminio para que no se quemen demasiado. Mariscos •• Cuando ase mariscos con su caparazón, siempre use el ajuste - LG LSE4615ST | Owners Manual - Page 95
o leudar. Desenchufe y extraiga siempre la sonda para carne del horno cuando retire la comida. Antes de usar, inserte la sonda en el centro de la parte más gruesa de la carne o en el muslo interno o la pechuga de las aves, alejada de la grasa o los huesos. Coloque la comida en el horno - LG LSE4615ST | Owners Manual - Page 96
36 FUNCIONAMIENTO Cambio de la temperatura de la sonda durante la cocción 1 Presione Probe. 2 Configure la temperatura del termòmetro. 3 Presione Start. NOTA IMPORTANTE Gire la perilla de modo del horno hasta la posición Off para cancelar la función Sonda para carne en cualquier momento. Para evitar - LG LSE4615ST | Owners Manual - Page 97
Sabbath Mode (Modo Sabático) Modo Sabático es usado en días de descanso Judíos y festivos. Cuando el horno está en modo Sabático, la temperatura no se puede cambiar y las funciones de temporizador, luz y alarma están deshabilitadas. Si la luz del horno está encendida cuando el horno está en modo Sab - LG LSE4615ST | Owners Manual - Page 98
ñar cualquier objeto no diseñado específicamente para ser usado dentro del mismo y solo debe usarse para guardar batería de cocina suministrada por LG junto con su cocina. •• No coloque los alimentos ni el papel de aluminio directamente sobre la superficie o la base del cajón de calentamiento. Esto - LG LSE4615ST | Owners Manual - Page 99
únicamente con redes Wi- Fi de 2.4 GHz. Contacte a su proveedor de servicios de internet o verifique el manual del enrutador inalámbrico para revisar la frecuencia de su red. •• LG SmartThinQ no es responsable por ningún problema de conexión en red, falla, mal funcionamiento o error causado por la - LG LSE4615ST | Owners Manual - Page 100
para realizar un diagnóstico inteligente usando su teléfono inteligente. 1 Abra la aplicación LG SmartThinQ en el teléfono inteligente. 2 Seleccione el artefacto y luego el menú en la parte superior del lado derecho. 3 Seleccione Smart Diagnosis, luego presione el botón Start Smart Diagnosis - LG LSE4615ST | Owners Manual - Page 101
licencias, exención de responsabilidad de la garantía y avisos de copyright. LG Electronics también le proporcionará código abierto en CDROM por un importe que los límites para los dispositivos digitales de Clase B, en conformidad con la parte 15 de las normas de la FCC. Estos límites están diseñados - LG LSE4615ST | Owners Manual - Page 102
42 MANTENIMIENTO MANTENIMIENTO Limpieza de la placa de cocción de vitrocerámica PRECAUCIÓN •• No use esponjas para fregar ni esponjas abrasivas. Pueden dañar la superficie de la placa de cocción. •• Por su seguridad, póngase un guante para horno o una agarradera cuando use una espátula en la - LG LSE4615ST | Owners Manual - Page 103
seque. Para obtener más información sobre el product, visite nuestro sitio web en www.lg.com Rayas y marcas del metal 1 Tenga cuidado de no deslizar las ollas ni EasyClean® •• Ayuda a aflojar la suciedad leve antes de la limpieza manual •• EasyClean® solo usa agua; no usa limpiadores con químicos. - LG LSE4615ST | Owners Manual - Page 104
44 MANTENIMIENTO Cuándo usar EasyClean® Método sugerido de limpieza EasyClean® Self Clean* (Autolimpieza) (Para los modelos : LSE4615, LSE4613) Ejemplo de suciedad en el horno Forma de la suciedad Gotitas o manchitas Tipos de suciedad Queso u otros ingredientes Salpicadura leve Grasa/aceite - LG LSE4615ST | Owners Manual - Page 105
perilla de modo del horno hasta la posición Off para borrar la pantalla y apagar el tono. 8 Después del ciclo de limpieza y durante la limpieza manual, debe quedar suficiente agua en la base del horno para sumergir completamente la suciedad. Agregue agua si fuera necesario. Coloque una toalla en el - LG LSE4615ST | Owners Manual - Page 106
se emanan durante el ciclo de Autolimpieza de cualquier cocina. •• No recubra las paredes del horno, los estantes, el fondo ni ninguna otra parte de la cocina con papel de aluminio ni con ningún otro material. Hacer esto destruye la distribución de calor, produce resultados de horneado deficientes - LG LSE4615ST | Owners Manual - Page 107
apagarla. MANTENIMIENTO 47 1 Desenchufe la cocina o desconecte la electricidad. 2 Para quitar la tapa de vidrio de la bombilla, que se encuentra en la parte trasera del horno, gírela hacia la izquierda. 3 Gire la bombilla hacia la izquierda para quitarla del receptáculo. 4 Inserte la bombilla nueva - LG LSE4615ST | Owners Manual - Page 108
cuando quite y levante la puerta. •• No levante la puerta de la manija. La puerta es muy pesada. •• No guarde asaderas ni rejillas sucias en ninguna parte de la cocina. •• No limpie la asadera ni la rejilla en el modo de autolimpieza. (Para los modelos : LSE4615, LSE4613) •• Quite la rejilla de la - LG LSE4615ST | Owners Manual - Page 109
de la cocina desde el fusible principal o el panel disyuntor. El no hacerlo podría causar lesiones graves, descargas eléctricas o la muerte. La mayor parte de la limpieza se puede realizar con el cajón puesto; sin embargo, el cajón puede extraerse si se necesita realizar una limpieza adicional. Use - LG LSE4615ST | Owners Manual - Page 110
íficas de cocción. Consulte la sección de Ajuste de temperatura del horno de este manual para obtener instrucciones fáciles sobre cómo ajustar el termostato. ¿Es normal que se escuche un chasquido que proviene de la parte trasera del horno cuando lo uso? Su nueva cocina está diseñada para mantener - LG LSE4615ST | Owners Manual - Page 111
el ciclo EasyClean®. ¿Qué más debo hacer? El ciclo EasyClean® solo ayuda a aflojar la suciedad leve de la cocina con horno para ayudar en la limpieza manual del horno. No quita automáticamente toda la suciedad después del ciclo. Es posible que necesite fregar la cocina con horno después de haber - LG LSE4615ST | Owners Manual - Page 112
52 SOLUCIÓN DE PROBLEMAS Antes de llamar al servicio técnico Antes de llamar para solicitar servicio, revise esta lista. Puede ahorrarle tiempo y gastos. La lista incluye sucesos comunes que no son consecuencia de problemas de fabricación ni de los materiales de este aparato. Síntomas La cocina - LG LSE4615ST | Owners Manual - Page 113
a la empresa de electricidad local para solicitar servicio. •• Reemplace o ajuste la bombilla. Consulte la sección Cambio de la luz del horno de este manual del propietario. •• El control no está bien configurado. Siga las instrucciones para el ajuste de los controles del horno. •• La carne est - LG LSE4615ST | Owners Manual - Page 114
ón Ajuste de la temperatura del horno en la sección Funciones. •• Las partículas ásperas como las de sal o arena entre la placa de cocción pueden producir rayas. Asegúrese de que la superficie de la placa y la parte inferior de los utensilios estén limpias antes de usarlos. Las rayas pequeñas no - LG LSE4615ST | Owners Manual - Page 115
SOLUCIÓN DE PROBLEMAS 55 Español Síntomas La puerta del horno no se abre después de un ciclo de Autolimpieza * El horno no se limpia después de un ciclo de Autolimpieza * Limpiar y la puerta parpadean en la pantalla * Aparece Bloqueada en la pantalla cuando quiere cocinar * Sale olor a quemado o a - LG LSE4615ST | Owners Manual - Page 116
ía Piezas y mano de obra (solo partes internas / funcionales) CÓMO SE MANEJA EL SERVICIO TÉCNICO LG proporcionará, de forma gratuita, todo el trabajo una atmósfera corrosiva o contraria a las instrucciones detalladas en el manual del propietario del producto. •• Daños o fallos del producto causados - LG LSE4615ST | Owners Manual - Page 117
que no estén autorizados por LG. •• Reemplazo de focos, filtros o cualquier parte consumible. •• Cuando el producto manual del propietario del producto. •• Costos asociados con el retiro y la reinstalación de su producto para realizar reparaciones. •• Estantes, cajones y accesorios, excepto partes - LG LSE4615ST | Owners Manual - Page 118
ú. O visite nuestro sitio web en http://www.lg.com O por correo: LG Electronics Customer Service P.O. Box 240007 Huntsville, AL 35813 ATTN: CIC el remedio que busca. Si usted y LG no pueden resolver la disputa dentro de 30 días, cualquiera de las partes pueden proceder a presentar una demanda de arbitraje - LG LSE4615ST | Owners Manual - Page 119
disputa entre usted y LG como parte de una acción colectiva o representativa. En lugar del arbitraje, cualquiera de las partes podrá iniciar una en el producto, o (ii) en la dirección de https://www.lg.com/us/support/repair-service/schedule-repair-continued al hacer clic en "Find My Model & Serial - LG LSE4615ST | Owners Manual - Page 120
LG Customer Information Center 1-800-243-0000 USA 1-888-542-2623 CANADA Register your product Online! www.lg.com Printed in Korea
-
 1
1 -
 2
2 -
 3
3 -
 4
4 -
 5
5 -
 6
6 -
 7
7 -
8
-
9
-
10
-
11
-
12
-
13
-
14
-
15
-
16
-
17
-
18
-
19
-
20
-
21
-
22
-
23
-
24
-
25
-
26
-
27
-
28
-
29
-
30
-
31
-
32
-
33
-
34
-
35
-
36
-
37
-
38
-
39
-
40
-
41
-
42
-
43
-
44
-
45
-
46
-
47
-
48
-
49
-
50
-
51
-
52
-
53
-
54
-
55
-
56
-
57
-
58
-
59
-
60
-
61
-
62
-
63
-
64
-
65
-
66
-
67
-
68
-
69
-
70
-
71
-
72
-
73
-
74
-
75
-
76
-
77
-
78
-
79
-
80
-
81
-
82
-
83
-
84
-
85
-
86
-
87
-
88
-
89
-
90
-
91
-
92
-
93
-
94
-
95
-
96
-
97
-
98
-
99
-
100
-
101
-
102
-
103
-
104
-
105
-
106
-
107
-
108
-
109
-
110
-
111
-
112
-
113
-
114
-
115
-
116
-
117
-
118
-
119
-
120
 |
 |

ENGLISH
ESPAÑOL
OWNER’S MANUAL
ELECTRIC
RANGE
Read this owner’s manual thoroughly before operating the appliance
and keep it handy for reference at all times.
www.lg.com
MFL68881511_10
LSE4615**
LSE4613**
LSE4611**
Copyright © 2017 - 2019 LG Electronics Inc. All Rights Reserved.