LG R975GM Owners Manual
LG R975GM Manual
 |
View all LG R975GM manuals
Add to My Manuals
Save this manual to your list of manuals |
LG R975GM manual content summary:
- LG R975GM | Owners Manual - Page 1
ENGLISH ESPAÑOL FRANÇAIS OWNER'S MANUAL R9 • Charge the battery fully before first use. • Read the Safety Instructions before using the product. • After reading this manual, keep it in an easily accessible location. MFL69826107 www.lg.com Copyright © 2020 LG Electronics Inc. All Rights Reserved - LG R975GM | Owners Manual - Page 2
- LG R975GM | Owners Manual - Page 3
TABLE OF CONTENTS 4 IMPORTANT SAFETY INSTRUCTIONS 4 READ ALL INSTRUCTIONS BEFORE USE 4 WARNING STATEMENTS 7 CAUTION STATEMENTS 8 BEFORE USING THE 23 Using Smart Diagnosis 25 MAINTENANCE 25 Regular Cleaning 30 TROUBLESHOOTING 30 Before Calling for Service 32 LIMITED WARRANTY 32 USA 3 Rev.03_070320 - LG R975GM | Owners Manual - Page 4
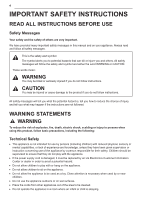
4 IMPORTANT SAFETY INSTRUCTIONS READ ALL INSTRUCTIONS BEFORE USE Safety Messages Your safety and the safety of others are very important. We have provided many important safety messages in this manual and on your appliance. Always read and follow all safety messages. This is the safety alert symbol - LG R975GM | Owners Manual - Page 5
assistance. •• Use only as described in this manual. Use only manufacturer's recommended attachments. •• Do Read all safety warnings and instructions. Failure to follow the warnings and instructions may result in electric shock of the battery. •• Have servicing performed by a qualified repair person - LG R975GM | Owners Manual - Page 6
in commercial applications such as workshops or garages or around indoor swimming pools, etc. Maintenance •• Turn off the main power switch before cleaning or servicing the robot cleaner. •• If any abnormal sound, odor, or smoke is generated by the appliance, remove it from the home station and turn - LG R975GM | Owners Manual - Page 7
that do not require cleaning. The robot cleaner may cross over low thresholds and enter into rooms that you do not want cleaned. SAVE THESE INSTRUCTIONS - LG R975GM | Owners Manual - Page 8
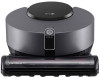
8 BEFORE USING THE ROBOT CLEANER BEFORE USING THE ROBOT CLEANER Parts and Specifications Front View a LED b Nozzle Bottom View c 3D DUAL Eye d Control Panel a Brush b Charging Terminals c Brush Release Button d Cliff Detection Sensors e Top Cover Release Button f Exhaust Port - LG R975GM | Owners Manual - Page 9
Rear View BEFORE USING THE ROBOT CLEANER 9 ENGLISH a Top Cover b Dust Suction Port c Dust Sensors d HEPA Filter e Main Power Switch f Cyclonic Mesh Filter g Dust Bin Release Button h Dust Bin i Pre-Filter j Pre-Filter Case NOTE •• The filters will eventually need to be replaced. To purchase - LG R975GM | Owners Manual - Page 10
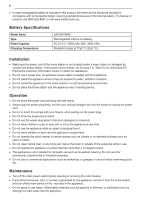
10 BEFORE USING THE ROBOT CLEANER Accessories a Remote Control b Remote Control Station c Batteries for Remote Control (AAA) d Pre-Filter Specifications Robot Cleaner Model Maximum Physical Dimensions (Width × Depth × Height) Weight Power Consumption Charging Time Cleaning Time (Based on general - LG R975GM | Owners Manual - Page 11
ENGLISH Charging Before Charging the Battery •• Charging takes place even if the main power switch of the robot cleaner is turned off. •• The charging time depends on the status of the battery. •• It takes approximately 4 hours to fully charge the battery after it is completely discharged. •• Clean - LG R975GM | Owners Manual - Page 12
it does not move. NOTE •• If the robot cleaner does not turn on or nothing is displayed on the control panel, charge the robot cleaner manually by placing it on the home station. •• The Power button on the remote control operates only when the main power switch is turned on. WARNING - LG R975GM | Owners Manual - Page 13
while the robot cleaner is charging, press the Start/Stop button on the control panel or the remote control. Manual Charging Moving the Robot Cleaner Charge the battery manually if using the robot cleaner for the first time after purchasing or if the battery is completely discharged. 1 Insert - LG R975GM | Owners Manual - Page 14
the robot cleaner is cleaning laminate floors or uneven floors. •• If manually placing the robot cleaner away from the home station to start cleaning, choose dust bin is missing, the robot cleaner will stop cleaning and announce a problem. •• If water gets inside the robot cleaner, do not attempt to - LG R975GM | Owners Manual - Page 15
Control Panel Touch Buttons Press the touch button icons to start the robot cleaner or quickly choose a cleaning mode. OPERATION 15 Status Display The status display shows the selected cleaning mode, auxiliary functions, and status of the robot cleaner. ENGLISH a Start/Stop Button ••Press the - LG R975GM | Owners Manual - Page 16
16 OPERATION Remote Control a Power Button b Mode Button c Start/Stop Button d Repeat Button e Language Button f a Lock Button g Smart Diagnosis Button h Mute Button i Smart Turbo Button j Directional Buttons k Turbo Button l Home Button NOTE •• The a Lock button will lock the 3D camera sensor. •• - LG R975GM | Owners Manual - Page 17
to the wall. •• When a wall is detected, the robot cleaner reduces its speed and temporarily increases the suction power. Manual Mode You can move the robot cleaner manually by pressing the directional buttons on the remote control. •• Press the Directional buttons on the remote control to operate - LG R975GM | Owners Manual - Page 18
18 OPERATION Choosing an Auxiliary Function Repeat Function The robot cleaner repeats the selected cleaning mode. •• To activate the Repeat function, press the Repeat button on the remote control. •• After cleaning is finished, the robot cleaner changes its direction and cleans the same area again. - LG R975GM | Owners Manual - Page 19
the control panel is lit. •• The appliance supports 2.4 GHz WLAN networks only. To check your network frequency, contact your Internet service provider or refer to your wireless router manual. •• LG ThinQ is not responsible for any network connection problems or any faults, malfunctions, or errors - LG R975GM | Owners Manual - Page 20
or Apple App Store on a smartphone. Follow instructions to download and install the application. •• Depending •• If using the HomeGuard or HomeView service for other purposes or outside the home vary by model. •• Follow LG ThinQ application guide for details on using the SMART FUNCTIONS. •• LG - LG R975GM | Owners Manual - Page 21
ENGLISH 5 Set the location from which the HomeGuard function will monitor and tap Save in the application. ••The HomeGuard location must be within the area stretching 5 ft (1.5 m) to either side of the home station and 10 ft (3 m) in front of the home station. 1.5 m 3 m 1.5 m SMART FUNCTIONS 21 - LG R975GM | Owners Manual - Page 22
installed and operated with a minimum distance of 20 cm (7.8 inches) between the antenna and your body. Users must follow the specific operating instructions for satisfying RF exposure compliance. Open Source Software Notice Information To obtain the source code under GPL, LGPL, MPL, and other open - LG R975GM | Owners Manual - Page 23
Robot Cleaner to Diagnose Issues You can diagnose the current status of the robot cleaner automatically using the Smart Diagnosis function. •• If you experience problems with the robot cleaner, run the Smart Diagnosis function and use the results to help solve them. 1 Turn on the main power switch - LG R975GM | Owners Manual - Page 24
power switch OFF then ON again to resume the diagnosis. •• Smart Diagnosis will not be activated in the following cases. In each case, check the problem and try again. −−Robot cleaner is detached from the home station. −−Battery level is insufficient. −−Dust bin filter is not attached. •• Run Smart - LG R975GM | Owners Manual - Page 25
MAINTENANCE Regular Cleaning Before Cleaning the Robot Cleaner •• Turn off the main power switch before cleaning the robot cleaner. •• In order to maintain the optimum suction power of the robot cleaner, the dust bin, filters, and brush should be cleaned at least once a month. •• If the dust bin is - LG R975GM | Owners Manual - Page 26
26 MAINTENANCE 5 Clean the cyclonic mesh filter thoroughly with a vacuum cleaner or rinse it under running water. ••To avoid odor, allow the cyclonic mesh filter to dry completely in a well-ventilated area out of direct sunlight for at least 24 hours before reassembling. 8 Clean the pre-filter - LG R975GM | Owners Manual - Page 27
ENGLISH Cleaning the HEPA Filter 1 Separate the dust bin from the robot cleaner body and pull out the HEPA filter case a. MAINTENANCE 27 Cleaning the Brush 1 Place a soft cloth on the floor and place the robot cleaner upside down on top of the cloth. 2 Push the brush release button a to separate - LG R975GM | Owners Manual - Page 28
28 MAINTENANCE 5 Insert the brush into the brush case, starting with the right side. •• Dust may build up at the brush inlet at the bottom of the brush. Periodically remove the buildup using another vacuum cleaner or a soft brush. 6 Reassemble the brush case on the nozzle. •• If the suction power - LG R975GM | Owners Manual - Page 29
ENGLISH Cleaning the Sensors and the Charging Terminals 1 Place a soft cloth on the floor and place the robot cleaner on top of the cloth. 2 Clean the 3D DUAL Eye of the robot cleaner using a soft cloth. ••Be careful not to scratch the sensors. MAINTENANCE 29 4 Clean the dust sensors on the robot - LG R975GM | Owners Manual - Page 30
TROUBLESHOOTING TROUBLESHOOTING Before Calling for Service Troubleshooting Guide Save time and money by checking the following before calling for service the robot cleaner. Battery is discharged completely. •• If needed, manually move the robot cleaner to the home station to charge. Robot cleaner - LG R975GM | Owners Manual - Page 31
TROUBLESHOOTING 31 ENGLISH Symptom The product is noisier than usual. The robot the main power switch at the back of the robot cleaner. Battery is discharged completely. •• If needed, manually move the robot cleaner to the home station to charge. Brush is not installed correctly. •• Separate and - LG R975GM | Owners Manual - Page 32
of the Product to perform during power failures and interrupted or inadequate electrical service. •• Damage resulting from operating the product in a corrosive atmosphere or contrary to the product owner's manual. •• Damage or failure to the Product caused by accidents, pests and vermin, lightning - LG R975GM | Owners Manual - Page 33
installation or maintenance includes installation or maintenance contrary to the Product owner's manual. •• Expendable items that can wear out, including, but not limited to, filters and belts. •• A service technician to instruct the user in correct product assembly, operation or maintenance - LG R975GM | Owners Manual - Page 34
; and (d) the serial number (the serial number can be found (i) on the product; or (ii) online by accessing https://www.lg.com/ us/support/repair-service/schedule-repaircontinued and clicking on "Find My Model & Serial Number"). You may only opt out of the dispute resolution procedure in the manner - LG R975GM | Owners Manual - Page 35
- LG R975GM | Owners Manual - Page 36
-
 1
1 -
 2
2 -
 3
3 -
 4
4 -
 5
5 -
 6
6 -
 7
7 -
8
-
9
-
10
-
11
-
12
-
13
-
14
-
15
-
16
-
17
-
18
-
19
-
20
-
21
-
22
-
23
-
24
-
25
-
26
-
27
-
28
-
29
-
30
-
31
-
32
-
33
-
34
-
35
-
36
 |
 |
OWNER'S MANUAL
R9
• Charge the battery fully before first use.
• Read the Safety Instructions before using the product.
• After reading this manual, keep it in an easily accessible location.
MFL69826107
www.lg.com
Copyright © 2020 LG Electronics Inc. All Rights Reserved