LG R975GM Owners Manual - Page 11
Charging, Before Charging the Battery, Battery Level Indicator, Inserting Batteries into the Remote
 |
View all LG R975GM manuals
Add to My Manuals
Save this manual to your list of manuals |
Page 11 highlights
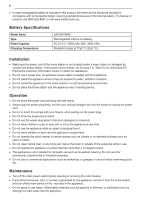
ENGLISH Charging Before Charging the Battery •• Charging takes place even if the main power switch of the robot cleaner is turned off. •• The charging time depends on the status of the battery. •• It takes approximately 4 hours to fully charge the battery after it is completely discharged. •• Clean the charging terminals using a soft cloth. If the charging terminals are dirty or covered or obstructed with foreign material, the robot cleaner may not be charged normally. •• Charging may not take place if the ambient temperature is below 41°F (5°C). Charge the robot cleaner indoors. •• If it is necessary to store the robot cleaner for a long period of time, fully charge the battery every 6 months. •• Storing the robot cleaner for a long period of time without periodically charging the battery may cause a battery malfunction. •• If cleaning is not started from the home station or you lift and move the robot cleaner, it may take a longer time to find the home station. Battery Level Indicator •• The battery level is indicated on the control panel, as follows. −−The remaining battery level is displayed in 3 stages (r → s → t) according to the amount of power remaining. −−The battery level indicator flashes when the robot cleaner needs to be charged. −−The battery level indicator flashes while recharging is in progress, showing the battery level. −−If recharging is complete, the battery level indicator turns on. BEFORE USING THE ROBOT CLEANER 11 Inserting Batteries into the Remote Control 1 Release the tab at the back of the remote control to open the battery cover. 2 Insert two AAA batteries into the remote control. ••Make sure the + and - ends of the batteries are aligned properly. 3 Insert the bottom of the battery cover into the remote control and close the cover. Installing the Home Station 1 Remove the protective film attached to the home station, the robot cleaner, and the nozzle. ••If the protective film is not removed, the robot cleaner may have difficulty finding the home station or it may affect performance. 2 Position the home station on a hard, level floor to prevent sliding during docking. ••Locate the home station where there are no obstacles within 5 ft (1.5 m) of either side and within 6.5 ft (2 m) of the front. 1.5 m 1.5 m 2 m
-
 1
1 -
2
-
3
-
4
-
5
-
 6
6 -
 7
7 -
 8
8 -
 9
9 -
 10
10 -
 11
11 -
 12
12 -
 13
13 -
 14
14 -
 15
15 -
 16
16 -
17
-
18
-
19
-
20
-
21
-
22
-
23
-
24
-
25
-
26
-
27
-
28
-
29
-
30
-
31
-
32
-
33
-
34
-
35
-
36
 |
 |
