LG WKEX200HWA Owners Manual - Page 26
Testing the Washer, Testing the Dryer
 |
View all LG WKEX200HWA manuals
Add to My Manuals
Save this manual to your list of manuals |
Page 26 highlights
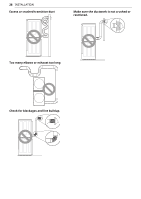
26 INSTALLATION WARNING • Do not modify the power cord and plug provided with the appliance. Do not damage it when installing or moving the appliance. Doing so may result in death, fire, electric shock, or malfunction. • Make sure that the appliance is grounded. • Connect this appliance to a grounded outlet conforming to the rating prior to use. Failure to do so may result in fire, electric shock, or malfunction. • Do not damage or cut off the ground prong of the power cord. Doing so may cause death, fire, electric shock, or product malfunction. • Improper connection of the equipment grounding conductor can result in risk of electric shock. Check with a qualified electrician or service technician if you are in doubt as to whether the appliance is properly grounded. If the plug does not fit the outlet, have a proper outlet installed by a qualified electrician. • The appliance and outlet must be positioned so that the plug is easily accessible. • Do not use an adapter or extension cord. Doing so may result in serious injury, fire, electric shock, or death. • For best performance, plug the appliance into its own individual outlet. This helps prevent overloading house wiring circuits which could cause a fire hazard from overheated wires. • If necessary, use a new, UL-listed 3-prong (grounding) plug rated at no less than the branch circuit. Do not use an extension cord longer than 3 feet. Failure to follow these warnings may result in serious injury, fire, electric shock, or death. Testing the Washer Check if the washer is properly installed and run a test cycle. 1 Load the washer with 6 thick bath towels (approximately 6 pounds). 2 Press the Power button. 3 Press the Speed Wash button. 4 Select the Start/Pause button to start the wash cycle. 5 Make sure that water is supplied, that the washer does not rock or vibrate excessively, and that it drains well during the spin cycle. NOTE • If water leaks during water supply, see Connecting the Water Inlet Hoses to connect them properly. • If the appliance rocks and vibrates excessively, see Leveling the Appliance to level it again. • If the drain does not work, see Connecting the Drain Hose to install the hose properly. Testing the Dryer Once you have completed the installation of the appliance, use this test to make sure the condition of the exhaust system is adequate for proper operation of the appliance. This test should be performed to alert you to any serious problems in the exhaust system of your home. • Your appliance features Flow Sense(W), an innovative sensing system that automatically detects blockages and restrictions in dryer ductwork. Keeping ductwork clean of lint buildup and free of restrictions allows clothes to dry faster and reduces energy use. Testing Dryer Heating Gas Models Close the dryer door and press the Power button to turn the dryer on. Press the Time Dry and Start/Pause buttons to start the test. When the dryer starts, the igniter should ignite the main burner. NOTE • If all air is not purged from the gas line, the gas igniter may turn off before the main burner ignites. If this happens, the igniter will reattempt gas ignition after approximately two minutes. Electric Models Close the dryer door and press the Power button to turn the dryer on. Press the Time Dry and Start/Pause buttons to start the test. The exhaust air should be warm after the dryer has been operating for 3 minutes. Checking Airflow Effective dryer operation requires proper airflow. The adequacy of the airflow can be measured by
-
 1
1 -
2
-
3
-
4
-
5
-
6
-
7
-
8
-
9
-
10
-
11
-
12
-
13
-
14
-
15
-
16
-
17
-
18
-
19
-
20
-
 21
21 -
 22
22 -
 23
23 -
 24
24 -
 25
25 -
 26
26 -
 27
27 -
 28
28 -
 29
29 -
 30
30 -
 31
31 -
32
-
33
-
34
-
35
-
36
-
37
-
38
-
39
-
40
-
41
-
42
-
43
-
44
-
45
-
46
-
47
-
48
-
49
-
50
-
51
-
52
-
53
-
54
-
55
-
56
-
57
-
58
-
59
-
60
-
61
-
62
-
63
-
64
-
65
-
66
-
67
-
68
-
69
-
70
-
71
-
72
-
73
-
74
-
75
-
76
-
77
-
78
-
79
-
80
-
81
-
82
-
83
-
84
-
85
-
86
-
87
-
88
-
89
-
90
-
91
-
92
-
93
-
94
-
95
-
96
-
97
-
98
-
99
-
100
-
101
-
102
-
103
-
104
-
105
-
106
-
107
-
108
-
109
-
110
-
111
-
112
-
113
-
114
-
115
-
116
-
117
-
118
-
119
-
120
-
121
-
122
-
123
-
124
-
125
-
126
-
127
-
128
-
129
-
130
-
131
-
132
-
133
-
134
-
135
-
136
-
137
-
138
-
139
-
140
-
141
-
142
-
143
-
144
-
145
-
146
-
147
-
148
-
149
-
150
-
151
-
152
-
153
-
154
-
155
-
156
-
157
-
158
-
159
-
160
-
161
-
162
-
163
-
164
-
165
-
166
-
167
-
168
-
169
-
170
-
171
-
172
-
173
-
174
-
175
-
176
-
177
-
178
-
179
-
180
-
181
-
182
-
183
-
184
-
185
-
186
-
187
-
188
-
189
-
190
-
191
-
192
-
193
-
194
-
195
 |
 |
