LG WKEX200HWA Owners Manual - Page 27
Activating the Installation Test, Check the Duct Condition, Error Codes, Restricted or Blocked
 |
View all LG WKEX200HWA manuals
Add to My Manuals
Save this manual to your list of manuals |
Page 27 highlights
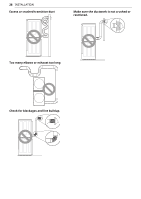
evaluating the static pressure. Static pressure in the exhaust duct can be measured with a manometer, placed on the exhaust duct approximately 2 ft. (60.9 cm) from the dryer. Static pressure in the exhaust duct should not exceed 0.6 inch (1.5 cm). The dryer should be checked while the dryer is running with no load. Activating the Installation Test 1 Do not load anything in the drum for this test, as it may affect the accuracy of the results. 2 Press the Power button and then press and hold the Reduce Static and Energy Saver buttons. • This button sequence activates the installation test. The code 1Ns will display if the activation is successful. 3 Press the Start/Pause button. • The appliance will start the test, which will last a few minutes. The heat will be turned on and the temperatures in the drum will be measured. 4 Check the display for results. • During the test cycle, monitor the Flow Sense(W) display on the control panel. If the Flow Sense(W) indicator has not turned on when the cycle ends, the exhaust system is adequate. If the exhaust system is severely restricted, the Flow Sense(W) indicator will turn on. Other problems may also be shown with error codes. See the chart on the next page for error code details and solutions. • If the Flow Sense(W) display indicates that the exhaust system is severely restricted, have the system checked immediately, as performance will be poor. 5 End of cycle. • At the end of the test cycle, ENd will display. The test cycle will end and the appliance will shut off automatically after a short delay. Check the Duct Condition If the Flow Sense(W) indicator is turned on, check the exhaust system for restrictions and damage. Repair or replace the exhaust system as needed. INSTALLATION 27 NOTE • When the appliance is first installed, this test should be performed to alert you to any existing problems with the exhaust duct in your home. However, since the test performed during normal operation provides more accurate information on the condition of the exhaust duct than the installation test, the number of bars displayed during the two tests may not be the same. • Do not interrupt the test cycle, as this could result in inaccurate results. • Even if no bars are displayed during the test cycle, some restrictions may still be present in the exhaust system. Refer to the Venting the Dryer section of this manual for complete exhaust system and venting requirements. Error Codes Check the error code before you call for service. Error Code tE1 or tEz Hs Ps, PF, or NP QAs Possible Cause & Solution Temperature sensor failure. • Turn off the appliance and call for service. Humidity sensor failure. • Turn off the appliance and call for service. Electric dryer power cord is not connected correctly, or house power supply is incorrect. • Reset circuit breaker or replace fuse. Do not increase the fuse capacity. House fuse is blown, circuit breaker has tripped, or power outage has occurred. • If the problem is a circuit overload, have it corrected by a qualified electrician. Gas supply or service turned off. (Gas Model only.) • Confirm that house gas shutoff and the dryer gas shutoff are both fully open. Restricted or Blocked Airflow Avoid long runs or runs with multiple elbows or bends. ENGLISH
-
 1
1 -
2
-
3
-
4
-
5
-
6
-
7
-
8
-
9
-
10
-
11
-
12
-
13
-
14
-
15
-
16
-
17
-
18
-
19
-
20
-
21
-
 22
22 -
 23
23 -
 24
24 -
 25
25 -
 26
26 -
 27
27 -
 28
28 -
 29
29 -
 30
30 -
 31
31 -
 32
32 -
33
-
34
-
35
-
36
-
37
-
38
-
39
-
40
-
41
-
42
-
43
-
44
-
45
-
46
-
47
-
48
-
49
-
50
-
51
-
52
-
53
-
54
-
55
-
56
-
57
-
58
-
59
-
60
-
61
-
62
-
63
-
64
-
65
-
66
-
67
-
68
-
69
-
70
-
71
-
72
-
73
-
74
-
75
-
76
-
77
-
78
-
79
-
80
-
81
-
82
-
83
-
84
-
85
-
86
-
87
-
88
-
89
-
90
-
91
-
92
-
93
-
94
-
95
-
96
-
97
-
98
-
99
-
100
-
101
-
102
-
103
-
104
-
105
-
106
-
107
-
108
-
109
-
110
-
111
-
112
-
113
-
114
-
115
-
116
-
117
-
118
-
119
-
120
-
121
-
122
-
123
-
124
-
125
-
126
-
127
-
128
-
129
-
130
-
131
-
132
-
133
-
134
-
135
-
136
-
137
-
138
-
139
-
140
-
141
-
142
-
143
-
144
-
145
-
146
-
147
-
148
-
149
-
150
-
151
-
152
-
153
-
154
-
155
-
156
-
157
-
158
-
159
-
160
-
161
-
162
-
163
-
164
-
165
-
166
-
167
-
168
-
169
-
170
-
171
-
172
-
173
-
174
-
175
-
176
-
177
-
178
-
179
-
180
-
181
-
182
-
183
-
184
-
185
-
186
-
187
-
188
-
189
-
190
-
191
-
192
-
193
-
194
-
195
 |
 |
