LG WKHC202HBA Owners Manual - Page 76
Clearances, Installation spacing for Recessed Area or Closet Installation
 |
View all LG WKHC202HBA manuals
Add to My Manuals
Save this manual to your list of manuals |
Page 76 highlights
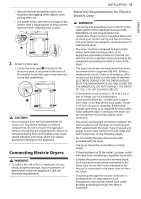
12 INSTALLATION Clearances The following clearances are recommended for the appliance. • Additional clearances should be considered for ease of installation and servicing. • Additional clearances should be considered on all sides of the appliance to reduce noise transfer. Installation spacing for Recessed Area or Closet Installation Description A: Upper Ventilation Opening B: Lower Ventilation Opening C: Distance to Ventilation Opening D: Front Clearance Dimension/Clearance 48 sq. in. (310 cm2) 24 sq. in. (155 cm2) 3″ (7.6 cm) 4″ (10 cm) Closet Ventilation Requirements Closets with doors must have both an upper and lower vent to prevent heat and moisture buildup in the closet. One upper vent opening with a minimum opening of 48 sq. in. (310 cm2) must be installed no lower than 6 feet above the floor. One lower vent opening with a minimum opening of 24 sq. in. (155 cm2) must be installed no more than one foot above the floor. Install vent grills in the door or cut down the door at the top and bottom to form openings. Louvered doors with equivalent ventilation openings are also acceptable. NOTE • There should be at least a little space around the appliance (or any other appliance) to eliminate the transfer of vibration from one appliance to another. If there is enough vibration, it could cause appliances to make noise or come into contact, causing paint damage and further increasing noise. • No other fuel-burning appliance can be installed in the same closet as an appliance. Unpacking and Removing Shipping Material Unpacking Shipping Material * This feature is only available on some models. Lifting the Appliance off the Foam Base • After removing the carton and shipping material, lift the appliance off the foam base. • Make sure the plastic drum support a* comes off with the base and is not stuck to the bottom of the appliance. • If you must lay the appliance down to remove the carton base b, always protect the side of the appliance and lay it carefully on its side. Do not lay the appliance on its front or back. * CAUTION • Remove all shipping materials from the appliance for proper operation and inspect it for shipping damage. Failure to remove shipping materials can cause excessive noise and vibration. Removing Shipping Material 1 Remove the bolt assemblies. • Starting with the bottom two shipping bolts, use the included wrench c to fully loosen all 4 shipping bolts by turning them counterclockwise.
-
 1
1 -
2
-
3
-
4
-
5
-
6
-
7
-
8
-
9
-
10
-
11
-
12
-
13
-
14
-
15
-
16
-
17
-
18
-
19
-
20
-
21
-
22
-
23
-
24
-
25
-
26
-
27
-
28
-
29
-
30
-
31
-
32
-
33
-
34
-
35
-
36
-
37
-
38
-
39
-
40
-
41
-
42
-
43
-
44
-
45
-
46
-
47
-
48
-
49
-
50
-
51
-
52
-
53
-
54
-
55
-
56
-
57
-
58
-
59
-
60
-
61
-
62
-
63
-
64
-
65
-
66
-
67
-
68
-
69
-
70
-
 71
71 -
 72
72 -
 73
73 -
 74
74 -
 75
75 -
 76
76 -
 77
77 -
 78
78 -
 79
79 -
 80
80 -
 81
81 -
82
-
83
-
84
-
85
-
86
-
87
-
88
-
89
-
90
-
91
-
92
 |
 |
