Lenovo ThinkPad X200s Hardware Maintenance Manual - Page 86
Palm rest or palm rest with fingerprint reader, reader has any defects
 |
View all Lenovo ThinkPad X200s manuals
Add to My Manuals
Save this manual to your list of manuals |
Page 86 highlights
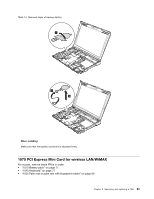
Table 12. Removal steps of keyboard (continued) 4. Secure the keyboard by tightening the screws from the bottom side of the computer. 1050 Palm rest or palm rest with fingerprint reader For access, remove this FRU in order: • "1010 Battery pack" on page 71 • "1040 Keyboard" on page 77 Note: In models with the fingerprint reader, the sensor is attached to the palm rest FRU. If the fingerprint reader has any defects, you can replace it by the procedures given in this section, which are the same for a palm rest with or without a fingerprint reader. Table 13. Removal steps of palm rest 1 1 1 1 1 80 Hardware Maintenance Manual
-
 1
1 -
2
-
3
-
4
-
5
-
6
-
7
-
8
-
9
-
10
-
11
-
12
-
13
-
14
-
15
-
16
-
17
-
18
-
19
-
20
-
21
-
22
-
23
-
24
-
25
-
26
-
27
-
28
-
29
-
30
-
31
-
32
-
33
-
34
-
35
-
36
-
37
-
38
-
39
-
40
-
41
-
42
-
43
-
44
-
45
-
46
-
47
-
48
-
49
-
50
-
51
-
52
-
53
-
54
-
55
-
56
-
57
-
58
-
59
-
60
-
61
-
62
-
63
-
64
-
65
-
66
-
67
-
68
-
69
-
70
-
71
-
72
-
73
-
74
-
75
-
76
-
77
-
78
-
79
-
80
-
 81
81 -
 82
82 -
 83
83 -
 84
84 -
 85
85 -
 86
86 -
 87
87 -
 88
88 -
 89
89 -
 90
90 -
 91
91 -
92
-
93
-
94
-
95
-
96
-
97
-
98
-
99
-
100
-
101
-
102
-
103
-
104
-
105
-
106
-
107
-
108
-
109
-
110
-
111
-
112
-
113
-
114
-
115
-
116
-
117
-
118
-
119
-
120
-
121
-
122
-
123
-
124
-
125
-
126
-
127
-
128
-
129
-
130
-
131
-
132
-
133
-
134
-
135
-
136
-
137
-
138
-
139
-
140
-
141
-
142
-
143
-
144
-
145
-
146
-
147
-
148
-
149
-
150
-
151
-
152
-
153
-
154
-
155
-
156
-
157
-
158
-
159
-
160
-
161
-
162
-
163
-
164
-
165
-
166
-
167
-
168
-
169
-
170
-
171
-
172
-
173
-
174
-
175
-
176
-
177
-
178
-
179
-
180
-
181
-
182
-
183
-
184
-
185
-
186
-
187
-
188
-
189
-
190
-
191
-
192
-
193
-
194
-
195
-
196
-
197
-
198
-
199
-
200
-
201
-
202
-
203
-
204
-
205
-
206
-
207
-
208
-
209
-
210
-
211
-
212
-
213
-
214
-
215
-
216
-
217
-
218
-
219
-
220
-
221
-
222
-
223
-
224
-
225
-
226
-
227
-
228
-
229
-
230
-
231
-
232
-
233
-
234
-
235
-
236
-
237
-
238
-
239
-
240
-
241
-
242
-
243
-
244
-
245
-
246
-
247
-
248
-
249
-
250
-
251
-
252
-
253
-
254
-
255
-
256
-
257
-
258
-
259
-
260
-
261
-
262
-
263
-
264
-
265
-
266
-
267
-
268
-
269
-
270
-
271
-
272
-
273
-
274
-
275
-
276
-
277
-
278
 |
 |

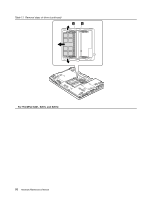
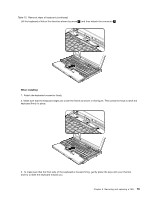
Table 12. Removal steps of keyboard (continued)
4. Secure the keyboard by tightening the screws from the bottom side of the computer.
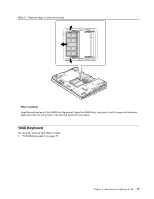
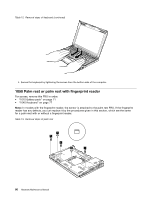
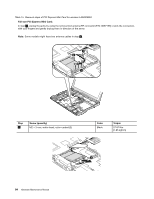
1050 Palm rest or palm rest with fingerprint reader
For access, remove this FRU in order:
•
“1010 Battery pack” on page 71
•
“1040 Keyboard” on page 77
Note:
In models with the fingerprint reader, the sensor is attached to the palm rest FRU. If the fingerprint
reader has any defects, you can replace it by the procedures given in this section, which are the same
for a palm rest with or without a fingerprint reader.
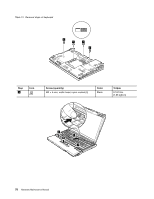
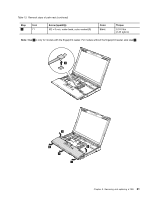
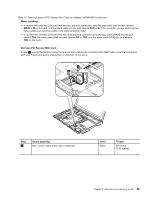
Table 13. Removal steps of palm rest
1
1
1
1
1
80
Hardware Maintenance Manual