Lenovo ThinkVision LT1423p 13.3-inch IPS LED Backlit LCD Wireless Touch Monitor - Page 24
The USB cable
 |
View all Lenovo ThinkVision LT1423p 13.3-inch IPS LED Backlit LCD Wireless Touch Monitor with pen manuals
Add to My Manuals
Save this manual to your list of manuals |
Page 24 highlights
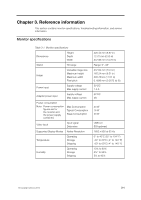
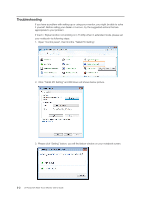
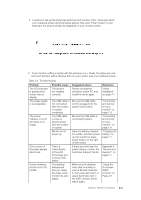
4. 2 options to set up the stylus pen and the touch function. Click "stylus pen input", your notebook screen will show below picture.Then click "Enter" button of your keyboard, the picture will also be displayed on your monitor screen. 5. Touch function setting is similar with the previous one.>.Finally, the stylus pen and the touch function will be effective both on your monitor and your notebook screen. Table 3-2. Troubleshooting Problem The LED indicator is greenbut the screen has no display. The image quality is unacceptable. The power indicator is not lit and there is no image. One or more of the pixels appear discolored. Screen skewing, picture not in the middle. Possible cause The driver is not installed correctly. Suggested action Please uninstall the driverthen restart PC and install the driver again. Reference "Driver Installation" on page 4-1 The USB cable is not connected with the monitor or system completely. The USB cable is loose or disconnected with the monitor or system. Monitor is not power up This is a characteristic of the LCD technology and is not an LCD defect. The desktop background have no clearly boundary when monitor do auto adjust. Be sure the USB cable is firmly plugged into the system and monitor. Be sure the USB cable is connected properly. Have the battery charged for a while, and then power up the monitor by press power button on the right of the monitor. If there are more than five pixels missing, contact the Customer Support Center. Make sure the desktop have clear boundary or open a file and maximize it, then press left button or select Automatic item in the OSD, monitor will do adjust again. "Connecting and turning on your monitor" on page 1-6 "Connecting and turning on your monitor" on page 1-6 "Charging the battery" on page 1-7 Appendix A, "Service and Support," on page A-1 "Using the On-Screen (OSD) controls" on Page 2-3 Chapter 3. Reference information 3-3
-
 1
1 -
2
-
3
-
4
-
5
-
6
-
7
-
8
-
9
-
10
-
11
-
12
-
13
-
14
-
15
-
16
-
17
-
18
-
 19
19 -
 20
20 -
 21
21 -
 22
22 -
 23
23 -
 24
24 -
 25
25 -
 26
26 -
 27
27 -
 28
28 -
 29
29 -
30
-
31
-
32
-
33
-
34
-
35
-
36
-
37
-
38
-
39
-
40
-
41
-
42
-
43
-
44
-
45
-
46
-
47
-
48
-
49
-
50
-
51
-
52
-
53
-
54
-
55
-
56
-
57
-
58
-
59
-
60
-
61
-
62
-
63
-
64
-
65
-
66
-
67
-
68
-
69
-
70
-
71
-
72
-
73
-
74
-
75
-
76
-
77
-
78
-
79
-
80
-
81
-
82
-
83
-
84
-
85
-
86
 |
 |
