Lexmark 22L0214 User's Guide - Page 13
Installing memory and option cards, Removing the system board access cover, Installing a memory card
 |
UPC - 734646098595
View all Lexmark 22L0214 manuals
Add to My Manuals
Save this manual to your list of manuals |
Page 13 highlights
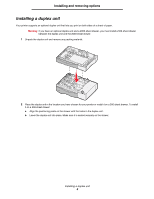
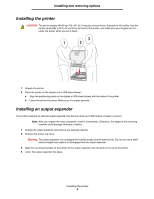
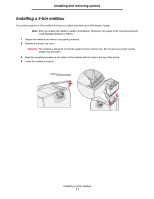
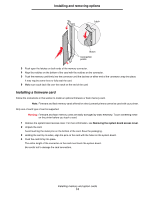
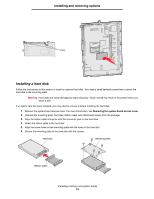
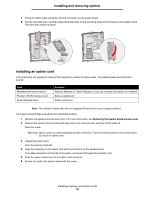
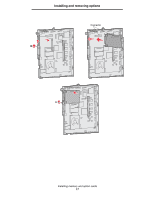
Installing and removing options Installing memory and option cards CAUTION: If you are installing memory or option cards sometime after setting up the printer, turn the printer off and unplug the power cord before continuing. If you have any other devices connected to the printer, turn them off as well and unplug any cables going to the printer. Removing the system board access cover 1 Locate the access cover on the back of the printer. 2 Remove the four access cover screws (two at top, two at bottom). 3 Remove the access cover. 4 Use the illustration to locate the connector for the card you want to install. Option card connector Memory card connector Firmware and flash memory card connectors Hard disk connector Installing a memory card Follow the instructions in this section to install a printer memory card. Memory cards must have 100-pin connectors. Note: Memory cards designed for other Lexmark printers may not work with your printer. 1 Remove the system board access cover. For more information, see Removing the system board access cover. Warning: Memory cards are easily damaged by static electricity. Touch something metal on the printer before you touch a card. 2 Unpack the memory card. Avoid touching the connection points along the edge of the card. Save the packaging. Installing memory and option cards 13
-
 1
1 -
2
-
3
-
4
-
5
-
6
-
7
-
 8
8 -
 9
9 -
 10
10 -
 11
11 -
 12
12 -
 13
13 -
 14
14 -
 15
15 -
 16
16 -
 17
17 -
 18
18 -
19
-
20
-
21
-
22
-
23
-
24
-
25
-
26
-
27
-
28
-
29
-
30
-
31
-
32
-
33
-
34
-
35
-
36
-
37
-
38
-
39
-
40
-
41
-
42
-
43
-
44
-
45
-
46
-
47
-
48
-
49
-
50
-
51
-
52
-
53
-
54
-
55
-
56
-
57
-
58
-
59
-
60
-
61
-
62
-
63
-
64
-
65
-
66
-
67
-
68
-
69
-
70
-
71
-
72
-
73
-
74
-
75
-
76
-
77
-
78
-
79
-
80
-
81
-
82
-
83
-
84
-
85
-
86
-
87
-
88
-
89
-
90
-
91
-
92
-
93
-
94
-
95
-
96
-
97
-
98
-
99
-
100
-
101
-
102
-
103
-
104
-
105
-
106
-
107
-
108
-
109
-
110
-
111
 |
 |
