Lexmark 22R0010 User's Guide - Page 11
Securing the drawer to the printer
 |
UPC - 734646009553
View all Lexmark 22R0010 manuals
Add to My Manuals
Save this manual to your list of manuals |
Page 11 highlights
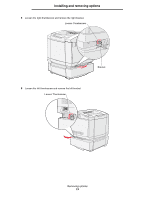
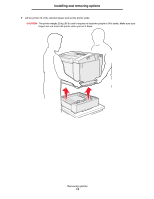
Installing and removing options Securing the drawer to the printer Bracket Tighten thumbscrew 1 Align one bracket with the hole on the right side of the printer as shown. Press the bracket flat against the printer, and then tighten the thumbscrew. 2 Starting at the front of the printer, push the right side cover onto the printer, fitting each slot on the cover over its corresponding tab on the optional drawer in order to cover the gap between the printer and the optional drawer. Note the side cover orientation. The side cover is flat on the bottom. Installing a 530-sheet drawer 9
-
 1
1 -
2
-
3
-
4
-
5
-
 6
6 -
 7
7 -
 8
8 -
 9
9 -
 10
10 -
 11
11 -
 12
12 -
 13
13 -
 14
14 -
 15
15 -
 16
16 -
17
-
18
-
19
-
20
-
21
-
22
-
23
-
24
-
25
-
26
-
27
-
28
-
29
-
30
-
31
-
32
-
33
-
34
-
35
-
36
-
37
-
38
-
39
-
40
-
41
-
42
-
43
-
44
-
45
-
46
-
47
-
48
-
49
-
50
-
51
-
52
-
53
-
54
-
55
-
56
-
57
-
58
-
59
-
60
-
61
-
62
-
63
-
64
-
65
-
66
-
67
-
68
-
69
-
70
-
71
-
72
-
73
-
74
-
75
-
76
-
77
-
78
-
79
-
80
-
81
-
82
-
83
-
84
 |
 |

Installing a 530-sheet drawer
9
Installing and removing options
Securing the drawer to the printer
1
Align one bracket with the hole on the right side of the printer as shown. Press the bracket flat against the printer,
and then tighten the thumbscrew.
2
Starting at the front of the printer, push the right side cover onto the printer, fitting each slot on the cover over its
corresponding tab on the optional drawer in order to cover the gap between the printer and the optional drawer.
Note the side cover orientation. The side cover is flat on the bottom.
Bracket
Tighten
thumbscrew