Lexmark 22S0502 User's Guide - Page 95
Mac OS 8.6 to 9.x, Install, Step 2: Create a desktop printer, LaserWriter 8, Create, Printing
 |
UPC - 734646017022
View all Lexmark 22S0502 manuals
Add to My Manuals
Save this manual to your list of manuals |
Page 95 highlights
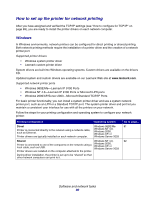
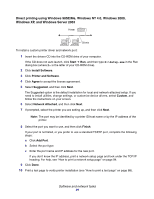
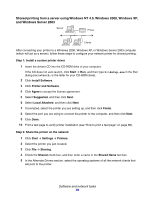
Macintosh (Web) Note: A PostScript Printer Description (PPD) file provides detailed information about the capabilities of a printer to your Macintosh computer. To print to a network printer, each Macintosh user must install a custom PostScript Printer Description (PPD) file and either create a desktop printer on the computer (Mac OS 8.6 to 9.x) or create a print queue in Print Center or Printer Setup Utility (depending on your version of Mac OS X). Follow the instructions for your operating system. Mac OS 8.6 to 9.x 1 Install a printer PostScript Printer Description (PPD) file on your computer. Note: Installing the custom PPD is required only if this is the first time the printer has been set up. If the printer was previously installed, go on to Step 2: Create a desktop printer. Download the package for your printer from the Lexmark Web site at www.lexmark.com. After the download completes, this package will automatically decompress and open on your desktop. 2 Double-click the installer package for your printer. 3 Select the language of your operating system, and then click OK. 4 Click Install to install the PPD file for your printer. Step 2: Create a desktop printer 1 In the Chooser, select the LaserWriter 8 driver. 2 If you have a routed network, select the default zone from the list. If you don't know which zone to select, look on the Network Setup page under AppleTalk for Zone. 3 Select the new printer from the list. If you don't know which printer to select, look on the Network Setup page under the AppleTalk heading to find the default name of the printer. 4 Click Create. 5 Make sure there is an icon next to the printer name in the Chooser. 6 Close the Chooser window. 7 Verify printer installation. a Click the desktop printer icon you just created. b Choose Printing Æ Change Setup. Software and network tasks 95
-
 1
1 -
2
-
3
-
4
-
5
-
6
-
7
-
8
-
9
-
10
-
11
-
12
-
13
-
14
-
15
-
16
-
17
-
18
-
19
-
20
-
21
-
22
-
23
-
24
-
25
-
26
-
27
-
28
-
29
-
30
-
31
-
32
-
33
-
34
-
35
-
36
-
37
-
38
-
39
-
40
-
41
-
42
-
43
-
44
-
45
-
46
-
47
-
48
-
49
-
50
-
51
-
52
-
53
-
54
-
55
-
56
-
57
-
58
-
59
-
60
-
61
-
62
-
63
-
64
-
65
-
66
-
67
-
68
-
69
-
70
-
71
-
72
-
73
-
74
-
75
-
76
-
77
-
78
-
79
-
80
-
81
-
82
-
83
-
84
-
85
-
86
-
87
-
88
-
89
-
 90
90 -
 91
91 -
 92
92 -
 93
93 -
 94
94 -
 95
95 -
 96
96 -
 97
97 -
 98
98 -
 99
99 -
 100
100 -
101
-
102
-
103
-
104
-
105
-
106
-
107
-
108
-
109
-
110
-
111
-
112
-
113
-
114
-
115
-
116
-
117
-
118
-
119
-
120
-
121
-
122
-
123
 |
 |
