Lexmark 34S0300 User's Guide - Page 114
Accessing jam areas, Understanding jam lights and access locations
 |
View all Lexmark 34S0300 manuals
Add to My Manuals
Save this manual to your list of manuals |
Page 114 highlights
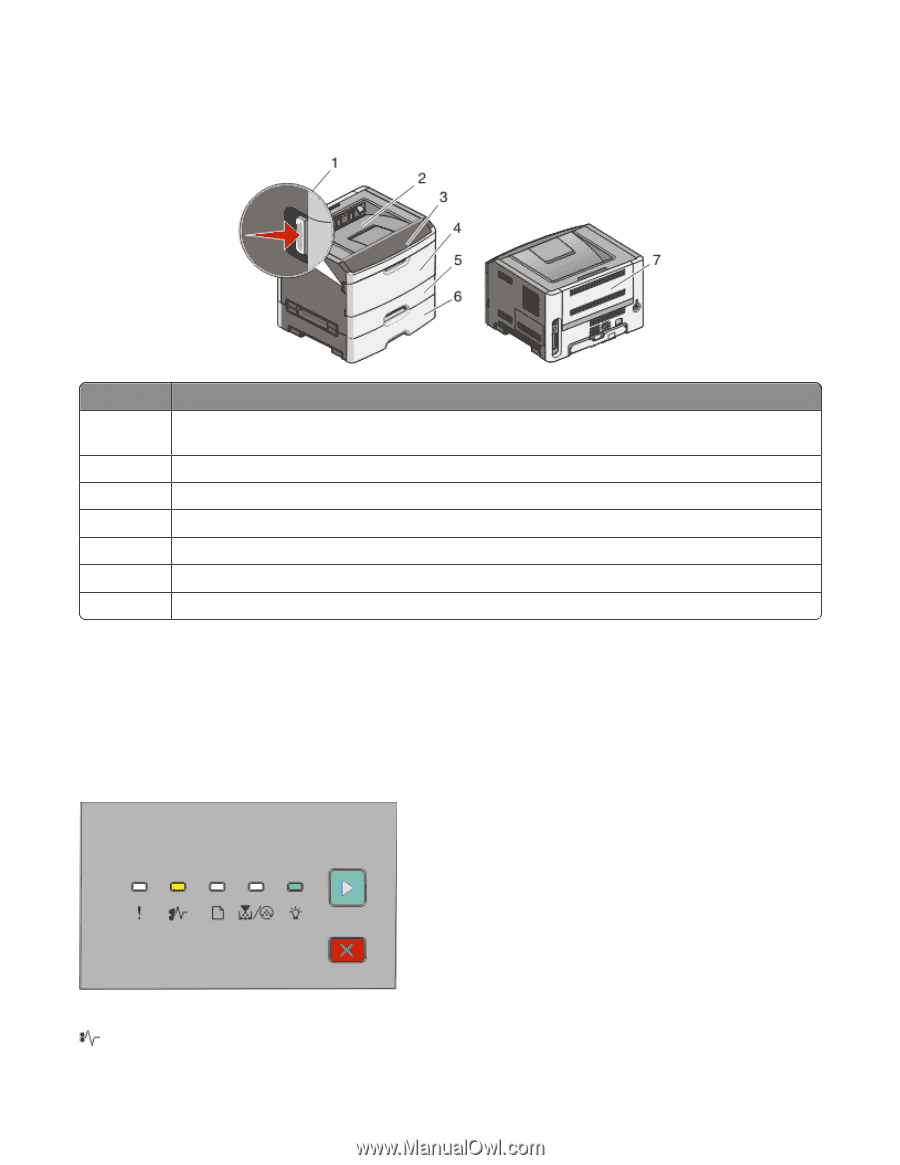
Accessing jam areas Open doors and remove trays to access jam areas. The following illustration shows possible jam areas: Access point Description 1 Push button to open the front door. Inside this door is the unit housing the toner cartridge and photoconductor kit. 2 Standard exit bin 3 Front door 4 Manual feeder door 5 Standard 250-sheet tray (Tray 1) 6 Optional tray (Tray 2) 7 Rear door Understanding jam lights and access locations The following table lists the jam lights and messages and provides brief instructions for how to access each jam. More detailed instructions follow. Note: The jam messages listed appear on the virtual display of the Embedded Web Server. 200.yy Paper jam 200.yy Paper jam - On Clearing jams 114
-
 1
1 -
2
-
3
-
4
-
5
-
6
-
7
-
8
-
9
-
10
-
11
-
12
-
13
-
14
-
15
-
16
-
17
-
18
-
19
-
20
-
21
-
22
-
23
-
24
-
25
-
26
-
27
-
28
-
29
-
30
-
31
-
32
-
33
-
34
-
35
-
36
-
37
-
38
-
39
-
40
-
41
-
42
-
43
-
44
-
45
-
46
-
47
-
48
-
49
-
50
-
51
-
52
-
53
-
54
-
55
-
56
-
57
-
58
-
59
-
60
-
61
-
62
-
63
-
64
-
65
-
66
-
67
-
68
-
69
-
70
-
71
-
72
-
73
-
74
-
75
-
76
-
77
-
78
-
79
-
80
-
81
-
82
-
83
-
84
-
85
-
86
-
87
-
88
-
89
-
90
-
91
-
92
-
93
-
94
-
95
-
96
-
97
-
98
-
99
-
100
-
101
-
102
-
103
-
104
-
105
-
106
-
107
-
108
-
 109
109 -
 110
110 -
 111
111 -
 112
112 -
 113
113 -
 114
114 -
 115
115 -
 116
116 -
 117
117 -
 118
118 -
 119
119 -
120
-
121
-
122
-
123
-
124
-
125
-
126
-
127
-
128
-
129
-
130
-
131
-
132
-
133
-
134
-
135
-
136
-
137
-
138
-
139
-
140
-
141
-
142
-
143
-
144
-
145
-
146
-
147
-
148
-
149
-
150
-
151
-
152
-
153
-
154
-
155
-
156
 |
 |
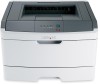
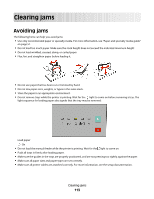
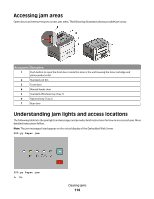
Accessing jam areas
Open doors and remove trays to access jam areas. The following illustration shows possible jam areas:
Access point
Description
1
Push button to open the front door. Inside this door is the unit housing the toner cartridge and
photoconductor kit.
2
Standard exit bin
3
Front door
4
Manual feeder door
5
Standard 250-sheet tray (Tray 1)
6
Optional tray (Tray 2)
7
Rear door
Understanding jam lights and access locations
The following table lists the jam lights and messages and provides brief instructions for how to access each jam. More
detailed instructions follow.
Note:
The jam messages listed appear on the virtual display of the Embedded Web Server.
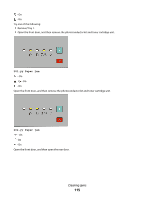
200.yy Paper jam
200.yy Paper jam
- On
Clearing jams
114