Lexmark 9350 Setup Guide - Page 7
computers on
 |
UPC - 734646031202
View all Lexmark 9350 manuals
Add to My Manuals
Save this manual to your list of manuals |
Page 7 highlights
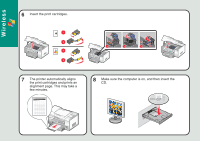
Wireless 21 Assign a name to the computer, select an optional PIN for security, and then click Next. 22 Click Next. 23 Follow the instructions on the screen to complete installation. 24 To use the fax feature, move the printer near a telephone wall jack, and connect the telephone cord to both the printer and the wall jack. If this is the only computer on the wireless network, setup is complete. 25 Make sure the next computer is on, and then insert the CD. To print from other computers on the network, complete steps 25-31, and repeat until all computers are networked.
-
 1
1 -
 2
2 -
 3
3 -
 4
4 -
 5
5 -
 6
6 -
 7
7 -
 8
8 -
 9
9 -
 10
10 -
 11
11 -
 12
12 -
13
-
14
-
15
-
16
-
17
-
18
-
19
-
20
-
21
-
22
 |
 |

Wireless
If this is the only
computer on the
wireless network,
setup is
complete.
To print from other
computers on the
network, complete
steps 25
–
31, and
repeat until all
computers are
networked.
Make sure the next
computer is on, and then
insert the CD.
25
24
To use the fax
feature, move the
printer near a
telephone wall jack,
and connect the
telephone cord to
both the printer and
the wall jack.
23
Follow the instructions
on the screen to
complete installation.
Click
Next
.
22
21
Assign a name to the
computer, select an
optional PIN for security,
and then click
Next
.