Lexmark C736dn User's Guide - Page 34
Verifying printer setup, Printing a menu settings - review
 |
View all Lexmark C736dn manuals
Add to My Manuals
Save this manual to your list of manuals |
Page 34 highlights
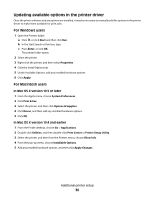
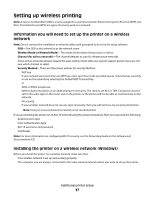
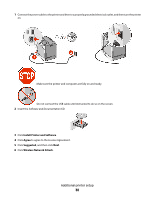
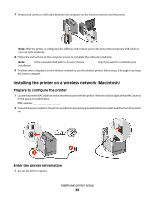
1 USB port Warning-Potential Damage: Do not touch the USB cable, any network adapter, or the printer in the area shown while actively printing. A loss of data or a malfunction can occur. 2 Ethernet port Verifying printer setup Printing a menu settings page Print a menu settings page to review the current menu settings and to verify if the printer options are installed correctly. Note: If you have not made any menu item settings changes yet, then the menu settings page lists all the factory default settings. Once you select and save other settings from the menus, they replace the factory default settings as user default settings. A user default setting remains in effect until you access the menu again, choose another value, and save it. 1 Make sure the printer is on and Ready appears. 2 From the printer control panel, press . 3 Press the up or down arrow button until Reports appears, and then press . 4 Press the up or down arrow button until Menu Settings Page appears, and then press . After the menu settings page prints, the printer returns to the Ready state. Additional printer setup 34
-
 1
1 -
2
-
3
-
4
-
5
-
6
-
7
-
8
-
9
-
10
-
11
-
12
-
13
-
14
-
15
-
16
-
17
-
18
-
19
-
20
-
21
-
22
-
23
-
24
-
25
-
26
-
27
-
28
-
 29
29 -
 30
30 -
 31
31 -
 32
32 -
 33
33 -
 34
34 -
 35
35 -
 36
36 -
 37
37 -
 38
38 -
 39
39 -
40
-
41
-
42
-
43
-
44
-
45
-
46
-
47
-
48
-
49
-
50
-
51
-
52
-
53
-
54
-
55
-
56
-
57
-
58
-
59
-
60
-
61
-
62
-
63
-
64
-
65
-
66
-
67
-
68
-
69
-
70
-
71
-
72
-
73
-
74
-
75
-
76
-
77
-
78
-
79
-
80
-
81
-
82
-
83
-
84
-
85
-
86
-
87
-
88
-
89
-
90
-
91
-
92
-
93
-
94
-
95
-
96
-
97
-
98
-
99
-
100
-
101
-
102
-
103
-
104
-
105
-
106
-
107
-
108
-
109
-
110
-
111
-
112
-
113
-
114
-
115
-
116
-
117
-
118
-
119
-
120
-
121
-
122
-
123
-
124
-
125
-
126
-
127
-
128
-
129
-
130
-
131
-
132
-
133
-
134
-
135
-
136
-
137
-
138
-
139
-
140
-
141
-
142
-
143
-
144
-
145
-
146
-
147
-
148
-
149
-
150
-
151
-
152
-
153
-
154
-
155
-
156
-
157
-
158
-
159
-
160
-
161
-
162
-
163
-
164
-
165
-
166
-
167
-
168
-
169
-
170
-
171
-
172
-
173
-
174
-
175
-
176
-
177
-
178
-
179
-
180
-
181
-
182
-
183
-
184
-
185
-
186
-
187
-
188
-
189
-
190
-
191
-
192
-
193
-
194
-
195
-
196
-
197
-
198
-
199
-
200
-
201
-
202
-
203
-
204
-
205
-
206
-
207
-
208
-
209
-
210
-
211
-
212
-
213
-
214
-
215
-
216
 |
 |
