Lexmark C925 Quick Reference
Lexmark C925 Manual
 |
View all Lexmark C925 manuals
Add to My Manuals
Save this manual to your list of manuals |
Lexmark C925 manual content summary:
- Lexmark C925 | Quick Reference - Page 1
guides in each tray except in the standard 150-sheet tray (Tray 1) and in the multipurpose feeder. The Paper Size setting for Tray 1 is set manually via the wheel on the tray, while the Paper Size 550-sheet trays support the same paper sizes and types. The only sizes that are supported for both long- - Lexmark C925 | Quick Reference - Page 2
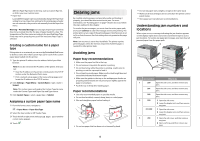
not bent or wrinkled. 7 Lock the width guide. 9 From the printer control panel, set the Paper Size and Paper Type for the tray based on the paper you loaded. Loading the multipurpose feeder The multipurpose feeder can hold several sizes and types of print media, such as transparencies, labels, card - Lexmark C925 | Quick Reference - Page 3
setting is automatically sensed according to the position of the paper guides in each tray except Tray 1 and the multipurpose feeder. The Paper Size setting for the multipurpose feeder must be set manually from the Paper Size menu. The Paper Type setting must be set for all trays from the Paper Type - Lexmark C925 | Quick Reference - Page 4
automatic; they must be set manually from the Paper Size menu. Warning-Potential Damage: Do not assign aPaper Typenamethat does not accurately describe the type of paper loaded in a tray. The temperature of the fuser varies according to the specified Paper Type. Prints may not be properly processed - Lexmark C925 | Quick Reference - Page 5
the paper guides. 5 Touch Continue, jam cleared. 200 paper jam 1 Open the side door. CAUTION-HOT SURFACE: The inside of the printer might be hot cleared. 5 1 Lift the handles on each side of the fuser, and then pull to remove the fuser unit. 2 Remove the jammed paper. Notes: • Make sure all - Lexmark C925 | Quick Reference - Page 6
3 Align the fuser unit using the handles on each side, and then place it back into the printer. 230 paper jam 1 Open the side door. 2 Hold onto the handles of the duplexing unit, open the cover, and then remove any jammed paper. CAUTION-HOT SURFACE: The inside of the printer might be hot. To reduce - Lexmark C925 | Quick Reference - Page 7
24x paper jam Paper jam in Tray 1 1 Check the side access door to trays and then pull the jammed pages out. 1 Note: Make sure all paper fragments are removed. 3 Close Tray 1. 4 Touch Continue, jam cleared. Paper jam in one of the optional trays 1 Check the side access door to trays and then pull - Lexmark C925 | Quick Reference - Page 8
250 paper jam 1 Remove any jammed pages from the multipurpose feeder. 2 Load paper into the multipurpose feeder. 3 Touch Continue, jam cleared. 8 - Lexmark C925 | Quick Reference - Page 9
jams avoiding 4 paper jams, clearing 231-239 paper jams 6 24x paper jam 7 250 paper jam 8 paper size setting 1 paper type setting 1 S setting the paper size 1 setting the paper type 1 standard tray loading 1 T transparencies loading in multipurpose feeder 2 trays linking 3 unlinking 3 U unlinking
-
 1
1 -
 2
2 -
 3
3 -
 4
4 -
 5
5 -
 6
6 -
 7
7 -
8
-
9
 |
 |
Quick Reference
Loading paper and
specialty media
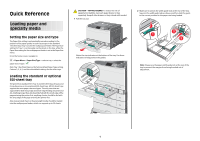
Setting the paper size and type
The Paper Size setting is automatically sensed according to the
position of the paper guides in each tray except in the standard
150-sheet tray (Tray 1) and in the multipurpose feeder. The Paper Size
setting for Tray 1 is set manually via the wheel on the tray, while the
Paper Size setting for the multipurpose feeder is set in the Paper Size
menu.
From the home screen, navigate to:
>
Paper Menu
>
Paper Size/Type
> select a tray > select the
paper size or type >
Only Tray 1 has Plain Paper as the factory default Paper Type setting.
Custom 2, 3, 4, 5, and 6 are the default settings for the other trays.
Loading the standard or optional
550-sheet tray
The printer has standard150- (Tray 1) and 250-sheet trays (Tray 2), and
it may have one or more optional 550-sheet trays. All 550-sheet trays
support the same paper sizes and types. The only sizes that are
supported for both long-edge and short-edge feeding are Letter and
A4. Anything longer than A4 should be fed with the short edge of the
page entering the printer first, anything shorter should be fed with
the long edge of the page entering the printer first.
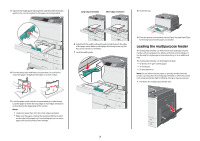
Any unusual sized sheets or heavy weight media should be loaded
into the multipurpose feeder, which can support up to 50 sheets.
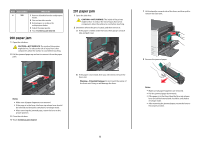
CAUTION—TIPPING HAZARD:
To reduce the risk of
equipment instability, load each paper drawer or tray
separately. Keep all other drawers or trays closed until needed.
1
Pull the tray out.
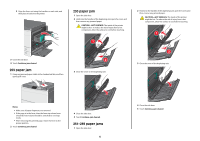
Notice the size indicators at the bottom of the tray. Use these
indicators to help position the guides.
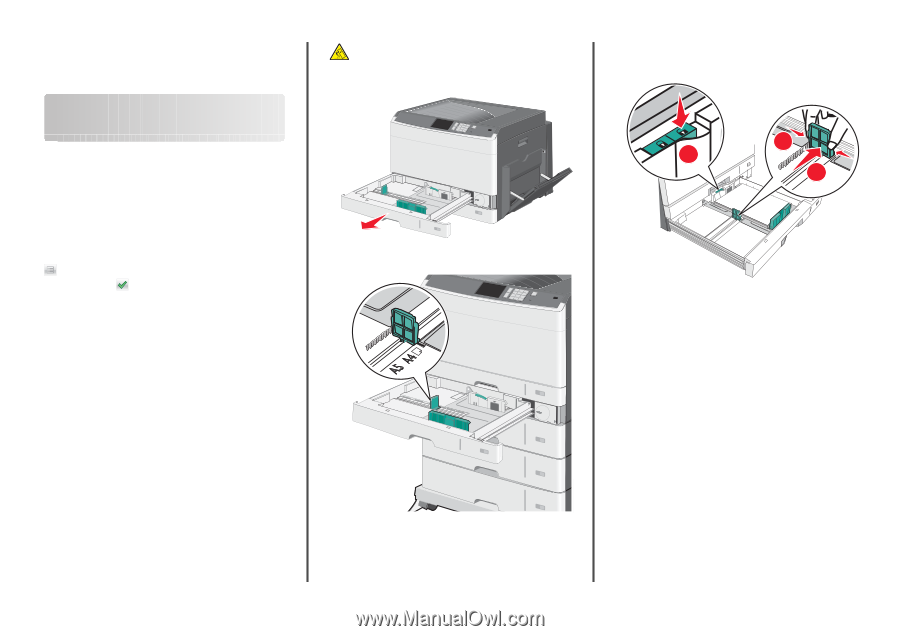
2
Make sure to unlock the width guide lock at the rear of the tray.
Squeeze the width guide tabs as shown, and then slide the guide
to the correct position for the paper size being loaded.
2
3
1
Note:
Always use the paper width guide lock at the rear of the
tray to prevent the margins from being knocked out of
adjustment.
1