Lexmark C925 Quick Reference - Page 6
paper jam, paper jam, 239 paper jams
 |
View all Lexmark C925 manuals
Add to My Manuals
Save this manual to your list of manuals |
Page 6 highlights
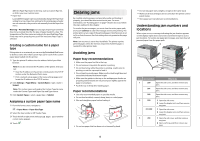
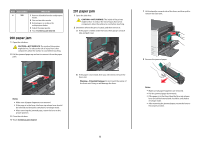
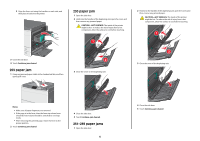
3 Align the fuser unit using the handles on each side, and then place it back into the printer. 230 paper jam 1 Open the side door. 2 Hold onto the handles of the duplexing unit, open the cover, and then remove any jammed paper. CAUTION-HOT SURFACE: The inside of the printer might be hot. To reduce the risk of injury from a hot component, allow the surface to cool before touching. 1 3 Close the side door. 4 Touch Continue, jam cleared. 203 paper jam 1 Grasp any jammed paper visible in the standard exit bin, and then gently pull it out. 2 3 Close the cover on the duplexing unit. 2 Hold onto the handles of the duplexing unit, open the cover, and then remove any jammed paper. CAUTION-HOT SURFACE: The inside of the printer might be hot. To reduce the risk of injury from a hot component, allow the surface to cool before touching. 1 2 3 Close the cover of the duplexing unit. Notes: • Make sure all paper fragments are removed. • If the page is in the fuser, then the fuser nip release lever should be lowered and should be switched to envelope mode. • After removing the jammed page, return the lever to the proper position. 2 Touch Continue, jam cleared. 4 Close the side door. 5 Touch Continue, jam cleared. 231-239 paper jams 1 Open the side door. 6 4 Close the side door. 5 Touch Continue, jam cleared.
-
 1
1 -
 2
2 -
 3
3 -
 4
4 -
 5
5 -
 6
6 -
 7
7 -
 8
8 -
 9
9
 |
 |
