Lexmark C925 Quick Reference - Page 2
Loading the multipurpose feeder
 |
View all Lexmark C925 manuals
Add to My Manuals
Save this manual to your list of manuals |
Page 2 highlights
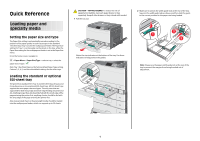
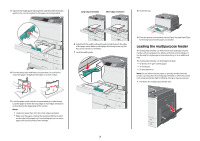
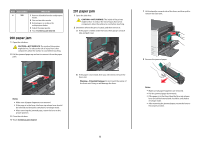
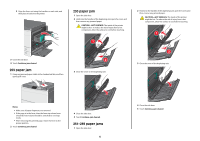
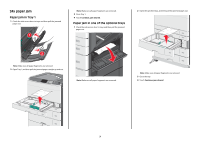
3 Squeeze the length guide tabs together, and then slide the length guide to the correct position for the paper size being loaded. Long-edge orientation Short-edge orientation 8 Insert the tray. 4 Flex the sheets back and forth to loosen them. Do not fold or crease the paper. Straighten the edges on a level surface. 6 Adjust both the width and length guides to lightly touch the edge of the paper stack. Make sure the paper fits loosely in the tray, lies flat, and is not bent or wrinkled. 7 Lock the width guide. 9 From the printer control panel, set the Paper Size and Paper Type for the tray based on the paper you loaded. Loading the multipurpose feeder The multipurpose feeder can hold several sizes and types of print media, such as transparencies, labels, card stock, and envelopes. It can be used for single-page or manual printing, or as an additional tray. The multipurpose feeder can hold approximately: • 50 sheets of 75-g/m2 (20-lb) paper • 10 envelopes • 20 transparencies Note: Do not add or remove paper or specialty media when the printer is printing from the multipurpose feeder or when the printer control panel indicator light is blinking. Doing so may cause a jam. 1 Pull down the multipurpose feeder door. 5 Load the paper stack with the recommended print side faceup. Load the paper in either the long-edge or short-edge orientation as described at the beginning of this section. Notes: • Load sizes larger than A4 in the short-edge orientation. • Make sure the paper is below the maximum fill line located on the edge of the paper tray. Overloading the tray can cause paper jams and possible printer damage. 2
-
 1
1 -
 2
2 -
 3
3 -
 4
4 -
 5
5 -
 6
6 -
 7
7 -
 8
8 -
9
 |
 |
