Lexmark E260dn Quick Reference
Lexmark E260dn Manual
 |
View all Lexmark E260dn manuals
Add to My Manuals
Save this manual to your list of manuals |
Lexmark E260dn manual content summary:
- Lexmark E260dn | Quick Reference - Page 1
trays. The factory default paper type setting is plain paper, so the paper type setting must be set manually for all trays that do not contain plain paper. Access the Paper menu through the Embedded Web Server if your printer is networked: 1 Type the printer IP address in the address field of your - Lexmark E260dn | Quick Reference - Page 2
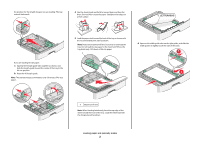
recommended print side facedown. Note: Notice the maximum fill line. Do not try to overload the tray. Do not load A6-size paper to the maximum fill line; the tray holds only 150 sheets of A6-size paper. 6 Squeeze the width guide tabs on the right guide, and slide the width guides to lightly touch - Lexmark E260dn | Quick Reference - Page 3
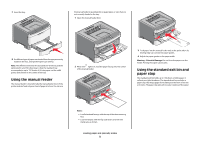
printer and can feed only one sheet of paper at a time. You can use 2 When the light is lit, load the paper faceup into the center of the manual feeder. 3 Feed paper into the manual feeder only to the point where its leading edge can contact the paper guides. 4 Adjust the paper guides to the paper - Lexmark E260dn | Quick Reference - Page 4
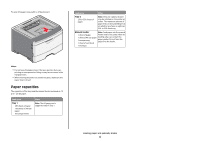
250 or 550 sheets of paper Note: Only one optional drawer may be installed on the printer at a time. The maximum amount of paper that can be loaded depends on whether you have an optional 250- or 550-sheet tray. Manual feeder Note: Feed paper into the manual 1 sheet of paper feeder only to the - Lexmark E260dn | Quick Reference - Page 5
1 Push the button to open the front door. Inside this door is the unit housing the toner cartridge and photoconductor kit. 2 Standard exit bin 3 Front door 4 Manual feeder door 5 Standard 250-sheet tray (Tray 1) 6 Optional tray (Tray 2) 7 Rear door Understanding jam lights and access - Lexmark E260dn | Quick Reference - Page 6
- On - On - On Open the front door, and then open the rear door. 231.yy Paper jam - On - Blinking - On Open the front door, and then open the rear door. 233.yy Paper jam - On - Blinking - Blinking - On Try one of the following: • Remove Tray 1, and then depress the lever. • Open the front door, and - Lexmark E260dn | Quick Reference - Page 7
touching. 3 Remove the jammed paper. 251.yy Paper jam - On - On - On - On Remove the jam from the manual feeder. 2 Lift and pull the unit containing the photoconductor kit and the toner cartridge out of the printer. Set the unit aside on a flat, clean surface. Note: If the paper is not easy to - Lexmark E260dn | Quick Reference - Page 8
2 Remove the jammed paper. 4 Insert the tray. Clearing jams from Tray 1 To see whether paper is jammed in or behind Tray 1, the standard tray: 1 Remove Tray 1. 3 If necessary, depress the lever to free the paper and remove the jam. 5 Press to continue printing. Clearing jams in the manual feeder - Lexmark E260dn | Quick Reference - Page 9
kit and toner cartridge unit. For more information, see "Clearing jams behind the photoconductor kit and toner cartridge" on page 7. Clearing jams behind the rear door If the paper is exiting the printer, pull the paper out. If the paper is not exiting the printer: 1 Push the release button
-
 1
1 -
 2
2 -
 3
3 -
 4
4 -
 5
5 -
 6
6 -
 7
7 -
8
-
9
 |
 |
Quick Reference
Loading paper and
specialty media
This section explains how to load the 250- and 550-sheet trays, and
the manual feeder. It also includes information about setting the
Paper Size and Paper Type.
Setting the paper size and
paper type
Make sure the settings for the trays reflect the size and type of
paper loaded in the trays. The factory default paper type setting
is plain paper, so the paper type setting must be set manually for
all trays that do not contain plain paper. Access the Paper menu
through the Embedded Web Server if your printer is networked:
1
Type the printer IP address in the address field of your Web
browser.
Note:
If you do not know the IP address of the printer, then
print a network setup page and locate the IP address in the
TCP/IP section.
2
Click
Settings
.
3
From the Paper menu, find the Size and Type for each input
source.
4
Select the paper size and paper type used most frequently from
each input source.
5
Click
Submit
.
If the printer is connected to a computer by a USB or parallel cable,
use one of the following utilities to access the Paper menu,
depending on your operating system:
•
On a Windows computer, access the Paper menu through the
Local Printer Settings Utility.
•
On a Macintosh computer, access the Paper menu through the
Printer Settings.
Note:
The Paper Size and Type settings will be saved until you reset
factory default settings. If you would like to override the Paper Size
and Type settings for a special print job, do one of the following:
•
For Windows users, click
File
Print
, and then click
Properties
,
Preferences
,
Options
, or
Setup
.
•
For Macintosh users, choose
File
>
Print
, and then adjust the
settings from the print dialog and pop-up menus.
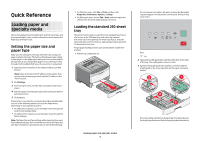
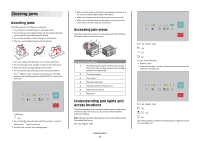
Loading the standard 250-sheet
tray
The printer has two trays to select from: the standard tray (Tray 1),
also known as the 250-sheet tray, and either the optional
250-sheet tray or the optional 550-sheet tray (Tray 2). Only one
optional drawer (which includes an optional tray) may be attached
to the printer at one time.
Proper paper loading prevents jams and facilitates trouble-free
printing.
1
Pull the tray completely out.
Do not remove trays while a job prints or when the Busy light
sequence appears on the printer control panel. Doing so may
cause a jam.
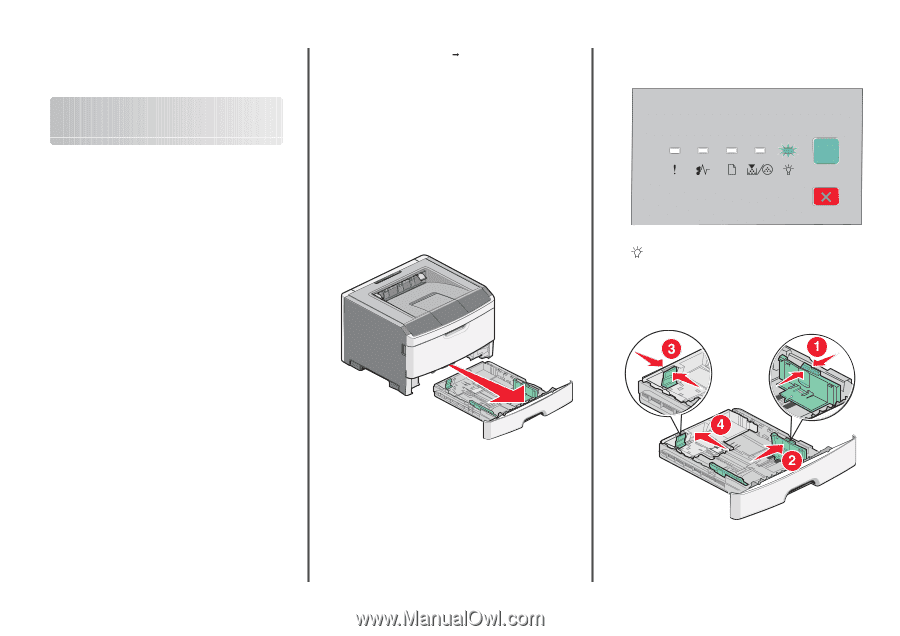
Busy
- On
2
Squeeze the width guide tabs, and then slide them to the sides
of the tray. The width guides move in unison.
3
Squeeze the length guide tabs together, and then slide the
length guide to the correct position for the paper size being
loaded.
If you are loading a longer size of paper like A4 or legal, squeeze
the length guide tabs and slide the length guide backwards to
Loading paper and specialty media
1