Lexmark E260dn Quick Reference - Page 8
Clearing jams from Tray 1, Clearing jams in the manual feeder, Remove Tray 1.
 |
View all Lexmark E260dn manuals
Add to My Manuals
Save this manual to your list of manuals |
Page 8 highlights
To remove the jam, gently pull the sheet straight out of the standard exit bin. 2 Remove the jammed paper. 4 Insert the tray. Clearing jams from Tray 1 To see whether paper is jammed in or behind Tray 1, the standard tray: 1 Remove Tray 1. 3 If necessary, depress the lever to free the paper and remove the jam. 5 Press to continue printing. Clearing jams in the manual feeder Clearing jams 8
-
 1
1 -
2
-
 3
3 -
 4
4 -
 5
5 -
 6
6 -
 7
7 -
 8
8 -
 9
9
 |
 |

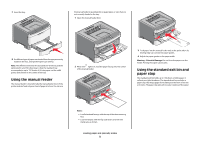
To remove the jam, gently pull the sheet straight out of the
standard exit bin.
Clearing jams from Tray 1
To see whether paper is jammed in or behind Tray 1, the standard
tray:
1
Remove Tray 1.
2
Remove the jammed paper.
3
If necessary, depress the lever to free the paper and remove
the jam.
4
Insert the tray.
5
Press
to continue printing.
Clearing jams in the manual
feeder
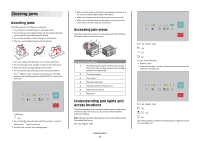
Clearing jams
8