Lexmark MX722 Users Guide PDF - Page 19
Using Shortcut Center, Using Display Customization, Setting up Scan Center
 |
View all Lexmark MX722 manuals
Add to My Manuals
Save this manual to your list of manuals |
Page 19 highlights
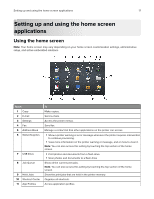
Setting up and using the home screen applications 19 Using Shortcut Center 1 From the home screen, touch Shortcut Center, and then select a printer function. 2 Touch Create Shortcut, and then configure the settings. 3 Touch Save, and then type a unique shortcut name. 4 Apply the changes. Using Display Customization Before using the application, make sure to do the following: • From the Embedded Web Server, click Apps > Display Customization > Configure. • Enable and configure the screen saver, slideshow, and wallpaper settings. Managing screen saver and slide show images 1 From the Screen Saver and Slideshow Images section, add, edit, or delete an image. Notes: • You can add up to 10 images. • When enabled, the status icons appear on the screen saver only when there are errors, warnings, or cloud‑based notifications. 2 Apply the changes. Changing the wallpaper image 1 From the home screen, touch Change Wallpaper. 2 Select an image to use. 3 Apply the changes. Running a slide show from a flash drive 1 Insert a flash drive into the USB port. 2 From the home screen, touch Slideshow. Images appear in alphabetical order. Note: You can remove the flash drive after the slide show starts, but the images are not stored in the printer. If the slide show stops, then insert the flash drive again to view the images. Setting up Scan Center 1 From the home screen, touch Scan Center. 2 Select and create a destination, and then configure the settings.
-
 1
1 -
2
-
3
-
4
-
5
-
6
-
7
-
8
-
9
-
10
-
11
-
12
-
13
-
 14
14 -
 15
15 -
 16
16 -
 17
17 -
 18
18 -
 19
19 -
 20
20 -
 21
21 -
 22
22 -
 23
23 -
 24
24 -
25
-
26
-
27
-
28
-
29
-
30
-
31
-
32
-
33
-
34
-
35
-
36
-
37
-
38
-
39
-
40
-
41
-
42
-
43
-
44
-
45
-
46
-
47
-
48
-
49
-
50
-
51
-
52
-
53
-
54
-
55
-
56
-
57
-
58
-
59
-
60
-
61
-
62
-
63
-
64
-
65
-
66
-
67
-
68
-
69
-
70
-
71
-
72
-
73
-
74
-
75
-
76
-
77
-
78
-
79
-
80
-
81
-
82
-
83
-
84
-
85
-
86
-
87
-
88
-
89
-
90
-
91
-
92
-
93
-
94
-
95
-
96
-
97
-
98
-
99
-
100
-
101
-
102
-
103
-
104
-
105
-
106
-
107
-
108
-
109
-
110
-
111
-
112
-
113
-
114
-
115
-
116
-
117
-
118
-
119
-
120
-
121
-
122
-
123
-
124
-
125
-
126
-
127
-
128
-
129
-
130
-
131
-
132
-
133
-
134
-
135
-
136
-
137
-
138
-
139
-
140
-
141
-
142
-
143
-
144
-
145
-
146
-
147
-
148
-
149
-
150
-
151
-
152
-
153
-
154
-
155
-
156
-
157
-
158
-
159
-
160
-
161
-
162
-
163
-
164
-
165
-
166
-
167
-
168
-
169
-
170
-
171
-
172
-
173
-
174
-
175
-
176
-
177
-
178
-
179
-
180
-
181
-
182
-
183
-
184
-
185
-
186
-
187
-
188
-
189
-
190
-
191
-
192
-
193
-
194
-
195
-
196
-
197
-
198
-
199
-
200
-
201
-
202
-
203
-
204
-
205
-
206
-
207
-
208
-
209
-
210
-
211
-
212
-
213
-
214
-
215
-
216
-
217
-
218
-
219
-
220
-
221
-
222
-
223
-
224
-
225
-
226
-
227
-
228
-
229
-
230
-
231
-
232
-
233
-
234
-
235
-
236
-
237
-
238
-
239
-
240
-
241
-
242
-
243
-
244
-
245
-
246
-
247
-
248
-
249
-
250
-
251
-
252
-
253
-
254
-
255
-
256
-
257
-
258
-
259
-
260
-
261
-
262
-
263
-
264
-
265
-
266
-
267
-
268
-
269
-
270
-
271
-
272
-
273
-
274
-
275
-
276
-
277
-
278
-
279
 |
 |
