Lexmark T652DTN Clearing Jams Guide - Page 2
and 203 paper jams, paper jam - tray
 |
UPC - 734646317368
View all Lexmark T652DTN manuals
Add to My Manuals
Save this manual to your list of manuals |
Page 2 highlights
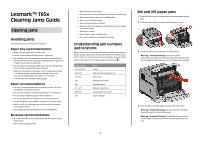
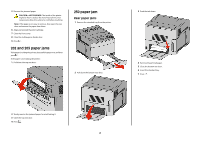
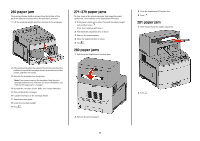
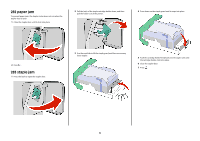
5 Remove the jammed paper. CAUTION-HOT SURFACE: The inside of the printer might be hot. To reduce the risk of injury from a hot component, allow the surface to cool before touching. Note: If the paper is not easy to remove, then open the rear door and remove the paper from there. 6 Align and reinstall the print cartridge. 7 Close the front cover. 8 Close the multipurpose feeder door. 9 Press . 202 and 203 paper jams If the paper is exiting the printer, then pull the paper out, and then press . If the paper is not exiting the printer: 1 Pull down the top rear door. 230 paper jam Rear paper jams 1 Remove the standard tray from the printer. 2 Pull down the bottom rear door. 3 Push the tab down. 4 Remove the jammed paper. 5 Close the bottom rear door. 6 Insert the standard tray. 7 Press . 2 Slowly remove the jammed paper to avoid tearing it. 3 Close the top rear door. 4 Press . 2
-
 1
1 -
 2
2 -
 3
3 -
 4
4 -
 5
5 -
 6
6
 |
 |
