Lexmark X658 User's Guide - Page 136
Printing information s, Printing a directory list, Printing the print quality test s - hard drive
 |
View all Lexmark X658 manuals
Add to My Manuals
Save this manual to your list of manuals |
Page 136 highlights
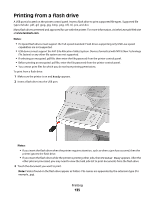
4 Touch the arrows if you want to increase the number of printed copies. 5 Touch Print. Note: Do not remove the flash drive from the USB port until the document has finished printing. If you leave the flash drive in the printer after leaving the initial USB menu screen, then you can still print .pdf files from the flash drive as held jobs. Printing information pages Printing a directory list A directory list shows the resources stored in flash memory or on the printer hard disk. 1 Make sure the printer is on and Ready appears. 2 On the home screen, touch . 3 Touch Reports. 4 Touch the down arrow until Print Directory appears. 5 Touch Print Directory. Printing the print quality test pages Print the print quality test pages to isolate print quality problems. 1 Turn the printer off. 2 Hold down and while turning the printer on. 3 Release the buttons when the screen with the progress bar appears. The printer performs a power-on sequence, and then the Configuration menu appears. 4 Touch the down arrow until Print Quality Pages appears. 5 Touch Print Quality Pages. The print quality test pages print. 6 Touch Back. 7 Touch Exit Configuration. Canceling a print job Canceling a print job from the printer control panel 1 Touch Cancel Jobs on the touch screen, or press on the keypad. 2 Touch the job you want to cancel. 3 Touch Delete Selected Jobs. Printing 136
-
 1
1 -
2
-
3
-
4
-
5
-
6
-
7
-
8
-
9
-
10
-
11
-
12
-
13
-
14
-
15
-
16
-
17
-
18
-
19
-
20
-
21
-
22
-
23
-
24
-
25
-
26
-
27
-
28
-
29
-
30
-
31
-
32
-
33
-
34
-
35
-
36
-
37
-
38
-
39
-
40
-
41
-
42
-
43
-
44
-
45
-
46
-
47
-
48
-
49
-
50
-
51
-
52
-
53
-
54
-
55
-
56
-
57
-
58
-
59
-
60
-
61
-
62
-
63
-
64
-
65
-
66
-
67
-
68
-
69
-
70
-
71
-
72
-
73
-
74
-
75
-
76
-
77
-
78
-
79
-
80
-
81
-
82
-
83
-
84
-
85
-
86
-
87
-
88
-
89
-
90
-
91
-
92
-
93
-
94
-
95
-
96
-
97
-
98
-
99
-
100
-
101
-
102
-
103
-
104
-
105
-
106
-
107
-
108
-
109
-
110
-
111
-
112
-
113
-
114
-
115
-
116
-
117
-
118
-
119
-
120
-
121
-
122
-
123
-
124
-
125
-
126
-
127
-
128
-
129
-
130
-
 131
131 -
 132
132 -
 133
133 -
 134
134 -
 135
135 -
 136
136 -
 137
137 -
 138
138 -
 139
139 -
 140
140 -
 141
141 -
142
-
143
-
144
-
145
-
146
-
147
-
148
-
149
-
150
-
151
-
152
-
153
-
154
-
155
-
156
-
157
-
158
-
159
-
160
-
161
-
162
-
163
-
164
-
165
-
166
-
167
-
168
-
169
-
170
-
171
-
172
-
173
-
174
-
175
-
176
-
177
-
178
-
179
-
180
-
181
-
182
-
183
-
184
-
185
-
186
-
187
-
188
-
189
-
190
-
191
-
192
-
193
-
194
-
195
-
196
-
197
-
198
-
199
-
200
-
201
-
202
-
203
-
204
-
205
-
206
-
207
-
208
-
209
-
210
-
211
-
212
-
213
-
214
-
215
-
216
-
217
-
218
-
219
-
220
-
221
-
222
-
223
-
224
-
225
-
226
-
227
-
228
-
229
-
230
-
231
-
232
-
233
-
234
-
235
-
236
-
237
-
238
-
239
-
240
-
241
-
242
-
243
-
244
-
245
-
246
-
247
-
248
-
249
-
250
-
251
-
252
-
253
-
254
-
255
-
256
-
257
-
258
-
259
-
260
-
261
-
262
-
263
-
264
-
265
-
266
-
267
-
268
-
269
-
270
-
271
-
272
-
273
-
274
-
275
-
276
-
277
-
278
-
279
-
280
-
281
-
282
-
283
-
284
-
285
-
286
-
287
-
288
-
289
-
290
-
291
-
292
-
293
-
294
-
295
-
296
-
297
-
298
-
299
-
300
-
301
-
302
-
303
-
304
-
305
-
306
-
307
-
308
-
309
-
310
-
311
-
312
-
313
-
314
-
315
 |
 |
