Lexmark X864 Quick Reference - Page 2
Faxing, Scanning to an FTP, address, Scanning to a computer or, flash drive - windows 7 driver
 |
View all Lexmark X864 manuals
Add to My Manuals
Save this manual to your list of manuals |
Page 2 highlights
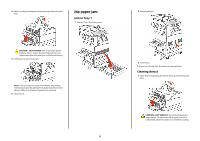
Faxing Sending a fax using the printer control panel 1 Load an original document faceup, short edge first into the ADF or facedown on the scanner glass. Note: Do not load postcards, photos, small items, transparencies, photo paper, or thin media (such as magazine clippings) into the ADF. Place these items on the scanner glass. 2 If you are loading a document into the ADF, then adjust the paper guides. 3 On the home screen, touch Fax. 4 Enter the fax number or a shortcut using the touch screen or keypad. To add recipients, touch Next Number, and then enter the recipient's telephone number or shortcut number, or search the address book. Note: To place a dial pause within a fax number, press . The dial pause appears as a comma in the "Fax to" box. Use this feature if you need to dial an outside line first. 5 Touch Fax It. Sending a fax using the computer Faxing from a computer lets you send electronic documents without leaving your desk. This gives you the flexibility of faxing documents directly from software programs. Note: In order to perform this function from your computer, you must use the PostScript printer driver for your printer. 1 From your software program, click File ª Print. 2 From the Print window, select your printer, and then click Properties. 3 Choose the Other Options tab, and then click Fax. 4 Click OK, and then click OK again. 5 On the Fax screen, type the name and number of the fax recipient. 6 Click Send. Scanning to an FTP address Scanning to an FTP address using the keypad 1 Load an original document faceup, short edge first into the ADF or facedown on the scanner glass. Note: Do not load postcards, photos, small items, transparencies, photo paper, or thin media (such as magazine clippings) into the ADF. Place these items on the scanner glass. 2 If you are loading a document into the ADF, then adjust the paper guides. 3 On the home screen, touch FTP. 4 Type the FTP address. 5 Touch Send It. Scanning to an FTP address using a shortcut number 1 Load an original document faceup, short edge first into the ADF or facedown on the scanner glass. Note: Do not load postcards, photos, small items, transparencies, photo paper, or thin media (such as magazine clippings) into the ADF. Place these items on the scanner glass. 2 If you are loading a document into the ADF, then adjust the paper guides. 3 Press #, and then enter the FTP shortcut number. 4 Touch Send It. 2 Scanning to an FTP address using the address book 1 Load an original document faceup, short edge first into the ADF or facedown on the scanner glass. Note: Do not load postcards, photos, small items, transparencies, photo paper, or thin media (such as magazine clippings) into the ADF. Place these items on the scanner glass. 2 If you are loading a document into the ADF, adjust the paper guides. 3 On the home screen, touch FTP. 4 Touch Search Address Book. 5 Type the name or part of the name you are searching for, and then touch Search. 6 Touch the name that you want to add to the To: field. 7 Touch Send It. Scanning to a computer or flash drive Scanning to a computer 1 Type the printer IP address into the address field of your Web browser. Note: If you do not know the IP address of the printer, then print a network setup page and locate the IP address in the TCP/IP section. 2 Click Scan Profile. 3 Click Create Scan Profile. Note: Your computer must have java program installed to be able to create a scan profile. 4 Select your scan settings, and then click Next. 5 Select a location on your computer where you want to save the scanned output file. 6 Enter a scan name. The scan name is the name that appears in the Scan Profile list on the display.
-
 1
1 -
 2
2 -
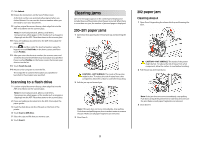 3
3 -
 4
4 -
 5
5 -
 6
6 -
 7
7 -
 8
8 -
9
-
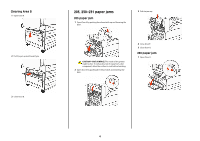
10
-
11
-
12
 |
 |
