LiftMaster SL585UL Installation Manual - Page 11
Step 1 Install the Operator, Pad mount installation
 |
View all LiftMaster SL585UL manuals
Add to My Manuals
Save this manual to your list of manuals |
Page 11 highlights
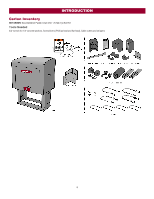
INSTALLATION Step 1 Install the Operator Check the national and local building codes before installation. Pad mount installation Retro-fit installation The operator is shipped from the factory with the lower mounting angles configured out (Figure 1). If you have pad constrictions, either angle can be unbolted and reversed to angle in. NOTE: If you are replacing an SL580 and wish to use the same pad mounting hardware, the gate side mounting angle must be installed angle in. New Installation 1. Lay out concrete pad. 2. Install the electrical conduit. 3. Pour a concrete pad (reinforced concrete is recommended). 4. Secure operator to the concrete pad using four 1/2" concrete anchors (not provided). 11
-
 1
1 -
2
-
3
-
4
-
5
-
 6
6 -
 7
7 -
 8
8 -
 9
9 -
 10
10 -
 11
11 -
 12
12 -
 13
13 -
 14
14 -
 15
15 -
 16
16 -
17
-
18
-
19
-
20
-
21
-
22
-
23
-
24
-
25
-
26
-
27
-
28
-
29
-
30
-
31
-
32
-
33
-
34
-
35
-
36
-
37
-
38
-
39
-
40
-
41
-
42
-
43
-
44
-
45
-
46
-
47
-
48
 |
 |

11
Step 1 Install the Operator
Check the national and local building codes before installation.
Pad mount installation
Retro-fit installation
The operator is shipped from the factory with the lower mounting angles
configured out (Figure 1). If you have pad constrictions, either angle can
be unbolted and reversed to angle in.
NOTE:
If you are replacing an
SL580 and wish to use the same pad mounting hardware, the gate side
mounting angle must be installed angle in.
New Installation
1.
Lay out concrete pad.
2.
Install the electrical conduit.
3.
Pour a concrete pad (reinforced concrete is recommended).
4.
Secure operator to the concrete pad using four 1/2" concrete anchors
(not provided).
INSTALLATION