Linksys SPA-841 Cisco SPA9000 Voice System Administration Guide - Page 101
PBX Status, Share Ext, shared, Shared User ID, IP Address, Ext 1, Share Line Appearance
 |
View all Linksys SPA-841 manuals
Add to My Manuals
Save this manual to your list of manuals |
Page 101 highlights
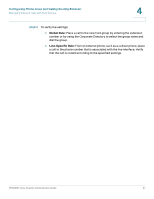
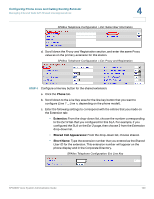
Configuring Phone Lines and Calling Routing Behavior Managing Inbound Calls with Shared Line Appearances 4 STEP 1 Start Internet Explorer, and then enter the IP address of the SPA9000. Click Admin Login and then click Advanced. STEP 2 Choose the client station that you want to configure: a. Click the PBX Status link near the top right corner or lower left corner of the page to view the list of client stations. b. Click the hyperlink in the IP Address column for the first phone that you want to configure. The telephone configuration page appears in a separate browser window. STEP 3 Configure the shared extension on the selected station: a. Click the tab for the extension that you want to configure (Ext 1 ... Ext n, depending on the phone model). NOTE As a general practice, Cisco recommends that you always reserve Extension 1 on the client station as the primary and private extension of the designated user. b. Scroll down to the Share Line Appearance section, and then enter the following settings: - Share Ext: Choose shared. - Shared User ID: Enter a user ID number for this SLA. After the line key is configured, this ID will appear on the phone display and in the Corporate Directory. SPA9xx Telephone Configuration > Ext: Shared Line Appearance c. Scroll down to the Subscriber Information section, and then enter a User ID and Display Name for this shared extension. SPA9000 Voice System Administration Guide 99
-
 1
1 -
2
-
3
-
4
-
5
-
6
-
7
-
8
-
9
-
10
-
11
-
12
-
13
-
14
-
15
-
16
-
17
-
18
-
19
-
20
-
21
-
22
-
23
-
24
-
25
-
26
-
27
-
28
-
29
-
30
-
31
-
32
-
33
-
34
-
35
-
36
-
37
-
38
-
39
-
40
-
41
-
42
-
43
-
44
-
45
-
46
-
47
-
48
-
49
-
50
-
51
-
52
-
53
-
54
-
55
-
56
-
57
-
58
-
59
-
60
-
61
-
62
-
63
-
64
-
65
-
66
-
67
-
68
-
69
-
70
-
71
-
72
-
73
-
74
-
75
-
76
-
77
-
78
-
79
-
80
-
81
-
82
-
83
-
84
-
85
-
86
-
87
-
88
-
89
-
90
-
91
-
92
-
93
-
94
-
95
-
 96
96 -
 97
97 -
 98
98 -
 99
99 -
 100
100 -
 101
101 -
 102
102 -
 103
103 -
 104
104 -
 105
105 -
 106
106 -
107
-
108
-
109
-
110
-
111
-
112
-
113
-
114
-
115
-
116
-
117
-
118
-
119
-
120
-
121
-
122
-
123
-
124
-
125
-
126
-
127
-
128
-
129
-
130
-
131
-
132
-
133
-
134
-
135
-
136
-
137
-
138
-
139
-
140
-
141
-
142
-
143
-
144
-
145
-
146
-
147
-
148
-
149
-
150
-
151
-
152
-
153
-
154
-
155
-
156
-
157
-
158
-
159
-
160
-
161
-
162
-
163
-
164
-
165
-
166
-
167
-
168
-
169
-
170
-
171
-
172
-
173
-
174
-
175
-
176
-
177
-
178
-
179
-
180
-
181
-
182
-
183
-
184
-
185
-
186
-
187
-
188
-
189
-
190
-
191
-
192
-
193
-
194
-
195
-
196
-
197
-
198
-
199
-
200
-
201
-
202
-
203
-
204
-
205
-
206
-
207
-
208
-
209
-
210
-
211
-
212
-
213
-
214
-
215
-
216
-
217
-
218
-
219
-
220
-
221
-
222
-
223
-
224
-
225
-
226
-
227
-
228
-
229
-
230
-
231
-
232
-
233
-
234
-
235
-
236
-
237
-
238
-
239
-
240
-
241
-
242
-
243
-
244
-
245
-
246
-
247
-
248
-
249
-
250
-
251
-
252
-
253
-
254
-
255
-
256
-
257
-
258
-
259
-
260
-
261
-
262
-
263
-
264
-
265
-
266
-
267
-
268
-
269
-
270
-
271
-
272
-
273
-
274
-
275
-
276
-
277
-
278
-
279
-
280
-
281
-
282
-
283
-
284
-
285
-
286
 |
 |
