Linksys SPA-841 Cisco SPA9000 Voice System Administration Guide - Page 37
Setting the Group Address, PBX Status, Submit All Changes, Group, Voice tab > SIP
 |
View all Linksys SPA-841 manuals
Add to My Manuals
Save this manual to your list of manuals |
Page 37 highlights
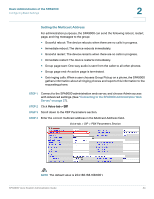
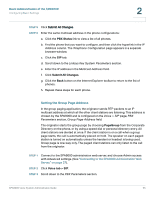
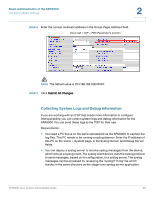
Basic Administration of the SPA9000 Configuring Basic Settings 2 STEP 5 Click Submit All Changes. STEP 6 Enter the same multicast address in the phone configurations: a. Click the PBX Status link to view a list of all phones. b. Find the phone that you want to configure, and then click the hyperlink in the IP Address column. The Telephone Configuration page appears in a separate browser window. c. Click the SIP tab. d. Scroll down to the Linksys Key System Parameters section. e. Enter the IP address in the Multicast Address field. f. Click Submit All Changes. g. Click the Back button on the Internet Explorer toolbar to return to the list of phones. h. Repeat these steps for each phone. Setting the Group Page Address In the group paging application, the originator sends RTP packets to an IP multicast address at which all the other client stations are listening. This address is chosen by the SPA9000 and is configured on the Voice > SIP page, PBX Parameters section, Group Page Address field. The originator starts the group page by choosing PageGroup from the Corporate Directory on the phone, or by using a speed dial or personal directory entry. All client stations are alerted at once. If the client station is on a call when a group page starts, the call is automatically placed on hold. The speaker on each paged station is turned on automatically unless the handset or headset is being used. Group page is one-way only. The paged client stations can only listen to the call from the originator. STEP 1 Connect to the SPA9000 administration web server, and choose Admin access with Advanced settings. (See "Connecting to the SPA9000 Administration Web Server," on page 27). STEP 2 Click Voice tab > SIP. STEP 3 Scroll down to the PBX Parameters section. SPA9000 Voice System Administration Guide 35
-
 1
1 -
2
-
3
-
4
-
5
-
6
-
7
-
8
-
9
-
10
-
11
-
12
-
13
-
14
-
15
-
16
-
17
-
18
-
19
-
20
-
21
-
22
-
23
-
24
-
25
-
26
-
27
-
28
-
29
-
30
-
31
-
 32
32 -
 33
33 -
 34
34 -
 35
35 -
 36
36 -
 37
37 -
 38
38 -
 39
39 -
 40
40 -
 41
41 -
 42
42 -
43
-
44
-
45
-
46
-
47
-
48
-
49
-
50
-
51
-
52
-
53
-
54
-
55
-
56
-
57
-
58
-
59
-
60
-
61
-
62
-
63
-
64
-
65
-
66
-
67
-
68
-
69
-
70
-
71
-
72
-
73
-
74
-
75
-
76
-
77
-
78
-
79
-
80
-
81
-
82
-
83
-
84
-
85
-
86
-
87
-
88
-
89
-
90
-
91
-
92
-
93
-
94
-
95
-
96
-
97
-
98
-
99
-
100
-
101
-
102
-
103
-
104
-
105
-
106
-
107
-
108
-
109
-
110
-
111
-
112
-
113
-
114
-
115
-
116
-
117
-
118
-
119
-
120
-
121
-
122
-
123
-
124
-
125
-
126
-
127
-
128
-
129
-
130
-
131
-
132
-
133
-
134
-
135
-
136
-
137
-
138
-
139
-
140
-
141
-
142
-
143
-
144
-
145
-
146
-
147
-
148
-
149
-
150
-
151
-
152
-
153
-
154
-
155
-
156
-
157
-
158
-
159
-
160
-
161
-
162
-
163
-
164
-
165
-
166
-
167
-
168
-
169
-
170
-
171
-
172
-
173
-
174
-
175
-
176
-
177
-
178
-
179
-
180
-
181
-
182
-
183
-
184
-
185
-
186
-
187
-
188
-
189
-
190
-
191
-
192
-
193
-
194
-
195
-
196
-
197
-
198
-
199
-
200
-
201
-
202
-
203
-
204
-
205
-
206
-
207
-
208
-
209
-
210
-
211
-
212
-
213
-
214
-
215
-
216
-
217
-
218
-
219
-
220
-
221
-
222
-
223
-
224
-
225
-
226
-
227
-
228
-
229
-
230
-
231
-
232
-
233
-
234
-
235
-
236
-
237
-
238
-
239
-
240
-
241
-
242
-
243
-
244
-
245
-
246
-
247
-
248
-
249
-
250
-
251
-
252
-
253
-
254
-
255
-
256
-
257
-
258
-
259
-
260
-
261
-
262
-
263
-
264
-
265
-
266
-
267
-
268
-
269
-
270
-
271
-
272
-
273
-
274
-
275
-
276
-
277
-
278
-
279
-
280
-
281
-
282
-
283
-
284
-
285
-
286
 |
 |