Magellan MapSend NW Alaska/Aleutians Quick Reference Guide - Page 5
Saved Regions List, Drawing and Cutting Rectangular Regions, Regions, Cut Region, Naming, Marking - map
 |
UPC - 763357113624
View all Magellan MapSend NW Alaska/Aleutians manuals
Add to My Manuals
Save this manual to your list of manuals |
Page 5 highlights
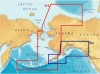
Saved Regions List: - The Saved Regions List is the window where you view the attributes of regions to be uploaded to the GPS receiver. - Regions contained in the Saved Regions List are displayed in the Map Window as rectangles with translucent colored borders. Drawing and Cutting Rectangular Regions: - To draw a region and put it in the Saved Regions List, select the Regions menu, New or click on the toolbar. - The mouse pointer changes to - Within the Map Window, click and hold the left mouse button, then drag a rectangle around the area you wish to define as a region. - If the region is not to your satisfaction, press to undo. - While you are drawing a region, its estimated size is displayed in the status bar at the bottom of the screen. The region's estimated size may differ from the final one and that can be critical when uploading regions to your GPS receiver. - After drawing the rectangular region you need to Cut that region. To do so, you can select from the Regions menu Cut Region or click on the toolbar. - In the Naming dialog box, type a name of the drawn region and choose OK. Now the new region's name will appear in the Saved Regions List. Marking Regions: - Before uploading regions to a GPS receiver, you have to mark them in the Saved Regions List. - To mark a region, click the corresponding check-box next to the region's name. - Marked regions are displayed in the Map Window as translucently colored filled rectangles.
-
 1
1 -
 2
2 -
 3
3 -
 4
4 -
 5
5 -
 6
6 -
 7
7 -
 8
8
 |
 |
