Magnavox MRD20037B99 User manual, English (US) - Page 13
Hookups - Speakers
 |
View all Magnavox MRD20037B99 manuals
Add to My Manuals
Save this manual to your list of manuals |
Page 13 highlights
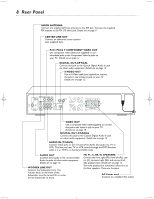
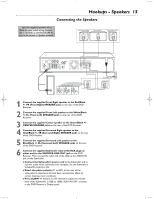
Hookups - Speakers 13 Connecting the Speakers Use the supplied speaker wires. Match the color coded wiring. Connect the +,- terminals on the Receiver (FR, FL, etc.) to the correct +,- Speaker terminals. Front Speaker (Right) Center Speaker Front Speaker (Left) + - + - + - COMPONENT VIDEO OUT PWCr PWCw Y AM FM (7Ω) AM/FM ANTENNA CENTER AUDIO OUT AUDIO IN LINE OUT L S-VIDEO VIDEO OUT OUT DIGITAL OUT WOOFER LINE OUT R TV AUX OPTICAL COAXIAL FR FL C SR SL + + SPEAKER (4Ω) +- (SUBWOOFER) Connecting Speaker Cable (1.024m7m" ) PUSH IN PUSH DOWN a b c 1 Connect the supplied Front Right speaker to the Red/Black +/- FR (Front Right) SPEAKER jacks on the rear of the DVD Receiver. 2 Connect the supplied Front Left speaker to the White/Black +/- FL (Front Left) SPEAKER jacks on the rear of the DVD Receiver. 3 Connect the supplied Center speaker to the Green/Black +/CENTER SPEAKER jacks on the rear of the DVD Receiver. 4 Connect the supplied Surround Right speaker to the Gray/Black +/- SR (Surround Right) SPEAKER jacks on the rear of the DVD Receiver. 5 Connect the supplied Surround Left speaker to the Blue/Black +/- SL (Surround Left) SPEAKER jacks on the rear of the DVD Receiver. 6 Connect the supplied Subwoofer cable (with RCA plugs on either end) to the WOOFER LINE OUT jack on the DVD Receiver. Then connect the other end of the cable to the AUDIO IN jack on the Subwoofer. G Connect the Subwoofer's power cord to the Subwoofer and to a power outlet when connections are complete. Set the Subwoofer's Volume/On control to On. G Select the phase polarity (0° or180°) at the rear of the subwoofer to determine the best bass reproduction effect for certain listening room conditions. G Press SUBW +/- buttons on the remote to adjust the volume level of the Subwoofer (-15dB to 10dB). SUB +XX DB" is shown in the DVD Receiver's Display panel. AC POWER CORD + -
-
 1
1 -
2
-
3
-
4
-
5
-
6
-
7
-
 8
8 -
 9
9 -
 10
10 -
 11
11 -
 12
12 -
 13
13 -
 14
14 -
 15
15 -
 16
16 -
 17
17 -
 18
18 -
19
-
20
-
21
-
22
-
23
-
24
-
25
-
26
-
27
-
28
-
29
-
30
-
31
-
32
-
33
-
34
-
35
-
36
-
37
-
38
-
39
-
40
-
41
-
42
-
43
-
44
 |
 |
