Marantz AV7701 AV7701 - User Guide - Page 151
Setting the back light, Specifying the zone used with the main remote control unit
 |
View all Marantz AV7701 manuals
Add to My Manuals
Save this manual to your list of manuals |
Page 151 highlights
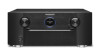
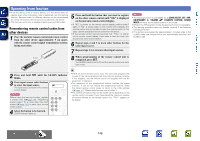
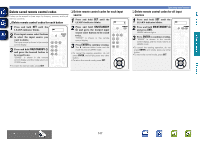
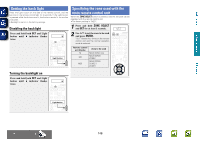
Basic version Advanced version Setting the back light Press the Light button on the side of the remote control, and the buttons on the remote control light for 2 seconds. If the Light button is pressed while the buttons are lit, the buttons remain lit for another 2 seconds. • Backlight is set on in the factory settings. Disabling the backlight Press and hold both SET and Light button until indicator flashes twice. Specifying the zone used with the main remote control unit When the ZONE SELECT button is pressed, only the set zone can be operated with the remote control unit. • The factory setting is "M23". 1 Press and hold ZONE SELECT and SET for at least 3 seconds. 2 Use ui to set the zone to be used and press ENTER. "SET" flashes four times on the remote control unit and the normal operation mode is restored. Light button Remote control unit display M M2 M23 Zone to be used MAIN ZONE only MAIN ZONE / ZONE2 MAIN ZONE / ZONE2 / ZONE3 Turning the backlight on Press and hold both SET and Light button until indicator flashes twice. Light button Information DVD 148
-
 1
1 -
2
-
3
-
4
-
5
-
6
-
7
-
8
-
9
-
10
-
11
-
12
-
13
-
14
-
15
-
16
-
17
-
18
-
19
-
20
-
21
-
22
-
23
-
24
-
25
-
26
-
27
-
28
-
29
-
30
-
31
-
32
-
33
-
34
-
35
-
36
-
37
-
38
-
39
-
40
-
41
-
42
-
43
-
44
-
45
-
46
-
47
-
48
-
49
-
50
-
51
-
52
-
53
-
54
-
55
-
56
-
57
-
58
-
59
-
60
-
61
-
62
-
63
-
64
-
65
-
66
-
67
-
68
-
69
-
70
-
71
-
72
-
73
-
74
-
75
-
76
-
77
-
78
-
79
-
80
-
81
-
82
-
83
-
84
-
85
-
86
-
87
-
88
-
89
-
90
-
91
-
92
-
93
-
94
-
95
-
96
-
97
-
98
-
99
-
100
-
101
-
102
-
103
-
104
-
105
-
106
-
107
-
108
-
109
-
110
-
111
-
112
-
113
-
114
-
115
-
116
-
117
-
118
-
119
-
120
-
121
-
122
-
123
-
124
-
125
-
126
-
127
-
128
-
129
-
130
-
131
-
132
-
133
-
134
-
135
-
136
-
137
-
138
-
139
-
140
-
141
-
142
-
143
-
144
-
145
-
 146
146 -
 147
147 -
 148
148 -
 149
149 -
 150
150 -
 151
151 -
 152
152 -
 153
153 -
 154
154 -
 155
155 -
 156
156 -
157
-
158
-
159
-
160
-
161
-
162
-
163
-
164
-
165
-
166
-
167
-
168
-
169
-
170
-
171
-
172
-
173
-
174
-
175
-
176
-
177
-
178
-
179
-
180
-
181
-
182
-
183
-
184
-
185
-
186
 |
 |