Marantz RC2000MKII User Guide - Page 4
Liquid Crystal Display Lcd, Window - remote
 |
View all Marantz RC2000MKII manuals
Add to My Manuals
Save this manual to your list of manuals |
Page 4 highlights
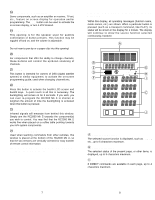
!8 OSD (On Screen Display) Some components, such as an amplifier or receiver, TV set, etc., feature on screen display for operation and/or programming. The OSD button can be used to activate the on screen display, or turn it off if desired. !9 SPEAKER This opening is for the speaker used for audible confirmation of button presses. This function may be toggled off and on, and the volume is adjustable. Note: Do not insert a pen tip or a paper clip into this opening! @0 CHANNEL For components that offer the ability to change channels, these buttons will control the up/down scanning of channels. @1 GUIDE This button is intended for owners of DSS (digital satellite system) or similar equipment, to activate the on-screen programming guide, used when changing channels etc. @2 LIGHTING Press this button to activate the backlit LCD screen and backlit keys. A quick touch is all that is necessary. The backlighting will remain on for 2 seconds. If you wish, you can even re-program the RC2000 Mk w to shorten or lengthen the amount of time the backlighting is activated when this button is pressed. @3 Transmitter window Infrared signals will emanate from behind this window. Simply aim the RC2000 Mk w towards the component(s) you wish to control. You may find that the RC2000 Mk w works fine when placed on a coffee table pointing towards your A/V system components. @4 Receiving window Used when learning commands from other remotes, this window is placed at the bottom of the RC2000 Mk w, so that the two remotes are vertically oriented for easy transfer of remote control information. All of the above buttons can be programmed with the exception of 1, 2, 3, 6, 8, and 22. LIQUID CRYSTAL DISPLAY (LCD) WINDOW Within this display, all operating messages (function name, mode names, etc.) are shown. When a particular button is pressed (such as a transport command, like PLAY), its status will be shown in the display for 1 minute. The display will continue to show the source function selected continuously, however. A B E G D LOW LEARN USE NAME H F I C 1234 J A Function indication The selected source function is displayed, such as LD, TV, etc., up to 6 characters maximum. B Status indication The selected status of the present page, or other items, is displayed, up to 9 characters maximum. C Direct commands 8 DIRECT commands are available in each page, up to 4 characters maximum. 7 8
-
 1
1 -
 2
2 -
 3
3 -
 4
4 -
 5
5 -
 6
6 -
 7
7 -
 8
8 -
 9
9 -
 10
10 -
11
-
12
-
13
-
14
-
15
-
16
-
17
-
18
-
19
-
20
-
21
-
22
-
23
-
24
 |
 |
