Marantz RC2000MKII User Guide - Page 9
How to re-write the STATUS name, How to re-write the DIRECT function button, names
 |
View all Marantz RC2000MKII manuals
Add to My Manuals
Save this manual to your list of manuals |
Page 9 highlights
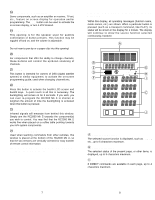
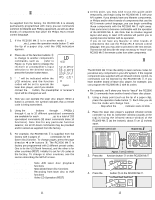
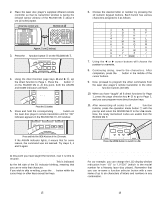
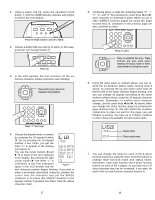
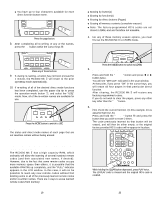
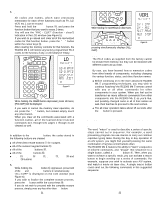
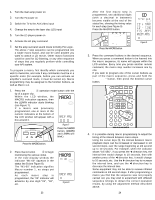
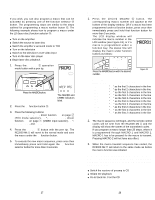
1. Using a paper clip tip, press the operation mode button q until the NAME indicator appears and begins to blink in the LCD window. POWER SOURCE ON ON/OFF OFF CLONE MACRO MODE MACRO LEARNING REMOTE CONTROL RC2000MK MACRO Press the MODE button to switch to NAME. 2. Choose a button that you wish to re-name, in this case, press the "LD" function button o DSS MD TV LD DVD VCR TUNER CD TAPE AUX AMP Press LD. 3. In the LCD window, the first character of the six function character display indicators starts blinking. Press either key to move the OK character entry position. 123 456 OK 789 OSD GUIDE MUTE M0C Press "4" four times. 4. Choose the desired letter or number by pressing the 10 keypad buttons !2. So, by pressing the 10 keypad number 4 four times, you get the LOW NAME letter "L" to appear in the display (see Figure 4). You use the cursor buttons ̇ and ̈ !6 to move to the next character in the display. By pressing the right cursor button ̈, the letter "L" is 1234 confirmed in the first character space in the LCD window and the Figure 4 next character position begins blinking. If you wish to erase a previously memorized character, position the cursor over the character and put the SPACE character in its place (the SPACE character is ten keypad number 0 pressed four times, from the above character chart). 17 5. Continuing along, re-write the remaining letters "V", "-", "5", "2", and "0". By pressing the cursor keys ̇ and ̈, each character is confirmed in place. When you go to other DIRECT function pages by using the page function keys i, characters in the previous page are also confirmed in place. 123 456 OK 789 OSD GUIDE MUTE M0C Press i twice. Press to establish the entry. These buttons are also used when OK entering the status name or direct mode name by moving the cursor. How to re-write the STATUS name: 6. Using the same steps as outlined above, you can rewrite the 9-character status name. During step 5 above, by pressing the up and down cursor keys !6 the left side of the status indicator begins blinking, and you can change its display according to the same method outlined above, using the 10 keypad character generator. Remember, to confirm each character change, use the cursor keys ̇ and ̈. As above, when you change the direct function page by pressing the page direction keys i, this will confirm the re-written characters in place as well for the page you just finished re-naming. You have up to 9 letters, numbers or other characters available for each status name. Status name LOW Direct mode name How to re-write the DIRECT function button names: 7. You can change the name for each of the 8 direct function buttons by using the steps described above to change main function name and status name. Remember, each main function has 8 direct function buttons on each of the 4 pages, so you have up to 32 direct functions that can be re-named, if you wish, for each of the 10 main function selection buttons o. 18
-
 1
1 -
2
-
3
-
 4
4 -
 5
5 -
 6
6 -
 7
7 -
 8
8 -
 9
9 -
 10
10 -
 11
11 -
 12
12 -
 13
13 -
 14
14 -
15
-
16
-
17
-
18
-
19
-
20
-
21
-
22
-
23
-
24
 |
 |
