Maytag MEDE900VJ Installation Instructions - Page 16
Dryer Results
 |
UPC - 883049144764
View all Maytag MEDE900VJ manuals
Add to My Manuals
Save this manual to your list of manuals |
Page 16 highlights
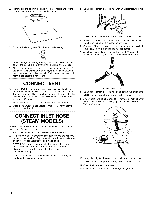
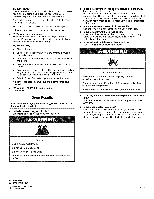
Try the following: Check to see if a household fuse has blown or circuit breaker has tripped. Electric dryers use two household fuses or breakers. Replace the fuse or reset the circuit breaker. Confirm the power cord is properly installed. Refer to "Electrical Connection" for details. Select a Timed Dry heated cycle, and restart the dryer. If the message persists, consult a qualified electrician. "AF" (low airflow condition): The dryer will continue to run when this diagnostic code is present. Press any key to clear the code from the display and return to the estimated time remaining. Try the following: • Clean lint screen. • Check to see if the vent run from the dryer to the wall is crushed or kinked. • Confirm the vent run from the dryer to the wall is free of lint and debris. • Confirm the exterior vent exhaust hood is free of lint and debris. • Confirm your vent system falls within the recommended run length and number of elbows for the type of vent you are using. Refer to "Plan Vent System" for details. • Select a Timed Dry heated cycle, and restart the dryer. If the message persists, have your entire home venting run cleaned. "E" Variable (El, E2, E3) service codes: Call for service. Dryer Results Clothes are not drying satisfactorily, drying times are too long, or load is too hot • Is the lint screen clogged with lint?. Lint screen should be cleaned beforeeach load. Is the exhaust vent or outside exhaust hood clogged with lint, restricting air movement? Run the dryer for 5-10 minutes. Hold your hand under the outside exhaust hood to check air movement. If you do not feel air movement, clean exhaust system of lint or replace exhaust vent with heavy metal or flexible metal vent. See the Installation Instructions. Are fabric softener sheets blocking the grille? Use only one fabric softener sheet, and use it only once. Is the exhaust vent the correct length? Check that the exhaust vent is not too long or has too many turns. Long venting will increase drying times. See the Installation Instructions. Is the exhaust vent diameter the correct size? Use 4" (102 mm) diameter vent material. Explosion Hazard Keep flammable materials and vapors, such as gasoline, away from dryer. Place dryer at least 18 inches (460 ram) above the floor for a garage installation. Failure to do so can result in death, explosion, or fire. • Is the dryer located in a room with temperature below 45°F (7°C)? Proper operation of dryer cycles requires temperatures above 45°F (7°C). • Is the dryer located in a closet?. Closet doors must have ventilation openings at the top and bottom of the door. The front of the dryer requires a minimum of 1" (25 mm) of airspace, and, for most installations, the rear of the dryer requires 5" (127 mm). See the Installation Instructions. Fire Hazard Use a heavy metal vent. Do not use a plastic vent. Do not use a metal foil vent. Failure to follow these instructions can result in death or fire. W10255468C W10259190B - SP © 2009 Whirlpool Corporation. All rights reserved. 4/09 Printed in U.S.A.
-
 1
1 -
2
-
3
-
4
-
5
-
6
-
7
-
8
-
9
-
10
-
 11
11 -
 12
12 -
 13
13 -
 14
14 -
 15
15 -
 16
16
 |
 |