Maytag MZF34X16DW Owners Manual - Page 7
Operating Your Freezer
 |
View all Maytag MZF34X16DW manuals
Add to My Manuals
Save this manual to your list of manuals |
Page 7 highlights
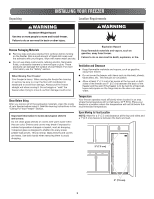
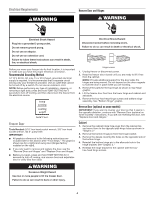
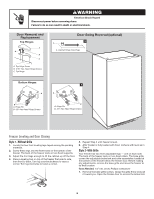
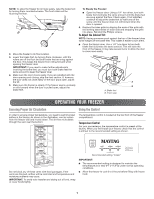
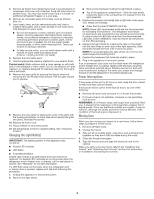
NOTE: To allow the freezer to roll more easily, raise the brake feet by turning them counterclockwise. The front rollers will be touching the floor. 2. Move the freezer to its final location. 3. Lower the brake feet, by turning them clockwise, until the rollers are off the floor and both brake feet are snug against the floor. This keeps the freezer from rolling forward when opening the freezer door. IMPORTANT: If you need to make further adjustments involving the brake feet, you must turn both brake feet the same amount to keep the freezer level. 4. Make sure the door closes easily. If you are satisfied with the door opening and closing, skip the next section. If, however, the door does not close easily or the door pops open, adjust the tilt. 5. Make sure the freezer is steady. If the freezer seems unsteady or rolls forward when the door is pulled open, adjust the brake feet. To Steady the Freezer: ■■ Open the freezer door. Using a 1/4" hex driver, turn both brake feet clockwise the same amount until the brake feet are snug against the floor. Check again. If not satisfied, continue to adjust the brake feet by half turns of the screw until the freezer does not roll forward when the door is opened. 6. Replace the base grille by aligning the ends of the grille with the leveling assemblies on each side and snapping the grille into place. Reinstall the Phillips screws. To Adjust the Cabinet Tilt: NOTE: Having someone push against the top of the freezer takes some weight off the brake feet. This makes it easier to turn them. ■■ Open the freezer door. Use a 1/4" hex driver to turn both brake feet clockwise the same amount. This will raise the front of the freezer. It may take several turns to allow the door to close more easily. 1/4" A B A. Brake foot B. Front roller OPERATING YOUR FREEZER Ensuring Proper Air Circulation Using the Control In order to ensure proper temperature, you need to permit proper airflow in the freezer. As shown in the illustration, cool air enters from the freezer wall and moves down. The air then recirculates through the vent near the bottom. The temperature control is located at the top front of the freezer compartment. Temperature Control For your convenience, the temperature control is preset at the factory. When you first install your freezer, check that the control is still set to the recommended setting as shown. Recommended setting "Colder" Do not block any of these vents with food packages. If the vents are blocked, airflow will be restricted and temperature and moisture problems may occur. IMPORTANT: To avoid odor transfer and drying out of food, wrap or cover foods tightly. IMPORTANT: ■■ The recommended setting is designed to maintain the temperature at or near 0°F (-17.8°C) under normal operating conditions. ■■ Allow the freezer to cool 6 to 8 hours before filling with frozen food. 7
-
 1
1 -
 2
2 -
 3
3 -
 4
4 -
 5
5 -
 6
6 -
 7
7 -
 8
8 -
 9
9 -
 10
10 -
 11
11 -
 12
12 -
13
-
14
-
15
-
16
-
17
-
18
-
19
-
20
-
21
-
22
-
23
-
24
-
25
-
26
-
27
-
28
 |
 |
