NEC NP-UM330X NP04WK1 Installation Manual - Page 10
Installing the Projector
 |
View all NEC NP-UM330X manuals
Add to My Manuals
Save this manual to your list of manuals |
Page 10 highlights
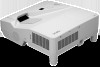
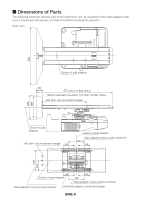
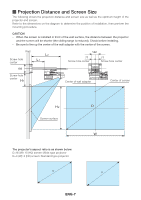
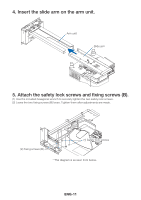
Installing the Projector Before installing 1. Consider the place where the screen is to be installed and determine the position in which the wall mount unit is to be mounted. (See page ENG-7) - It is not possible to install in such a way that the image is projected at an angle. Position in such a way that the image is projected directly to the front. 2. Check that the position of installation meets the conditions in "Be sure to read before installing" on page ENG-2 of these instructions. - Because the elevation angle of the projector's optical axis is large, small shifts in the projection distance will change the size and position of the projected image significantly. Also, if the direction in which the projector is facing is off, the distortion of the image increases. Preparations: 1. Prepare a Phillips screwdriver (magnetic) and the included hexagonal wrench. 2. Remove the projector's cable cover. For instructions, see the respective operating instructions. 1. Remove the slide arm. The wall adapter and slide arm are assembled upon shipment. (1) Remove the two fixing screws (B) and the two safety lock screws. - Use the included hexagonal wrench for the safety lock screws. (2) Pull off the slide arm. (2) Slide arm Safety lock screws (1) Fixing screws (B) ENG-9
-
 1
1 -
2
-
3
-
4
-
 5
5 -
 6
6 -
 7
7 -
 8
8 -
 9
9 -
 10
10 -
 11
11 -
 12
12 -
 13
13 -
 14
14 -
 15
15 -
16
-
17
-
18
-
19
-
20
-
21
 |
 |