NEC NP-UM330X NP04WK1 Installation Manual - Page 15
Adjusting for Distortion of the Projected Image
 |
View all NEC NP-UM330X manuals
Add to My Manuals
Save this manual to your list of manuals |
Page 15 highlights
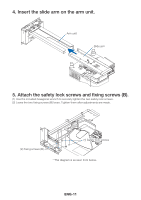
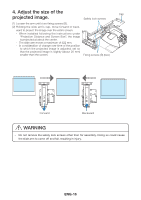
Adjusting for Distortion of the Projected Image M Before Adjusting Preparing the projector - Project an image from the projector, then first move the projector's focus ring to roughly adjust the focus of the projected image. For instructions on projecting images, see "Projecting Images (Basic Operation)" of the user's manual (CD-ROM) supplied with the projector. - At "Installation" or "Settings" on the on-screen menu, select "Ceiling/Front" for the projection method. - For projectors with a test pattern function, adjustment is easier by projecting the test pattern. The descriptive diagrams only indicate changes in the projected image for one adjustment at a time. In real circumstances, distortion is compound. 1. Adjust the projector's orientation in the horizontal direction. Turn the horizontal tilt adjustment knob and adjust so that the top and bottom edges of the pro- jected image are parallel. - The adjustment range is ±5°. Horizontal tilt adjust- ment knob ENG-14
-
 1
1 -
2
-
3
-
4
-
5
-
6
-
7
-
8
-
9
-
 10
10 -
 11
11 -
 12
12 -
 13
13 -
 14
14 -
 15
15 -
 16
16 -
 17
17 -
 18
18 -
 19
19 -
 20
20 -
21
 |
 |