Netgear WNR1000-2VCNAS WNR1000v2 Setup Manual - Page 10
Installing Your Wireless Router, Smart Wizard Setup
 |
View all Netgear WNR1000-2VCNAS manuals
Add to My Manuals
Save this manual to your list of manuals |
Page 10 highlights
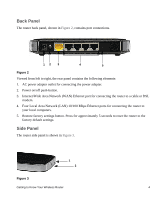
• Near the center of the area where your computers and other devices will operate, preferably within line of sight to your wireless devices. • Accessible to an AC power outlet and near Ethernet cables for wired computers. • In an elevated location such as a high shelf, keeping the number of walls and ceilings between the wireless router and your other devices to a minimum. • Away from electrical devices which are potential sources of interference, such as ceiling fans, home security systems, microwaves, or the base for a cordless phone. • Away from any large metal surfaces, such as a solid metal door or aluminum studs. Large expanses of other materials such as glass, insulated walls, fish tanks, mirrors, brick, and concrete can also affect your wireless signal. Failure to follow these guidelines can result in significant performance degradation or an inability to wirelessly connect to the Internet. Installing Your Wireless Router To help you set up your router and get on the Internet quickly, the Resource CD contains a Smart Wizard™ Installation Assistant. The Installation Assistant walks you through the steps required to connect your router, modem, and PC(s); configure your wireless settings; and enable wireless security for your network. When you have finished, you will be Internet ready! NETGEAR does not recommend or support adding a NETGEAR router behind another router, or replacing a gateway with a NETGEAR router. If you have a Macintosh or Linux system, you need to use the manual installation method (see "Manually Installing Your Router" on page 11). You can set up your wireless router using one of two methods: • Smart Wizard Setup: The Smart Wizard Installation Assistant setup is available on your Resource CD. See "Installing Your Router Using the Smart Wizard" on page 8 to use the Smart Wizard Installation Assistant. - This is the easiest option. The wizard guides you through the setup process. It automates many of the steps and verifies that the steps have been successfully completed. Getting to Know Your Wireless Router 6
-
 1
1 -
2
-
3
-
4
-
 5
5 -
 6
6 -
 7
7 -
 8
8 -
 9
9 -
 10
10 -
 11
11 -
 12
12 -
 13
13 -
 14
14 -
 15
15 -
16
-
17
-
18
-
19
-
20
-
21
-
22
-
23
-
24
-
25
-
26
-
27
-
28
-
29
-
30
-
31
-
32
-
33
-
34
-
35
-
36
-
37
-
38
-
39
-
40
-
41
-
42
-
43
-
44
 |
 |