Netgear WNR1000v3 WNR1000v3 Setup Manual - Page 28
Setting Your SSID and, Wireless Security - wireless not working
 |
View all Netgear WNR1000v3 manuals
Add to My Manuals
Save this manual to your list of manuals |
Page 28 highlights
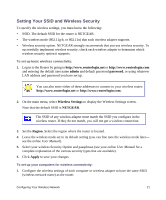
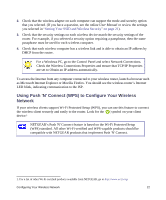
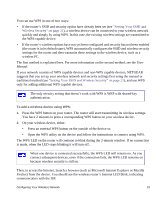
You can use WPS in one of two ways: • If the router's SSID and security option have already been set (see "Setting Your SSID and Wireless Security" on page 21), a wireless device can be connected to your wireless network quickly and simply by using WPS. In this case, the existing wireless settings are transmitted to the WPS-capable device. • If the router's wireless options have not yet been configured and security has not been enabled (the router is in its default state), WPS automatically configures the SSID and wireless security settings for the router and then transmits these settings to the wireless device, such as a wireless PC. The first method is explained here. For more information on the second method, see the User Manual. If your network consists of WPS capable devices and non-WPS capable devices, NETGEAR suggests that you set up your wireless network and security settings first using the manual or traditional method (see "Setting Your SSID and Wireless Security" on page 21), and use WPS only for adding additional WPS capable devices. The only security setting that doesn't work with WPS is WEP with shared-key authentication. To add a wireless device using WPS: 1. Press the WPS button on your router. The router will start transmitting its wireless settings. You have 2 minutes to press a corresponding WPS button on your wireless device. 2. On your wireless device, either: • Press an external WPS button on the outside of the device or, • Open the WPS utility on the device and follow the instructions to connect using WPS. The WPS LED on the router will continue to blink during the 2-minute window. If no connection is made, when the LED stops blinking it will turn off.. When one device is connected successfully, the WPS LED will remain on. As you connect subsequent devices, even if the connection fails, the WPS LED remains on because wireless security is still on. Then, to access the Internet, launch a browser (such as Microsoft Internet Explorer or Mozilla Firefox) from the device. You should see the wireless router's Internet LED blink, indicating communication with the ISP. Configuring Your Wireless Network 23
-
 1
1 -
2
-
3
-
4
-
5
-
6
-
7
-
8
-
9
-
10
-
11
-
12
-
13
-
14
-
15
-
16
-
17
-
18
-
19
-
20
-
21
-
22
-
 23
23 -
 24
24 -
 25
25 -
 26
26 -
 27
27 -
 28
28 -
 29
29 -
 30
30 -
 31
31 -
 32
32 -
 33
33 -
34
-
35
-
36
-
37
-
38
-
39
-
40
-
41
-
42
 |
 |