Netgear WNR1000v3 WNR1000v3 Setup Manual - Page 8
Back Panel, Side Panel - how to reset
 |
View all Netgear WNR1000v3 manuals
Add to My Manuals
Save this manual to your list of manuals |
Page 8 highlights
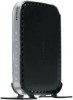
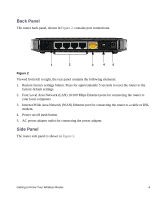
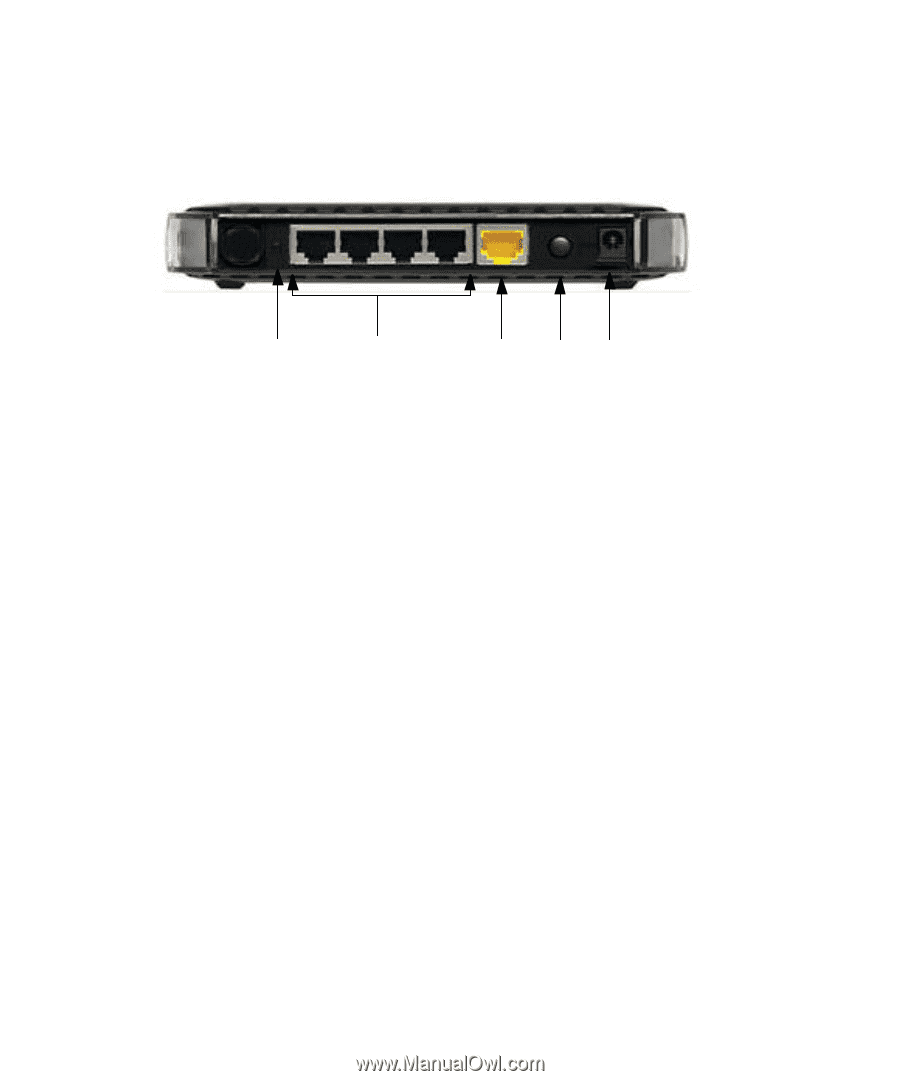
Back Panel The router back panel, shown in Figure 2, contains port connections. 1 2 3 4 5 Figure 2 Viewed from left to right, the rear panel contains the following elements: 1. Restore factory settings button. Press for approximately 5 seconds to reset the router to the factory default settings. 2. Four Local Area Network (LAN) 10/100 Mbps Ethernet ports for connecting the router to your local computers 3. Internet/Wide Area Network (WAN) Ethernet port for connecting the router to a cable or DSL modem. 4. Power on/off push-button. 5. AC power adapter outlet for connecting the power adapter. Side Panel The router side panel is shown in Figure 3. Getting to Know Your Wireless Router 4
-
 1
1 -
2
-
 3
3 -
 4
4 -
 5
5 -
 6
6 -
 7
7 -
 8
8 -
 9
9 -
 10
10 -
 11
11 -
 12
12 -
 13
13 -
14
-
15
-
16
-
17
-
18
-
19
-
20
-
21
-
22
-
23
-
24
-
25
-
26
-
27
-
28
-
29
-
30
-
31
-
32
-
33
-
34
-
35
-
36
-
37
-
38
-
39
-
40
-
41
-
42
 |
 |
Getting to Know Your Wireless Router
4
Back Panel
The router back panel, shown in
Figure 2
, contains port connections.
Viewed from left to right, the rear panel contains the following elements:
1.
Restore factory settings button. Press for approximately 5 seconds to reset the router to the
factory default settings.
2.
Four Local Area Network (LAN) 10/100 Mbps Ethernet ports for connecting the router to
your local computers
3.
Internet/Wide Area Network (WAN) Ethernet port for connecting the router to a cable or DSL
modem.
4.
Power on/off push-button.
5.
AC power adapter outlet for connecting the power adapter.
Side Panel
The router side panel is shown in
Figure 3
.
Figure 2
1
4
3
2
5