Nikon 110i Instruction Manual
Nikon 110i - Nuvis APS Camera Manual
 |
UPC - 018208121090
View all Nikon 110i manuals
Add to My Manuals
Save this manual to your list of manuals |
Nikon 110i manual content summary:
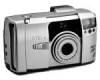
- Nikon 110i | Instruction Manual - Page 1
Nikon Nuvisll0 i Instruction Manual (Pages 2-39) Manual de instrucciones (Paginas 40-77) - Nikon 110i | Instruction Manual - Page 2
Foreword Thank you for purchasing theNikon Nuvis 11 Oi camera. Besure to read th is instruction manual thoroughly before use, and keep it close at hand unti l you are fam iliar with the newsystem outlined below. Your new Nikon cameraemploys theAdvanced Photo System (IX240 System) and features: • - Nikon 110i | Instruction Manual - Page 3
the camera, immediately stop operation and turn OFF the camera. Let the camera cool before taking it to your local Nikon dealer. Built-in flash Do not fire the flash close , call adoctor immediately. Nikon cannot be held responsible for malfunctions caused by using the Nuvis 11 Oi in ways not specified - Nikon 110i | Instruction Manual - Page 4
33 Loading the film... .. ... 16 Slow sync flash mode 34 Basic operation 19 Remote control photography (optional 34 Holding the camera properly .. ..19 For safehandling of the camera 36 Shutter release operation 20 Camera care tips .... ... 36 Selecting aprint type - Nikon 110i | Instruction Manual - Page 5
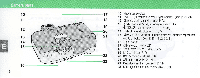
Camera parts 1 2 3 4 5 1 Remote control reception sensor (1& P. 35) 2 Flash (1& P. 31) 6 3 Viewfinder window 7 4 Shutter release button (1& P. 20) 8 5 Red-eye reduction/self-timer indicator lamp (1& p. 28, 29, 30, 35) 6 Auto exposure metering window 7 Power switch/Lens - Nikon 110i | Instruction Manual - Page 6
parts 10 11 12 15 16 6 17 10 Viewfinder eyepiece 11 Red LED (In-focus/flash ready-light indicator) (lIE P 20, 23) 18 12 Diopter adjustment switch (lIE P 23) 13 '1 /.... Flash mode/infinity focus/language select button (MO DE/SEL button)(1IE P 10-13, 30-34) 14 Mid-roll rewind button (lIE P 27 - Nikon 110i | Instruction Manual - Page 7
LCD panel indications 1 Recordi~g data (1& P 11 , 15) 2 Title recording indicator (1& P. 12, 13, 15) 3 Data recording indicator (1& P 11) 4 Flash mode indicator (1& P 31) 5 Red-eye reduction indicator (1& P 28) 6 Infinity focus indicator (1& P 30) 7 Frame counter (1& P 18, 26) 8 Low battery power - Nikon 110i | Instruction Manual - Page 8
------ Attaching the strap Getting ready to take pictures 8 Attach the strap by inserting it through the strap slot and fasten as shown. 1 Open the battery chamber lid. If necessary, insert aco in in the groove and twist gently 2 Install one 3V lithium battery (CR123A or DL 123A type) as - Nikon 110i | Instruction Manual - Page 9
Power switch/Lens cover in the direction of the arrow until it click stops -The lens automatically extends out to the W(wideangle) position . 2 Turn the camera OFF by sliding the Power switch/Lens cover in the reverse direction until i.t click stops -I f ClIII blinks in the LCD panel, rep lace the - Nikon 110i | Instruction Manual - Page 10
Setting date and time Set year, month and day fi rst, then set hour and minute. . 1 Turn the camera OFF. W1-, 1-, W1-, 2 Press the MODE/SEL button once. The "year" starts blinking IISEL ~. \ 1.. i'''J lI.i.,)! 3 DATE ·-· sMaOD ST Press the ADJUST button to set the - Nikon 110i | Instruction Manual - Page 11
Data recording function Data is recorded on the film. When ordering pri nts, ask your photo lab if they can handle frontprinting and backprinting 1 Turn the cameraOFF. 2 Press the MODE/SEL button to select one of three displays. Each pressing of thebutton changes the display in the order indicated. - Nikon 110i | Instruction Manual - Page 12
Nuvis 11 Oi offers title imprinting in 12 languages. You can change the language and title for each frame. Notethat replacing a film cartridge or battery, turning - Nikon 110i | Instruction Manual - Page 13
5 Press the MODE/SEL button. The right digit of thetitle number starts bl inking. :E' - !If : ~ t; I J ~I AU TO ~ I - 6 Press the ADJUSTbuttontoset the right digit. - Each pressing of thebuttonchanges the r display inthe order indicated. 0--+ 1--+ 2--+ 3--+ ... --+ 9J 7 Take apictureafter - Nikon 110i | Instruction Manual - Page 14
1To set a language: Repeat procedu res 1 to3 as instructed in the previous section "To set atitle". 2 Press theMODE/SEL button for more than 2 seconds. The lang uage number starts blinking ~~d 1.-~~ -&I .. jC _ - '_' I ,- -. I~:/~ 2e oGl~0 DATE •• - Nikon 110i | Instruction Manual - Page 15
Title recording function Title is recorded on the film. When ordering pri nts, ask your photo lab if they can handle backprinting. 1 Turn the camera ON. 2 Press the SEL button and confirm that I , title and language numbers appear in the LCD panel -Go ahead and take pictures at this point - Nikon 110i | Instruction Manual - Page 16
Use only afresh IX240 fi lmcartridge with th is camera. - Do not use conventi onal 3Smm film. - There is no film leader. Film is automatical ly thrust and loaded inside thecamera. .1 D : Processed film inside the - Nikon 110i | Instruction Manual - Page 17
filmcartridge to aphoto lab displaying the "Authorized Photo Lab Mark" sign for processing and printing. Authorized Photo labs offer the following services: 1 3 dillerent print types (C, Hor P-type). 2 Date/time and titleprinting 3 Index Prints (small images of each frame exposed on the roll of - Nikon 110i | Instruction Manual - Page 18
Loading the film Turn the camera OFF and makesure no D appears in the LCDpanel and sl ide thelock releaseto thecamera ON. When D and the number of available frames appear in theLCD panel, the camera is ready for use, - Film speed is automatically set when the cartridge is loaded. - Nikon 110i | Instruction Manual - Page 19
movi ng one foot forward a half step • Keep you r elbows inagainst the body while holding the camera with both hands as shown. Important! • When holding the camera vertical ly, make sure that theflash is on top as shown. • Do not block the lens, flash or autofocus windows with your fingers. Correct - Nikon 110i | Instruction Manual - Page 20
is locked. 2 Fully depress theshutter release button. - Depressing the shutter release button with a jerky motion may cause camera shake. To prevent this, press down smoothly and gently. Important! Keep the camera at least O.83m (27 tt) away from the subject, or the shutter wi ll lock. If the - Nikon 110i | Instruction Manual - Page 21
Selecting a print type You can select anyone of th ree print types (C, Hor P-type) at any time while film is loaded. C-type: H-type: Vertical VS. horizontal Vertical VS. horizontal = 2 • 3 (aspect ratio) = 9 • 16 (aspect ratio) P-type: Vertical VS. horizontal = 1 • 3 (aspect ratio) CAUTION To - Nikon 110i | Instruction Manual - Page 22
lever to adjust the zoom settings (ranging from 30mm W to 8Smm T) to the desired image size. Turn the camera ON ; move the zoom lever in the W or T direction. Wide 30mm I CAUTION When the camera is not In use for more than 3 minutes, the lens automatically I retracts to the W(wideangle) position - Nikon 110i | Instruction Manual - Page 23
by the printed image 1 Red LED • If lit for asecond Correct focus has been achieved. • If lit continuously: Flash is ready to fire. • If blinking: Flash is being charged. (Shutter is locked.) +t - [ !~11111 '*' 4 2 Parallax compensation marks for close-u p shooting in Cand Htypes at a distance - Nikon 110i | Instruction Manual - Page 24
Turn the camera ON. 24 2 Center theautofocus frame mark on the subject 3 Lightly press the shutter release button and confirm that the red LED lights up for asecond. - Nikon 110i | Instruction Manual - Page 25
for a second. Focus is locked on the subject as long as the shutter release button is pressed halfway. Important! Besure not to change sUbject-to-camera II!!I distance after lightly pressing the shutter i i i release button toachieve focus. 25 - Nikon 110i | Instruction Manual - Page 26
candle flame, fireworks; etc.) • Secondary subjects are closer to the camera than the main subject. In the above cases, use focus lock by focusing on another subject equidistant from the camera and follow the procedure in this section. Removing the film At the - Nikon 110i | Instruction Manual - Page 27
Remove thefilm after confirming that the letter "E" is visible in the LCD panel To rewind the film in mid-roll You can rewind the film midway through the roll. Important! Note that if you rewind the film without having taken asing lepicture, the film is stil l usable. However if even one picture - Nikon 110i | Instruction Manual - Page 28
eyes may sometimes appear bright red. To reduce the "red-eye" effect, use this mode. Important! Red-eye reduction does not work with flash cancel and infinity focus modes. 1 Turn the cameraONand press the @ / Ii ~ button until @ appears in the LCDpane l. 2 Lightly press the shutter release button - Nikon 110i | Instruction Manual - Page 29
or remote control operation. Use the self-timer when you want toinclude yourself in the picture, or if the camera is out of remote control range. Important! Place the camera on a tripod or a secure flat surface. II!I Press the @ /li ~ button until @ Iii ~ i i i appears in the LCD panel. 29 - Nikon 110i | Instruction Manual - Page 30
changes thedisplay in the order indicated. L @ ---. @ iii ~ ---. canCel ] ------- Infinity focus Useful for shooting landscapes, or distant scenes throughglass. Flash isautomatical ly canceled in this mode. @ . Red-eye reduction indicator (lIE P28) @ iii ~. Remote control/self-timer indicator (lIE - Nikon 110i | Instruction Manual - Page 31
photography With the camera turned ON, press the '1/j,l button to select the desired flash mode. Important! Before shooting with flash, make sure the subject is withi n flash shooting distance range. Refer to the following guide (ISO 200) w(30mm) approx 0.83 to 7.1m (27 to 23.3 It) T (85mm - Nikon 110i | Instruction Manual - Page 32
senses when theavailablelight is low and automaticallyfires the flash. Auto flash mode is automatically activated whenever you turn the camera ON. Make sure that AUTO ~ is displayed in the LCD panel To select Auto mode when in another flash mode, simply press the '1/'" button until AUTO 'I appears - Nikon 110i | Instruction Manual - Page 33
tends to select slow shutter speeds in this mode, use a tripod to prevent camera shake. In this mode, the flash fires every time, enabling you to achieve afill-flash effect when shooting asubject against abright background or in shadow. 2 Lightly press the shutter release button and confirm that - Nikon 110i | Instruction Manual - Page 34
Slow sync flash mode Use this mode to correctly expose both main subject and background in night and low light scenes. Remote control photography Inself-timer mode, this opti onal device gives youcontrol over shutter release. Important! Since the camera selects slow shutter speeds in th is mode, - Nikon 110i | Instruction Manual - Page 35
control extends up to approx Sm (16.4 It) wh ilefacing the camera. • When the battery is exhausted, it can be replaced at a Nikon service center. Do not replace thebattery you rself . 3 Aimthe remote control unit at the camera and press the shutter release button. -The indicator lamp lights up - Nikon 110i | Instruction Manual - Page 36
or near a heater. • Al low the camera to cool off after continuous flash firing Overuse generates heat in battery and camera. • The camera may not work properly at low temperatures (below 0 °C or 32 OF) Keep the camera warm . • Do not drop or hit the camera against a hard surface as it may damage - Nikon 110i | Instruction Manual - Page 37
the Radio Interference Regulations of the Canadian Department of Communications. CAUTION: A characteristic of electronic cameras In rare cases, when strong static electricity is applied to the camera from outside, the camera may not work properly If this happens, remove the battery and reinstall it - Nikon 110i | Instruction Manual - Page 38
(Advanced Photo System) type autofocus AE lens- shutter camera Usable film IX240 (Advanced Photo System) film cartridge frame; Red LED (flash ready-light/in-focus indicator)- Lights for asecond: subject focused; Lights continuously: flash ready; Blinks: flash charging Electronically controlled - Nikon 110i | Instruction Manual - Page 39
straight in front of the camera; Battery is available for approx. 10years; Dimensions (WxHxD): approx. 27 x 60 x 10 mm (1.1 x 2.4 x0.4 in.); Weight (with battery): approx. 13g (0.5 oz) Four flash modes available: Auto flash , Flash cancel, Anytime flash and Slow sync flash ; Guide number 17 (ISO 200 - Nikon 110i | Instruction Manual - Page 40
por su co mprade la camara Nikon Nuvis 11 Oi. Lea fnteg ramente el manual de instrucciones antes de utilizarla por primera vez, y guardelo en un lugar a mana hasta que se haya fam iliarizado con el nuevo sistema descrito acontinuaci6n. Su nueva camara Nikon utiliza el Sistema fotografico avanzado - Nikon 110i | Instruction Manual - Page 41
pueden producir descargas • No toque las partes metalicas del interior del flash , si se averfa, ya que contiene circuitos de alta tension que un medico. Nikon no se responsabiliza del mal funcionamiento provocado por el uso de la Nuvis 11 Oi de formas no especificadas en este manual. IIiIi!iII - Nikon 110i | Instruction Manual - Page 42
automatico'H 70 Seleccion de titu lo s ' H ' 50 Modo de cancelacion del flash 70 Funcion de grabacion del titu lo 53 Modo flash de toda ocasion 71 Carga de la pelicula............H 54 Modo flash con sincronizacion lenta 72 Manejo basico 57 Fotografia con mando adistancia - Nikon 110i | Instruction Manual - Page 43
r 5 1-----, 2- -"")" 4- - --\ tfW)'---- 9 1 Sensor de recepcion del mando a distancia (I&' pagina 73.) 2 Flash (I&' pagina 69) 3 Ventanilla del visor 4 Boton de disparo del obturador (I&' pagina 58.) 5 Indicador de reduccion de ojos rojos/autodisparador (I&' paginas 66,67,68,73.) 6 Ventanilla - Nikon 110i | Instruction Manual - Page 44
Elementos 10 11 12 16 44 10 Qcular del visor 17 11 LED rojo (indicador de enfocado/flash listo) 18 (1& paginas 58, 61 .) 12 Conmutador de dioptrias (1& pagina 61) 13 Boton de modo flash/enfoque a infinito '1/ ~ Iseleccion del idiama (Bot6n MODE/SEL) (1& paginas 48-51,68-72) 14 Boton de - Nikon 110i | Instruction Manual - Page 45
53.) 2 Indicador de grabacion del tftulo (~ paginas 50, 51,53.) 3 Indicador de registro de datos (~ pagina 49.) 4 Indicador de modo del flash (~ pagina 69.) 5 Indicador de reduccion de ojos rojos (~ pagina 66.) 6 Indicador de enfoque a infinito (~ pagina 68.) 7 Contador de fotogramas (I@" paginas 56 - Nikon 110i | Instruction Manual - Page 46
Colocaci6n de la correa Colocaci6n de la pila Preparacitin para tomar fotografias 46 Coloquelacorrea pasandola por laargo lla y sujetando latal como se puedeapreciar en la figura. 1 Abra la tapadel comparti mentode lapila Si es necesari o, introduzca una moneda en la ranura ygiresuavemente. 2 - Nikon 110i | Instruction Manual - Page 47
jlmportante! Recuerde que en la pantalla de cristal lfqui do aparece DD DDD cuando se cambia la pila Se deberaaj ustar de nuevo la fechay la hora. (Para mas detalles sobre el ajuste de fecha y hora, vea lapag ina 48) Nota: Paraconservar la carga de la pila, desconecte la camara aOFF cuando no se la - Nikon 110i | Instruction Manual - Page 48
Ajusteprimero el ano, mes ydia y, a continuacion, la hora ylos minutos. 1 Apague con el interruptor principaL 00 000 . 2 Oprima una vez el boton MODE/SEL. EI "ano" empieza adestel lar. ""hdJ] C' -, _ " f~_I II " SEiLF~f' Il /,l I I .. DATE :.:rEiD~ l i ~ . liST ~ 3 Oprima el boton - Nikon 110i | Instruction Manual - Page 49
F.unci6n de registro de datos Los datos quedan registrados en la pelfcula Cuandopida que Ie revelen las lotos, pregunte en ellaboratorio si pueden imprimir en ambas caras de la lotograffa 1 Apague con el interruptor principal 2 Oprima el boton MODE/SEL para se leccionar una de las siguientes - Nikon 110i | Instruction Manual - Page 50
La Nuvis 110i permite imprimir tftulos en 12 idiomas. Se puede cambiar el idioma y el titulo para cadatotograffa. Si se cambia un cartucho de pelicula 0 pila, se desconecta - Nikon 110i | Instruction Manual - Page 51
5 Presione el boton MODE/SEL. La citra de laderecha del numero del titu lo empieza adestel lar. 6 Presioneel boton ADJ UST para ajustar la citra de la derecha. -Cada vez que oprima el bot6n cambia el r visualizador en el orden indicado. 0 ---+ 1---+ 2 ---+ 3 9J 7 Haga una totograffa despues de - Nikon 110i | Instruction Manual - Page 52
1Para programar un idioma: Repita los procedimientos 1 a 3 de acuerdo a las instrucciones de la seccion anterior: "Para programar un titul o". 2 Oprima el boton MODE/SEL durante mas de 2 segundos EI nilmero del idioma empieza a destellar. 52 3 Oprima el boton ADJUSTpara programar el nilmero de idi - Nikon 110i | Instruction Manual - Page 53
ncion de grabacion del titulo EI titulo queda grabado en la pelfcu la. Cuando haga un pedido de impresion de fotograffas, consultecon su laboratorio fotografico sobre la posibilidad de impri mir 1los datos en el atras. Conecte la camara. 2 Oprima el botonSEL yconfirme que aparecen I ,y los numeros - Nikon 110i | Instruction Manual - Page 54
Carga de la p'elfcula a 6 54 Util ice solo cartuchos de pelfcula IX240 nuevos en esta camara. - No ulilice pelfcula convencional de 35 mm. - No hay guia de pelicula La pelicula enlra y se carga aulomalicamenle denlro de la camara. 1 0 : Pelfculaprocesada denlro del carlucho* 2. 0: Pelicula no - Nikon 110i | Instruction Manual - Page 55
• No trate de hacer girar el carrete del cartucho con un objeto puntiagudo (por ejemplo un destornillador) Podrfa velar la pelfcula, mod ificar el VE l 0 impedir una utilizacion 0 unprocesado correctos. • No guarde el cartucho de pelicula en un lugar: -Expuesto a los rayos del sol, calefaccion 0 en - Nikon 110i | Instruction Manual - Page 56
Carga de fa pelicula D 1 Desconecte la camarayverifique que no aparece D en la pantalla de cristal liquido, acontinuacion mueva el seguro para abrir la tapa del compartimiento del cartucho. jlmportante! Latapa del compartimento del cartucho se traba automaticamente despues de cargar el cartucho. - Nikon 110i | Instruction Manual - Page 57
Manejo basico Modo de sostener la camara correctamente Para evitar que se mueva la camara: • Mantenga el cuerpo bien equilibrado adelantando un pie medio paso • Mantenga los codos apretados contra el cuerpo y sujete la camara con ambas manos, como se ve en la figura jlmportante! • Cuando sostenga - Nikon 110i | Instruction Manual - Page 58
Funcionamiento del boton de disparo del obturador 1 Oprima ligeramente el boton de disparo del obtu rador para enfocar. - Cuando el objeto queda enfocado, se enciende el LED rojo durante un segundo y se bloquea el enfoque. 2 Op ri ma completamenteel boton de disparodel obtu rador. - No 10 oprima - Nikon 110i | Instruction Manual - Page 59
Seleccion del tipo de impresion Se puede seleccionar una de las tres tipos de impresi6n (tipo C, HoP) en cualquier momento, siempre que haya una pelfcu la cargadaen la camara. Tipo C: Relaci6n vertical a horizontal 2. 3. Tipo H: Relaci6n vertical a horizontal 9. 16. Tipo P: Relaci6n vertical - Nikon 110i | Instruction Manual - Page 60
Utilizaci6n del zoom Mire atraves del visor y mueva la palanca del zoom para ajustar la posicion del zoom (desde W a 30 mm hasta T a 85 mm) para obtener el tamano de imagen deseado. Conecte la camara, mueva la palanca en el sentido W 0 T. 60 Gran angular 30 mm Teleobjetivo 85 mm PRECAUCION Si no - Nikon 110i | Instruction Manual - Page 61
en~iende durante un segundo. EI enfoque es correcto. • Cuando se enciende y luce fijo. EI flash esta listo para el disparo. • Cuando destella Se esta cargando el flash . (EI obturador no funciona.) H ~ ~ 2 ( ) CifJ 3 1 -+ [ IUIII 8J--4 2 Marcas de compensacion de paralaje para acercamientos - Nikon 110i | Instruction Manual - Page 62
del obturador y confirme que se enciende el LED rojo durante un segu ndo jlmportante! Si no hay suficiente luz, el LED rojo se enciende y el flash destellaautomaticamente. Confirme que el sujeto esta dentro del alcance del - Nikon 110i | Instruction Manual - Page 63
4 Oprima completamente el boton del obturador para tomar una /otograffa Para que el sujeto quede bien en/ocado aunque no este en el centro del marco, utilice el bloqueo del en/oque. 1 Centre el sujeto en la marca de zona de en/oque automatico. 2 Oprima ligeramente el boton de disparo del obturador - Nikon 110i | Instruction Manual - Page 64
Utilizaci6n del bloqueo del enfoqu 3 Mantenga el boton de disparo del obturador ligeramente oprimido, componga la escena tal como la tenia pensada. Acontinuacion, oprima completamente el boton de disparo. 64 Condiciones de enfoque especiales Los siguientes objetos pueden ser muy diffci les de - Nikon 110i | Instruction Manual - Page 65
Saque la pelfcula despues de verificar que aparece la letra "E" en la pantalla de cristal Ifquido Rebobinado de la peifcula a mitad del roilo Se puede rebobinar la pelfcula cuando todavfa esta a la mitad del rollo. jlmportante! Tenga en cuenta que si se rebobina la pelfcula sin haber hecho - Nikon 110i | Instruction Manual - Page 66
para evitar ese efecto de "ojos rojos" jlmportante! Lareduccion de ojos raj os no fun ciona con los modos de cancelacion del flash yde enfoque a infinito. 1 Enciendacon el interruptor principal y oprima el boton @ / g~ hasta que aparezca @ en lapantalla de cristal Ifquido 2 Oprima ligeramente el - Nikon 110i | Instruction Manual - Page 67
continuacion oprima completamente el boton del obturador para tomar la fotograffa -La luz de reducci6n de ojos rajos se enciende durante un segundo antes de dispararse el obturador. jlmportante! Para cancelar el modo de reduccion de ojos rojos, oprima el boton @/ il ~ hasta que se apague @ en la - Nikon 110i | Instruction Manual - Page 68
, la indicacion cambia en el siguiente orden. Enfoque a infinito Esutil para fotografiar paisajes 0 escenas distantes atraves de un cristal. EI flash queda automaticamente cancelado en este modo. @: Indicadar de reduccion de ajas rajas (1& pagina 66) @ g ~: Manda a distancia/indicadar del - Nikon 110i | Instruction Manual - Page 69
la camara encendida, oprima el boton 'II~ para seleccionar el modo de flash deseado. jlmporlanle! Antes de tomar una fotografia con flash , verifique que el objeto esta dentro del alcancedel flash. Consu lte la siguiente guia (para ISO 200). w(30 mm): aprox 0,83 a7,1 m (2,7 a23,3 pies) T (85 - Nikon 110i | Instruction Manual - Page 70
can un efecto de luz natural, en los retratas yen las escenas nocturnas. Para volver al modo automatico cuando se estaba utilizando el flash en algOn otro modo, oprima el bot6n ~/.. hasta que aparezca AUTO ~ en lapantalla de cristallfquido. 1 Oprima el bot6n ~/.. hasta que aparezca ~ en la - Nikon 110i | Instruction Manual - Page 71
un trfpode para evitar que la camara se mueva. Modo flash de toda ocasion En este modo, el flash destella cada vez que se toma una fotografia,para que pueda obtenerse un efecto de flash de rellenoal fotografiar un sujeto contra un fonda brillante 0 en - Nikon 110i | Instruction Manual - Page 72
Modo flash con sincronizacion lenta UtiIice este modo para exponer correctamente tanto el sujetoprincipal como el fonda en las escenas nocturnas 0 con poca IUl. Fotografia con mando a - Nikon 110i | Instruction Manual - Page 73
un alcance deaprox. 5 m(16,4 pies) cuando apunta directamente hacia la camara. • Cuando se agote la pila, debera acudir aun centro de servic io Nikon. iNo cambie la pila usted mismo l 3 Apunte con la unidad del mandoa distancia hacia la camara y oprima el boton de disparodel obturador - Nikon 110i | Instruction Manual - Page 74
el interior de un coche al sol, en la playa 0 cerca de la calefaccion, • Espere a que la camara se enfrfe despues de utilizar repetidamente el flash , EI uso intensivo sin pausas genera calor en la baterfa y en la camara, • La camara puede no funcionar correctamente abajas temperatu ras (menos de - Nikon 110i | Instruction Manual - Page 75
• Si no utiliza la camara durante mucho tiempo, saque lade vez en cuando, dispare el obturador y haga destellar el flash varias veces. Notas sobre las pilas • Lacarga de lapi lase debilita cuando la temperatura desciende por debajo de D' C (32' F). Lapi lase recuperara cuando la temperatura - Nikon 110i | Instruction Manual - Page 76
cargado/indicador de enfocado) - Se enciende durante un segundo: Objeto enfocado; luce continuamente: flash cargado; Destella: se esta cargando el flash Control de la exposicion Programa de exposicion automatica con control electronico Alcance de la exposicion ISO 200; EV8-15 a 30 mm, EV9,6-16 - Nikon 110i | Instruction Manual - Page 77
; Dimensiones (An. x AI. x Pro!.): aprox. 27 x60 x 10 mm (1,1 x2,4 x0,4 pulg); i Peso (con pila): aprax.13 g(0,5 oz) Existen cuatro modos del flash: Flash automatico, Cancelacion del flash; Flash en cada fotografia y Flash con sincronizacion lenla; Numero de guia 17 (ISO 200 en metros); Alcance del - Nikon 110i | Instruction Manual - Page 78
78 - Nikon 110i | Instruction Manual - Page 79
79 - Nikon 110i | Instruction Manual - Page 80
No reproduction in any form of this manual, in whole or in part (except for brief quotation in critical articles or reviews), may be made without written authorization from NIKON CORPORATION. Queda prohibida la reproduccion total 0 parcial de este folleto (salvo en 10 que se refiere acitas breves en
-
 1
1 -
 2
2 -
 3
3 -
 4
4 -
 5
5 -
 6
6 -
 7
7 -
8
-
9
-
10
-
11
-
12
-
13
-
14
-
15
-
16
-
17
-
18
-
19
-
20
-
21
-
22
-
23
-
24
-
25
-
26
-
27
-
28
-
29
-
30
-
31
-
32
-
33
-
34
-
35
-
36
-
37
-
38
-
39
-
40
-
41
-
42
-
43
-
44
-
45
-
46
-
47
-
48
-
49
-
50
-
51
-
52
-
53
-
54
-
55
-
56
-
57
-
58
-
59
-
60
-
61
-
62
-
63
-
64
-
65
-
66
-
67
-
68
-
69
-
70
-
71
-
72
-
73
-
74
-
75
-
76
-
77
-
78
-
79
-
80
 |
 |
Nikon
Nuvisll0
i
Instruction
Manual
(Pages
2-39)
Manual
de
instrucciones
(Paginas
40-77)