NordicTrack Se 3i Instruction Manual - Page 11
Tip: Avoid pinching the Main Wire 89.
 |
View all NordicTrack Se 3i manuals
Add to My Manuals
Save this manual to your list of manuals |
Page 11 highlights
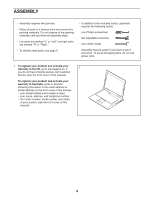
12. Identify the Rear and Front Leg Covers (38, 39), and orient them as shown. 12 Press the Rear and Front Leg Covers (38, 39) together around the right Upper Body Leg (13), and attach them with three M4 x 16mm Screws (78); start the center Screw first, and then start the other two Screws. Then, tighten all the Screws. Repeat this step on the other side of the elliptical. 13 38 78 39 13. Orient the Console Plate (92) as shown and hold it near the Upright (2). 13 Next, insert the Main Wire (89) in the Upright (2) through the Console Plate (92). Tip: Avoid pinching the Main Wire (89). Attach the Console Plate (92) to the Upright (2) with four M4 x 10mm Screws (95); start all the Screws, and then tighten them. 92 2 95 89 Avoid pinching the Main Wire (89) 11
-
 1
1 -
2
-
3
-
4
-
5
-
 6
6 -
 7
7 -
 8
8 -
 9
9 -
 10
10 -
 11
11 -
 12
12 -
 13
13 -
 14
14 -
 15
15 -
 16
16 -
17
-
18
-
19
-
20
-
21
-
22
-
23
-
24
-
25
-
26
-
27
-
28
 |
 |
