NordicTrack T9ci Treadmill User Manual
NordicTrack T9ci Treadmill Manual
 |
View all NordicTrack T9ci Treadmill manuals
Add to My Manuals
Save this manual to your list of manuals |
NordicTrack T9ci Treadmill manual content summary:
- NordicTrack T9ci Treadmill | User Manual - Page 1
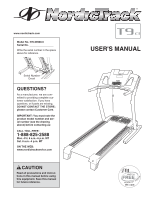
www.nordictrack.com Model No. NTL09908.0 Serial No. Write the serial number in the space above for reference. Mon.-Fri. 6 a.m.-6 p.m. MT Sat. 8 a.m.-4 p.m. MT ON THE WEB: www.nordictrackservice.com CAUTION Read all precautions and instructions in this manual before using this equipment. Save this - NordicTrack T9ci Treadmill | User Manual - Page 2
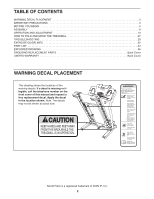
AND ADJUSTMENT 13 HOW TO FOLD AND MOVE THE TREADMILL 27 TROUBLESHOOTING 29 EXERCISE GUIDELINES 32 PART LIST 34 EXPLODED DRAWING or illegible, call the telephone number on the front cover of this manual and request a free replacement decal. Apply the decal in the location shown. Note: - NordicTrack T9ci Treadmill | User Manual - Page 3
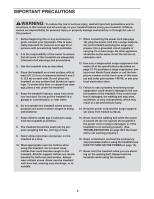
, see your local NordicTrack dealer or call the telephone number on the front cover of this manual and order part number turned off. Do not operate the treadmill if the power cord or plug is damaged, or if the treadmill is not working properly. (See TROUBLESHOOTING on page 29 if the treadmill - NordicTrack T9ci Treadmill | User Manual - Page 4
procedures de- scribed in this manual. Never remove the motor hood unless instructed to do so by an authorized service representative. Servicing other than the procedures in this manual should be performed by an authorized service representative only. 27. The treadmill is intended for in-home - NordicTrack T9ci Treadmill | User Manual - Page 5
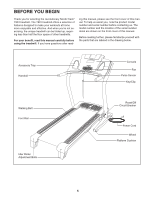
NordicTrack® T9CI treadmill. The T9CI treadmill offers a selection of features designed to make your workouts at home more enjoyable and effective. And when youʼre not exercising, the unique treadmill are shown on the front cover of this manual. Before reading further, please familiarize yourself - NordicTrack T9ci Treadmill | User Manual - Page 6
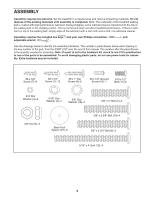
walking belt or the shipping carton. This is normal and does not affect treadmill performance. If there is lubricant on top of the walking belt, simply wipe number of the part, from the PART LIST near the end of this manual. The number after the parentheses is the quantity needed for assembly. Note: - NordicTrack T9ci Treadmill | User Manual - Page 7
tip the treadmill onto its side as shown. Partially fold the Frame (54) so the treadmill is more stable. Do not fully fold the Frame until the treadmill is completely assembled 3/8" x 2 3/4" Bolt (6) and a 3/8" Nut (5). 2 Do not overtighten the Nut; the Wheel must turn freely. 6 90 92 5 7 - NordicTrack T9ci Treadmill | User Manual - Page 8
3. Identify the Right Upright (112), which is marked with a sticker. Have a second person hold the Right Upright near the Base (85) as shown. Slide the Right Base Cover (119) onto the end of the Right Upright. See the inset drawing. Tie the wire tie in the Right Upright (112) securely around the end - NordicTrack T9ci Treadmill | User Manual - Page 9
x 2 3/4" Bolt (6) and a 3/8" Nut (5). Do not overtighten the Nut; the Wheel must turn freely. 6 85 18 10 118 Bend 111 6 90 92 5 54 7. Slide the Left Base Do not overtighten the Screws. With the help of a second person, tip the treadmill so that the Base (85) is flat on the floor. 7 118 85 1 - NordicTrack T9ci Treadmill | User Manual - Page 10
9. Hold the Right Handrail (107), which is labeled with a sticker, near the console assembly. Insert 9 the console wire into the hole in the side of the Right Handrail. Attach the Console Ground Wire (102) to the bracket on the Right Handrail (107) with the #8 x 1/2" Ground Screw (16). Set the - NordicTrack T9ci Treadmill | User Manual - Page 11
slide together easily and snap into place. If they do not, turn one connector and try again. IF THE CONNECTORS ARE NOT CONNECTED PROPERLY, THE CONSOLE MAY this step on the left side of the treadmill. Then, fully tighten the four 5/16" x 4" Bolts (12). 12 Wires 77 112 107 4 12 Console - NordicTrack T9ci Treadmill | User Manual - Page 12
Latch with the bracket. Lower the Frame (54) (see HOW TO LOWER THE TREADMILL FOR USE on page 28). 13 54 14. With the help of a second 10 112 10 15. Make sure that all parts are properly tightened before you use the treadmill. Keep the included hex keys in a secure place. A hex key is used to - NordicTrack T9ci Treadmill | User Manual - Page 13
being turned on or off. To decrease the possibility of your treadmill being damaged, always use a surge suppressor with your treadmill (see drawing 1 at the right). To purchase a surge suppressor, see your local NordicTrack dealer or call the telephone number on the front cover of this manual and - NordicTrack T9ci Treadmill | User Manual - Page 14
manual. In addition, the console features sixteen preset workouts-eight weight loss workouts and eight performance workouts. Each workout automatically controls the speed and incline of the treadmill as it guides that you can view your workout history and track your progress. You can even listen to - NordicTrack T9ci Treadmill | User Manual - Page 15
the displays remain lit, see THE INFORMATION MODE on page 26 to turn off the demo mode. Next, stand on the foot rails of the treadmill. Find the clip attached to the key (see the drawing on page THE INFORMATION MODE on page 26. For simplicity, all instructions in this section refer to miles. 15 - NordicTrack T9ci Treadmill | User Manual - Page 16
Turn on or turn off the display demo mode. The console features a display demo mode, designed to be used if the treadmill is displayed in a store. To turn on or turn 3. Select the manual mode. To select the manual mode, scroll through the main menu and press the screen near the word MANUAL. 4. Start - NordicTrack T9ci Treadmill | User Manual - Page 17
that you have walked or run. • The approximate number of calories you have burned. • The speed of the walking belt. • The incline level of the treadmill. • Your pace in minutes per mile or kilometer. • Your heart rate. Note: Your heart rate can be displayed only while you use the handgrip pulse - NordicTrack T9ci Treadmill | User Manual - Page 18
"off" position and unplug the power cord. Important: If you do not do this, the electrical components of the treadmill may wear prematurely. 1. Insert the key into the console. See HOW TO TURN ON THE POWER on page 15. Then, slide your finger across the screen to begin. The main menu will - NordicTrack T9ci Treadmill | User Manual - Page 19
When the next segment of the program begins, the treadmill will automatically adjust to the speed and incline settings desired. See step 7 on page 18. 7. Turn on the fan if desired. The program will is too high or too low, you can manually override the setting by pressing the speed and incline - NordicTrack T9ci Treadmill | User Manual - Page 20
of the workout, simply adjust the speed and incline of the treadmill as desired by pressing the speed and incline buttons. 2. Personalize page 19. 6. Measure your heart rate if desired. See step 7 on page 18. 7. Turn on the fan if desired. See step 8 on page 18. 8. When you are finished exercising - NordicTrack T9ci Treadmill | User Manual - Page 21
setting and one incline setting are programmed for each segment. See HOW TO TURN ON THE POWER on page 15. Then, slide your finger across the TO CREATE A CUSTOM WORKOUT on page 20. See step 7 on page 18. 7. Turn on the fan if desired. Favorite workouts allow you to access two workouts with the - NordicTrack T9ci Treadmill | User Manual - Page 22
TRAINING WORKOUT 1. Insert the key into the console. See HOW TO TURN ON THE POWER on page 15. Then, slide your finger across begin. Hold the handrails and begin walking. Adjust the speed and incline of the treadmill as desired. Your opponents will adjust their speed and tactics based on the course - NordicTrack T9ci Treadmill | User Manual - Page 23
the walking belt. See step 7 on page 18. • The incline level of the treadmill. • The approximate number of calories you have burned. • The distance that you To view your heart rate, select the display option shown at the right. 7. Turn on the fan if desired. See step 8 on page 18. 8. When you - NordicTrack T9ci Treadmill | User Manual - Page 24
HOW TO TURN ON THE POWER on page 15. Then, slide your finger across the screen to begin. During the workout, a personal trainer will guide you through you can manually override the setting by pressing the speed or incline buttons; however, when the next segment begins, the treadmill will - NordicTrack T9ci Treadmill | User Manual - Page 25
TURN ON THE POWER on page 15. Then, slide your finger across the screen to begin. The main menu will appear on the screen (see step 1 on page 15). • Distance-The total distance you have walked or run on the treadmill hours you have walked or run on the treadmill. HOW TO USE THE STEREO SOUND SYSTEM - NordicTrack T9ci Treadmill | User Manual - Page 26
walking platform should be. Platform Cushion Increase The console features a display demo mode, designed to be used if the treadmill is displayed in a store. While the demo mode is turned on, the console will function normally when you plug in the power cord, switch the reset/off circuit breaker to - NordicTrack T9ci Treadmill | User Manual - Page 27
to safely lift 45 lbs. (20 kg) to raise, lower, or move the treadmill. 1. Hold the metal frame firmly in the location shown by the arrow at the right. CAUTION: To decrease the possibility of injury, do not lift the treadmill by the plastic foot rails. Make sure you bend your legs and keep your - NordicTrack T9ci Treadmill | User Manual - Page 28
HOW TO LOWER THE TREADMILL FOR USE 1. Hold the upper end of the frame with your right hand. Pull the latch knob to the left and hold it. It may - NordicTrack T9ci Treadmill | User Manual - Page 29
TROUBLESHOOTING Most treadmill problems can be solved by following the steps below. Find the symptom that applies, and follow the steps listed. If further assistance is needed, please see the front cover of this manual. PROBLEM: The power does not turn on SOLUTION: a. Make sure that the power - NordicTrack T9ci Treadmill | User Manual - Page 30
and the Magnet (49) on the left side of the Pulley (51). Turn the Pulley until the Top Magnet is aligned with the Reed Switch. Make sure were removed. Run the treadmill for a few minutes to check for a cor- rect speed reading. PROBLEM: The incline of the treadmill does not change correctly - NordicTrack T9ci Treadmill | User Manual - Page 31
; if the walk- ing belt has shifted to the right, turn the bolt coun- terclockwise 1/2 of a turn. Be careful not to over- tighten the walking belt. Plug in the power cord, insert the key, and run the treadmill for a few minutes. Repeat until the walking belt is centered. b. If the walking belt - NordicTrack T9ci Treadmill | User Manual - Page 32
important for persons over the age 35 persons with pre-existing health problems. The pulse sensor is not a medical device. Various factors may the key to achieving results. You can use your heart rate as a guide to find the proper intensity level. The chart below shows recommended heart rates - NordicTrack T9ci Treadmill | User Manual - Page 33
SUGGESTED STRETCHES The correct form for several basic stretches is shown at the right. Move slowly as you stretch-never bounce. 1. Toe Touch Stretch Stand with your knees bent slightly and slowly bend forward from 1 your hips. Allow your back and shoulders to relax as you reach down toward - NordicTrack T9ci Treadmill | User Manual - Page 34
R1008B To locate the parts listed below, see the EXPLODED DRAWING near the end of this manual. Key No. Qty. 1 44 2 4 3 2 4 8 5 8 6 2 7 3/8" Speaker Screw Platform Cushion Warning Decal Cushion Stop Cushion Track Belt Guide Isolator Frame Spacer Magnet Walking Platform Key No. Qty. - NordicTrack T9ci Treadmill | User Manual - Page 35
Accent 6" Console Ground Wire 8" White Wire, M/F 4" Black Wire, M/F 4" Red Wire, M/F 8" Blue Wire, M/F User's Manual Note: Specifications are subject to change without notice. See the back cover of this manual for information about ordering replacement parts. *These parts are not illustrated. 35 - NordicTrack T9ci Treadmill | User Manual - Page 36
EXPLODED DRAWING A-Model No. NTL09908.0 19 36 120 19 26 19 44 29 26 14 43 83 14 28 56 22 33 32 42 25 58 38 19 28 24 59 32 22 33 36 36 57 45 44 26 46 26 29 28 47 26 9 26 27 14 20 50 48 49 51 19 19 25 56 14 38 24 55 14 54 45 26 44 29 26 42 120 52 16 53 27 9 28 14 47 46 - NordicTrack T9ci Treadmill | User Manual - Page 37
EXPLODED DRAWING B-Model No. NTL09908.0 R1008B 121 61 62 1 63 37 1 37 1 37 64 65 5 86 68 69 40 23 84 20 20 114 40 30 66 21 39 5 31 15 15 16 16 67 1 48 20 13 70 16 15 75 1 74 73 72 15 15 15 71 1 37 - NordicTrack T9ci Treadmill | User Manual - Page 38
EXPLODED DRAWING C-Model No. NTL09908.0 78 R1008B 77 4 12 78 79 12 118 111 91 77 113 12 4 12 80 112 119 81 91 85 34 5 17 82 2 4 1 87 88 8 1 79 87 88 18 82 8 4 90 10 17 34 6 1 5 87 92 88 8 5 89 87 90 2 1 88 18 8 1 5 87 1 10 88 8 87 88 92 6 8 - NordicTrack T9ci Treadmill | User Manual - Page 39
EXPLODED DRAWING D-Model No. NTL09908.0 R1008B 7 93 1 1 96 1 1 71 95 1 1 1 1 1 115 99 98 16 104 122 1 103 103 105 103 1 35 106 108 1 3 11 109 1 1 1 1 1 1 1 1 97 1 41 41 100 7 94 76 102 1 1 1 100 7 101 1 16 1 35 110 1 107 108 3 11 39 - NordicTrack T9ci Treadmill | User Manual - Page 40
the PART LIST and the EXPLODED DRAWING near the end of this manual) LIMITED WARRANTY ICON Health & Fitness, Inc. (ICON) warrants this product to be free from defects in workmanship and material, under normal use and service conditions. The frame and drive motor are warranted for a lifetime. Parts
-
 1
1 -
 2
2 -
 3
3 -
 4
4 -
 5
5 -
 6
6 -
 7
7 -
8
-
9
-
10
-
11
-
12
-
13
-
14
-
15
-
16
-
17
-
18
-
19
-
20
-
21
-
22
-
23
-
24
-
25
-
26
-
27
-
28
-
29
-
30
-
31
-
32
-
33
-
34
-
35
-
36
-
37
-
38
-
39
-
40
 |
 |

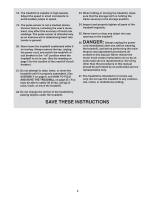
CAUTION
Read all precautions and instruc-
tions in this manual before using
this equipment. Save this manual
for future reference.
Serial Number
Decal
Model No. NTL09908.0
Serial No.
Write the serial number in the space
above for reference.
QUESTIONS?
As a manufacturer, we are com-
mitted to providing complete cus-
tomer satisfaction. If you have
questions, or if parts are missing,
DO NOT CONTACT THE STORE;
please contact Customer Care.
IMPORTANT: You must note the
product model number and ser-
ial number (see the drawing
above) before contacting us:
CALL TOLL-FREE:
1-888-825-2588
Mon.–Fri. 6 a.m.–6 p.m. MT
Sat. 8 a.m.–4 p.m. MT
ON THE WEB:
www.nordictrackservice.com
USER'S MANUAL
www.nordictrack.com