Panasonic AG-HMC80PJ Editing AVCHD with Final Cut Pro 7 - Page 5
Transferring Avchd Footage Directly From The, Panasonic Avccam Camcorders To Your Mac.
 |
View all Panasonic AG-HMC80PJ manuals
Add to My Manuals
Save this manual to your list of manuals |
Page 5 highlights
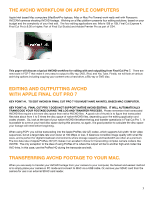
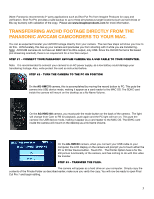
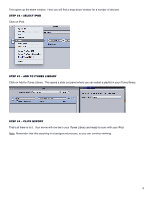
(Note: Panasonic recommends 3rd party applications such as Shot Put Pro from Imagine Products for copy and verification. Shot Put Pro provides a safe backup to up to three simultaneous target locations (such as hard drives or Blu-ray burners) with validation of the copy. Please see www.imagineproducts.com for more information. transferring avchd footage Directly from the Panasonic AVCcam camcorders to your mAC. You can as expected transfer your AVCHD footage directly from your camera. The next few steps will show you how to do this. Unfortunately, this ties up your camera and precludes you from shooting with it while you are transferring. Note: AVCCAM cameras do not have an IEEE1394 Fire Wire output, only USB. Since the AVCHD format is file based (not streaming oriented), there is no requirement for a Fire Wire output. Step #1 - connect your Panasonic AVCCAM camera via a USB cable to your computer. Note: It is recommended to connect your camera to an AC power supply, as a low battery could damage your transferring footage. Also, write protect the card as instructed before. Step #2 - turn the camera to the PC on position On the AG-HMC70 camera, this is accomplished by moving the record button to PC. This puts the camera into USB device mode, making it appear as a card reader to the MAC OS. The SDHC card inside the camera will mount on the desktop as a No Name Volume. On the AG-HMC150 camera, you must push the mode button on the back of the camera. The light will change from Cam to PB for playback, push again and the PC light will turn on. This puts the camera into USB device mode, making it appear as a card reader to the MAC OS. The SDHC card inside the camera will mount on the desktop as a No Name Volume. On the AG-HMC40 camera, when you connect your USB cable to your computer, the LCD display on the camera will prompt you to touch either the PC or Printer Device button. Touch PC. The Printer Option here is for the still picture functionality of the camera, and has nothing to do with this video file transfer. STEP #3 - TRANSFER THE FILES. The camera will appear as a hard drive on your computer. Simply copy the contents of the Private Folder as described earlier, make sure you verify the copy. You will now be ready to open Final Cut Pro 7 and begin editing. 5
-
 1
1 -
 2
2 -
 3
3 -
 4
4 -
 5
5 -
 6
6 -
 7
7 -
 8
8 -
 9
9 -
 10
10 -
 11
11 -
12
-
13
-
14
 |
 |
