Panasonic AG-HMC80PJ Editing AVCHD with Final Cut Pro 7 - Page 7
Step #3a - Click File > Log And Transfer, Step #4 - Click File > Log And Transfer
 |
View all Panasonic AG-HMC80PJ manuals
Add to My Manuals
Save this manual to your list of manuals |
Page 7 highlights
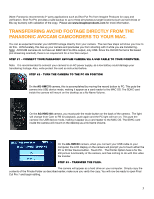
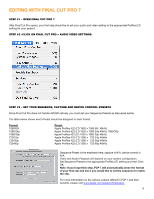
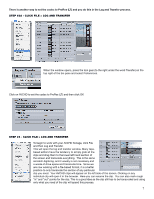
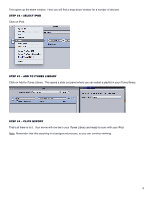
There is another way to set the codec to ProRes (LT) and you do this in the Log and Transfer process. STEP #3A - CLICK FILE > LOG AND TRANSFER When the window opens, press the tool gear (to the right under the word Transfer) on the top right of the bin pane and select Preferences. Click on AVCHD to set the codec to ProRes (LT) and then click OK STEP #4 - CLICK FILE > LOG AND TRANSFER To begin to work with your AVCHD footage, click File and then Log and Transfer. This will open the log and transfer window. Many tapebased editors have the tendency to simply grab all the clips and drag them to the lower left hand section of the screen and transcode everything. This is the same as batch digitizing, and it usually is not necessary and a waste of drive space and transcode time. Since we are now working with a file-based format, it is a better practice to only transcode the section of any particular clip you need. Your AVCHD clips will appear on the left side of the screen. Clicking on any individual clip will open it in the browser. Here you can rename the clip. You can also mark rough "in" and "out" points for the clip. This is a good idea as the clip still has to be transcoded and using only what you need of the clip will speed this process. 7
-
 1
1 -
 2
2 -
 3
3 -
 4
4 -
 5
5 -
 6
6 -
 7
7 -
 8
8 -
 9
9 -
 10
10 -
 11
11 -
 12
12 -
13
-
14
 |
 |
