Panasonic AW-HS50 Operating Instructions - Page 17
PinP picture in picture, Selecting the PinP material, PinP transition
 |
View all Panasonic AW-HS50 manuals
Add to My Manuals
Save this manual to your list of manuals |
Page 17 highlights
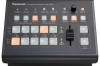
1. Basic operations 1-4. PinP (picture in picture) This function involves combining another image with the background image. 1-4-1. Selecting the PinP material Select the PinP material using the B bus crosspoint buttons. 1 Press the PinP button to establish the bus selection mode for the crosspoint buttons. The indicator of the PinP button blinks. 2 Select the PinP signal using the B bus crosspoint buttons. 3 Press the PinP button to release the bus selection mode for the crosspoint buttons. 1, 3 1-4-2. PinP transition When the PinP button is pressed, the PinP image transitions (fades in) for the transition duration which has been set. [1] TIME/CBGD Menu 2. PinP Time The transition duration can also be changed by turning the OSD/TIME dial while pressing the PinP button. When the PinP button is held down, the duration setting is displayed on the OSD menu so that the setting can now be changed while checking what is displayed. The PinP transition can also be initiated by operating the slide lever. [13] Operation Menu 7. Slide Lever AUX PinP KEY-F/S BUS DELEGATION MIX WIPE TRANSITION TYPE PinP ON KEY ON FTB ON KEY-S AUX PGM 16 KEY-F PinP AUX PVW 27 KEY OUT 38 CLN 49 MV 5 10 A SHIFT B SHIFT 2 CUT AUTO BKGD 17
-
 1
1 -
2
-
3
-
4
-
5
-
6
-
7
-
8
-
9
-
10
-
11
-
 12
12 -
 13
13 -
 14
14 -
 15
15 -
 16
16 -
 17
17 -
 18
18 -
 19
19 -
 20
20 -
 21
21 -
 22
22 -
23
-
24
-
25
-
26
-
27
-
28
-
29
-
30
-
31
-
32
-
33
-
34
-
35
-
36
-
37
-
38
-
39
-
40
-
41
-
42
-
43
-
44
-
45
-
46
-
47
-
48
-
49
-
50
-
51
-
52
-
53
-
54
-
55
-
56
-
57
-
58
-
59
-
60
-
61
-
62
-
63
-
64
-
65
-
66
-
67
-
68
 |
 |
