Panasonic FV-07VFH3 FV-07VFH3 Owner's Manual (English) - Page 7
Installation, Between Joist Mounting, Joist Mounting, Continued, Between - wiring
 |
View all Panasonic FV-07VFH3 manuals
Add to My Manuals
Save this manual to your list of manuals |
Page 7 highlights
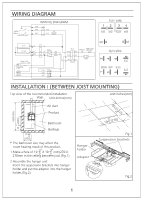
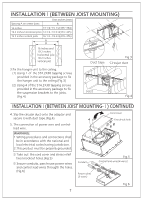
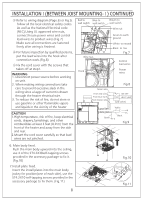
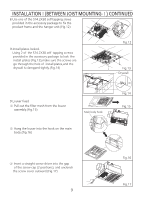
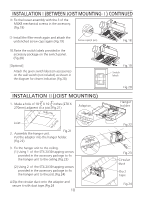
INSTALLATIONⅠ(BETWEEN JOIST MOUNTING) Unit:inches (mm) Spacing A on center joists B 16 inches 13 1/4~15 1/2(336~394) 19.2 inches horizontal joists 14 3/4~16 3/4(374~425) 19.2 inches vertical joists 16 1/2~18 3/4(419~476) A B 16 inches and 19.2 inches horizontal joist 19.2 inches vertical joist Duct tape Fig.3 Circular duct 3.Fix the hanger unit to the ceiling. (1) Using 1 of the ST4.2X30 tapping screws provided in the accessory package to fix the hanger unit to the ceiling.(Fig.3) (2) Using 4 of the ST4.2X30 tapping screws provided in the accessory package to fix the suspension brackets to the joists. (Fig.4) Joist Fig.4 INSTALLATIONⅠ(BETWEEN JOIST MOUNTING-Ⅰ) CONTINUED 4. Slip the circular duct onto the adaptor and secure it with duct tape.(Fig.4) 5. The connection of power wire and control lead wire. WARNING: 1.Wiring procedures and connections shall be in accordance with the national and local electrical codes having jurisdiction. 2.This product must be properly grounded. Cord cover Knock-out hole ① Take out the cord cover and stress relief two knockout holes.(Fig.5) ② Secure conduits, pass house power wires and control lead wires througth the holes. (Fig.6) Conduit Power wires (3 wires) Fig.5 Control lead wires(4 wires) Fig.6 7
-
 1
1 -
 2
2 -
 3
3 -
 4
4 -
 5
5 -
 6
6 -
 7
7 -
 8
8 -
 9
9 -
 10
10 -
 11
11 -
 12
12
 |
 |
