Panasonic KXTG6591 KXTG6591 User Guide - Page 34
Caller ID number auto edit, feature, Erasing selected caller, information, Erasing all caller
 |
View all Panasonic KXTG6591 manuals
Add to My Manuals
Save this manual to your list of manuals |
Page 34 highlights
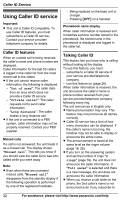
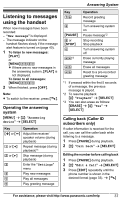
Caller ID Service Caller ID number auto edit feature Once you call back an edited number, the handset which was used to call back remembers the area code and format of the edited number. The next time someone calls from the same area code, caller information is customized by the handset as follows: - When the call is being received, the Caller ID number is displayed in the same format as the edited number. - After the call has ended, the caller's phone number is displayed in the same format as the edited number, when reviewed from the caller list. For example, you can use this feature to set the handset to ignore the area code of callers in your area, so that you can call these local numbers using caller information without dialing the area code. To activate this feature, you must edit an entry in the caller list, then call that number. After that, phone numbers from that caller's area code are edited automatically. This feature can be set for each handset (page 26). The default setting is "On". 3 MERASEN a MbN: "Yes" a MSELECTN a MOFFN Erasing all caller information 1 MFN CID 2 MERASEN a MbN: "Yes" a MSELECTN a MOFFN Storing caller information to the phonebook 1 MFN CID 2 MbN: Select the desired entry. R To edit the number, press MEDITN repeatedly until the phone number is shown in the desired format. 3 MSAVEN 4 MbN: "Phonebook" a MSELECTN 5 Continue from step 2, "Editing entries", page 20. Note: R Phone numbers from the 4 most recently edited area codes are automatically edited. R If you move to another area, you can turn this feature off to erase previously edited area codes. To use this feature again, turn it on and reprogram the area codes you want to edit once again. Erasing selected caller information 1 MFN CID 2 MbN: Select the desired entry. 34 For assistance, please visit http://www.panasonic.com/help
-
 1
1 -
2
-
3
-
4
-
5
-
6
-
7
-
8
-
9
-
10
-
11
-
12
-
13
-
14
-
15
-
16
-
17
-
18
-
19
-
20
-
21
-
22
-
23
-
24
-
25
-
26
-
27
-
28
-
 29
29 -
 30
30 -
 31
31 -
 32
32 -
 33
33 -
 34
34 -
 35
35 -
 36
36 -
 37
37 -
 38
38 -
 39
39 -
40
-
41
-
42
-
43
-
44
-
45
-
46
-
47
-
48
-
49
-
50
-
51
-
52
-
53
-
54
-
55
-
56
-
57
-
58
-
59
-
60
-
61
-
62
-
63
-
64
 |
 |
