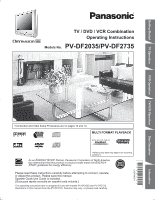
Panasonic PVDF2735 PVDF2035 User Guide - Page 6
Information
 |
View all Panasonic PVDF2735 manuals
Add to My Manuals
Save this manual to your list of manuals |
Page 6 highlights
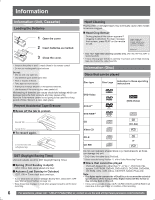
Information Information (Unit, Cassette) Loading the Batteries 1 Open the cover. 2 Insert batteries as marked. 3 Close the cover. • Insert so the poles (+ and - ) match those in the remote control. • Do not use rechargeable type batteries. Do not: • Mix old and new batteries. • Use different types at the same time. • Heat or expose to flame. • Take apart or short circuit. • Attempt to recharge alkaline or manganese batteries. • Use batteries if the covering has been peeled off. Mishandling of batteries can cause electrolyte leakage which can damage items the fluid contacts and may cause a fire. Remove if the remote control is not going to be used for a long period of time. Store in a cool, dark place. Prevent Accidental Tape Erasure Break off the tab to protect. Head Cleaning Playing older or damaged tapes may eventually cause video heads to become clogged. Head Clog Sensor During playback this screen appears if clogging is detected. To clear message from screen, press PLAY on the remote or unit. VIDEO HEADS MAY NEED CLEANING PLEASE INSERT HEAD CLEANING CASSETTE OR REFER TO MANUAL END:PLAY • Use "dry" type head cleaning cassette only. (Part No. NV-TCL30PT is recommended.) • Follow cleaning tape directions carefully. Excessive use of head cleaning tape can shorten the video head life. Information (Disc) Discs that can be played Disc type Disc Logo Indication in these operating instructions DVD-Video DVD-R*1 DVD-RAM*2 DVD-V (DVD-Video) RAM Record Tab Screw driver To record again. Cover the hole with cellophane tape. DST (Daylight Saving Time) Unit auto adjusts clock for DST (Daylight Saving Time.) ■ Spring (First Sunday in April) DST: ON ➞ Sets clock ahead one hour. ■ Autumn (Last Sunday in October) DST: ON ➞ Turns clock back one hour. • If your area does not observe Daylight Saving Time, select DST : OFF (see "Manual Clock Setting" on page 14). • Keep these time changes in mind when programming the unit for timer recording. CD Video CD CD (CD-DA) VCD CD-R CD or CD-RW VCD Do not use irregularly shaped discs (e.g. heart-shaped), as these can damage the unit. *1 DVD-Video formatted discs [finalized]. *2 Discs recorded using Version 1.1 of the Video Recording Format. Discs that cannot be played DVD with Region No. other than "1" or "ALL", DVD from PAL system, DVD-ROM, DVD+R, DVD-AUDIO, DVD-RW, DVD+RW, CD-ROM, CDV, CVD, CD-G, CD-TEXT, SACD, Photo-CD. Note: • The digital audio content side of DualDiscs do not meet the technical specifications of the Compact Disc Digital Audio (CD-DA) format so may not play back in this unit. • It may not be possible to play CD-R, CD-RW, DVD-R and DVD-RAM in all cases due to the type of disc or condition of the recording. 6 For assistance, please call : 1-800-211-PANA(7262) or, contact us via the web at:http://www.panasonic.com/contactinfo
-
 1
1 -
 2
2 -
 3
3 -
 4
4 -
 5
5 -
 6
6 -
 7
7 -
 8
8 -
 9
9 -
 10
10 -
 11
11 -
 12
12 -
13
-
14
-
15
-
16
-
17
-
18
-
19
-
20
-
21
-
22
-
23
-
24
-
25
-
26
-
27
-
28
-
29
-
30
-
31
-
32
-
33
-
34
-
35
-
36
-
37
-
38
-
39
-
40
-
41
-
42
-
43
-
44
-
45
-
46
-
47
-
48
-
49
-
50
-
51
-
52
-
53
-
54
-
55
-
56
-
57
-
58
-
59
-
60
-
61
-
62
-
63
-
64
 |
 |
