Pfaff 339 Owner's Manual
Pfaff 339 Manual
 |
View all Pfaff 339 manuals
Add to My Manuals
Save this manual to your list of manuals |
Pfaff 339 manual content summary:
- Pfaff 339 | Owner's Manual - Page 1
CPFAFFD 339 G.M. PFAFF AG. WERK KARLSRUHE-DURLACH - Pfaff 339 | Owner's Manual - Page 2
is essential for long life. This little booklet has been prepared to give you many useful sewing hints beyond the mere operating instructions. Whenever you have any questions regarding this machine, your dealer will be glad to help you in whichever way he can. Backed by many years of experience, - Pfaff 339 | Owner's Manual - Page 3
is Your Accessories Sewing Machine . 1. Preparing to Sew WNERMExeneiomcnegthddoaoaigrlvneniigngndgigarnitnvhgadaeenntddthabhenordrdbeeisbaspefedilwnoanlcigdniaingnggginfobgtooatbbthlbeeinseawndingbombebcinhanciassme 2. Upper threading, picking up bobbin Sewing - Setting Fundamentals the - Pfaff 339 | Owner's Manual - Page 4
- Pfaff 339 | Owner's Manual - Page 5
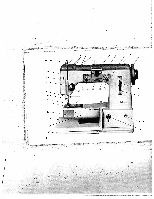
_- This is Your Sewing Machine 1 Thread take-up lever 2 Thread guides 3 Bobbin winder tension 4 Spool pins 5 Cam control 6 Automatic device 7 Top cover 8 Machine arm 9 Bobbin winder 10 Handwheel 11 Stitch length regulator 12 Stitch length scale 13 Sewlight switch 14 Lever for dropping feed dog 15 - Pfaff 339 | Owner's Manual - Page 6
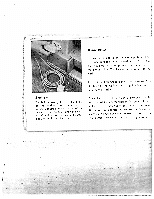
the underside of the bottom plate. Tilt the machine carefully to the bock. Connect the three-pronged plug 1 to the socket 2 on the back of the machine and plug the line cord 3 into the the control the faster the machine will run. Remember to take your foot off the foot control when you are not - Pfaff 339 | Owner's Manual - Page 7
Folding Table and Table Extension For all larger normal working sewing work and fancy area to put the material stitching on. you can raise the folding table to obtain a All you have to right part is - Pfaff 339 | Owner's Manual - Page 8
equir need/es system 130 R. Need/es of that system are avail able at your sewing machine dealer. Bring the thread takeup /ever to its highest position and /oosen c/amp screw 5 all the Way. Now take the needle between thumb and forefinger - Pfaff 339 | Owner's Manual - Page 9
i- and silk fabrics you will mostly be using sewing silk where there is no difference between upper and bobbin thread. f For fashion stitches we recommend the use of mercerized upper thread or sewing silk or machine embroidery cotton, and as bobbin thread machine embroidery cotton No. 50. H H - Pfaff 339 | Owner's Manual - Page 10
h ILdh. 49w.e . v , • N Needle and Thread Table (metric system) Example: You want to work on underwear. On the line saying "under- ag wear" you go to the right and find thread size 80 and above the kind OT c C thread to use. L.ast column C U indicates the needle size. °- U) Fine - Pfaff 339 | Owner's Manual - Page 11
Removing the Bobbin Case Bring thread take-up ever to its highest position and swing out to the left the cover at the end of the free arm. With thumb and forefinger of your right hand hold the case by its lctch 6. You can now take the bobbin case with the bobbin out to the front. When releasing the - Pfaff 339 | Owner's Manual - Page 12
the sewing mechanism as described on page 7. Now place the spool on the right-hand spool pin, pass the thread through the back thread guide,once Now press lever 8 to the back against the bobbin and set the machine in motion. The winder action stops automatically as the bobbin is fully loaded - Pfaff 339 | Owner's Manual - Page 13
Replacing the Loaded Bobbin 1) Place the bobbin case so that the from top towards photo). into the bobbin thread unwinds you .-m (upper 2) t 1 'aHrreiodlcddpithnaesgsbsotlhobetbi(nltohwirneeatrhdephtbhoortboobuignlheftc)athsee 3) (tttDlhhhoererweaawetoedrpnteshepninehoidonnttghohrs, - Pfaff 339 | Owner's Manual - Page 14
1,)1(1CiIl jJg() flobbiii (:(18( Bring the thread take-up lever again to its highest position and with thumb and forefinger ho!d the case by its open latch 9 and, with the cut-out on top, slide it onto stud 10. It is best to hold also the loose thread end to prevent it from getting caught between - Pfaff 339 | Owner's Manual - Page 15
clockwise between tension discs of the tension assembly 13, then up take-up and from right to left through lever 14, down through thread guide 15 and needle clomp thread guide 16 and finally from front to back through the needle. Pull about 4" of thread through the needle. 17 1411 12 LJi - Pfaff 339 | Owner's Manual - Page 16
through the needle plate. Now place both thread ends (about 3" long) under the sewing foot to the back. (Whenever you do not start working ot the edge of pick up the bobbin threod only after you hove ploced the fabric between sewing foot and needle plate. This will enoble you, as mentioned on poge - Pfaff 339 | Owner's Manual - Page 17
2. Sewing - Setting the Machine Fundamentals S•e•eomBnhttpsyBhthoeeoteaohoWnihprfeertnoccieueeoheiefdngthkevhaorieatliffocefder.eerndieeoenwfnrnoeeooTiel,rdifsoota6ythssbrahtpfy,ttoeeihek.fdoasil.rmrpsfrenanoreottaetAa-cglhsgmimwibuyatgeenelcgrdipsetegmhlitwoetldechfihstindiio6ieltlngeetteip2uigr, - Pfaff 339 | Owner's Manual - Page 18
instructions And remember: Never pull the material along, merely guide it. I given on pages 21 and 22. Make sure par ticularly that you sew sewing foot and Re,novin the Work needle plate and let down the sewing foot by lowering the presser bar lifter. As you depress the foot control, the machine - Pfaff 339 | Owner's Manual - Page 19
t.. Setting the Stitch Length faerltlYloohiteeiktronegnhew1uggue/1eatillrthae6sr.sfdt"tieTtinnrtshsetgasiteigtietntstcuwhcdslhhelehhiavnioitsgselgorseehrttartneiettgisschgs1tttthhe7ohe.sioo,ntrlidlTaetesccsuvltn3hoieretg/npwncr1tihitsh6ecrti"sethssutleewebrwnppneyioosdotnghcrss. - Pfaff 339 | Owner's Manual - Page 20
I Adjusting for Straight or Zigzag Sewing On the machine arm, facing you, you will see: Centre: Hinged cover plate 20 for the Auto matic device which opens to the front for inserting the pattern - Pfaff 339 | Owner's Manual - Page 21
certain special sewing techniques will be explained to you in detail in this book. which later sbettenh2eYhql3ieeeunocamgutollweoontdcinvchdk.eueot0dhmndlobfibcsocebcekrrltswot.d2sh4icetTesrekhcanaeizn2git4ldgh0heztvaeaaeltgsnshrtzodeictiscagothtlinnhetzicvneaht0egh. - Pfaff 339 | Owner's Manual - Page 22
LI I Loops on underside of fabric Ill Loops on top of fabric Regulating the Thread Tensions After sewing a few inches, examine the stitch ing on both sides of the fabric. The tensions are set correctly if upper and bobbin thread lock in the - Pfaff 339 | Owner's Manual - Page 23
in Turning to the left creases. Tension de The markings on the tension unit scale will help you remember the correct set ting for nomci sewing whenever you have to change the tension temporarily for special material. Regulating the Bobbin Case Tension Once it is set correctly, the bobbin case - Pfaff 339 | Owner's Manual - Page 24
the way down as the thick material by itself will force the sewing foot upwards which automatically increases the pressure. To release the pressure, press as card and velvet which may easily be marked by the sewing foot, you should always sew with reduced pressure. With the inner pin in its highest - Pfaff 339 | Owner's Manual - Page 25
Em Hemstitching - Toledo Work - Grained Work and Basting. - Wool Embroidery The needle plate with ovale the machine may also be straight stitch work. hole fitted to used for all All sewing feet and the following pages ed on page 6, are able extra charge. attachments shown on although not - Pfaff 339 | Owner's Manual - Page 26
, firmly tighten the clamp screw. The right edge of the material must be kept close to the guide (picture at left). This foot is used without g u ide when carrying out the following work: 1. Sewing very close to the edge of the material I 2. Laying several parallel stitch lines close together - Pfaff 339 | Owner's Manual - Page 27
of the material must remain in contact with the broad side of the guide. Quilting (f. I. cosies, bedroom slippers, quilts for children and dolls) Standard sewing foot 847495 or straight stitch sewing foot 847496 with quilting guide 847482 and holder 847480. First attach the presser foot. Next slide - Pfaff 339 | Owner's Manual - Page 28
from right to left, and tighten slightly the screw on the hotder, with the rounded part of the guide raised. Make your first row of stitches, then move the material to the right to give the ed and run the edge once more through the feller, sewing it down flat. 30 • - I - -_.____---- .- - Pfaff 339 | Owner's Manual - Page 29
,ga1liminyl/sht8yhts.oao"sietwduteeuwitremthrivaiantedaehbleetreled.,caerunfioeIraoudlnvdlrnsegmdweorteofrfeaiittrlkohfltaeifhitnneweigttdqphiidcehntneirhen.aaefmtawarotSrmbcotutrttahehiwhrrcrleee.t,, Ruffling and Sewing on Flounces in one Ruffler 847520 1 ftmaWwuhonpeioo)idnttrgh - Pfaff 339 | Owner's Manual - Page 30
(rgasFloB.t,ioiiondortnhbge:februyitrnhrwatehitoshetrThkerphrrrermpoeasadaudtrrdus:toticncTebfugdeiel.nnaesrpoBisnlo,oapnbcestsebh"aedi)eren.l I)arnin Line,, a) Without sewing (pictured at lefty foot, with embroidery hoop dUpDaaprrgopnepeinr gt4ha) encdtooftetbeotodhnbebdNiolnoeg.ftth5b0ry - Pfaff 339 | Owner's Manual - Page 31
bar lifter, hold the fab ric taut with both hands and do the stitching as describ ed under a). b) With standard sewing foot 847495, without em Darning with the normal sew broidery hoop ing foot and without em Drop the feed dog. Upper and bobbin thread: ma broidery hoop becomes ne cuphpoisni - Pfaff 339 | Owner's Manual - Page 32
the hoop). area in the centre Now gage lower the the upper presser bar lifter thread tension, pick to up en the bobbin thread and sew around the damag ed area once to prevent adders. Now continue darning in the same way as described on the preceding page with the only - Pfaff 339 | Owner's Manual - Page 33
in the centre. Perhaps you are used to do darning al ways with a special sewing foot; if so, ask your dealer for a Jura hopper foot II (847615) foot 847570 Control disc on zigzag. Drop feed dog. Upper and bobbin thread: Machine em broidery and darning cotton No. 50, suit ing the colour of the sock - Pfaff 339 | Owner's Manual - Page 34
Zigzag Width), Now pass the darning wool from back to front through the guide slot on the left back edge of the darning foot and place it right a moderate machine speed and lay the darning wool in close parallel lines over the hole, alternately from left to right and right to left, sewing it down to - Pfaff 339 | Owner's Manual - Page 35
with Twin-Hem Needle oPripunngivfeorosat l84se7w68in2g(sfeoeotp8a4g7e58509). Twin-hem needle system 130 Needle plate with thread (see picture). guide slot for filler Set control disc pages 22/23); 21 for onupspterraighant dstitcbhob(bsiene tStbtiohnhteigrrt1ece/haac1cddo6ot"ltte)tuoo - Pfaff 339 | Owner's Manual - Page 36
and, with the help of the threader, pull it up through the guide slot located in front of the needle hole. Attach the piping foot and close to the fabric. o lass bat is t e is especially suitable for this sewing technique where nothreads are drawn out. When working with Ii n en and similar material, - Pfaff 339 | Owner's Manual - Page 37
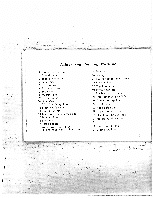
on lace 42 Shell edging 43 Roll hems 43 Buttonholes 44 Sewing on buttons 46 Blindstitching 46 Automatic fashion stitches . . . . 48-51 Twin needle fashion stitches 49 Manual fashion stitches 52 Satin stitch 53 Cording 53 Appliqué Work 54 Hole embroidery . 54 Elastic curve - Pfaff 339 | Owner's Manual - Page 38
" wide and about 3/16" long. The approxima settings are made with the zigzag lever and the stitch length regu lator. Overcasting, Overedging Standard sewing foot 847495 We recommend you to use machine embroidery and darning cotton No. 50. Centre needle position. The above designations namely - Pfaff 339 | Owner's Manual - Page 39
over the front of the foot, then into the slots and finally out and be neath the rear of the foot. Edge Join lug Standard sewing foot 847495 or edge joiner 847505 Zigzag lever on 3, stitch length to suit the work in hand. Narrowly fold over to the wrong side the - Pfaff 339 | Owner's Manual - Page 40
the first line of stitcNing, on the right side, with slightly larger zigzag stitches (scale marking 2-2.5). You may also use hemmers 847552 and 847549 for sewing on lace. Both hemmers have a diagonal slot on the right. The edge of the fabric is inserted into the curl, where the cloth is - Pfaff 339 | Owner's Manual - Page 41
Shell Edging Shell edger 847546 ossohveatSltnhrfeeniittgfirmdceetythchhtccmthretldif2yceie5wn,crrn:cie:ggitc.fde8hii"avn4trthRcnIi7stnnh:ldi5seeosigi5gssed4n2urs.etstohl:tsaS(fheotsttittefiteihsncdttetcethegerhhexosepditnmrtatulgehgemegreacedeneetahrgetnsatrmeT3hhiint1rqaheh:aidlaulratle"eleln. - Pfaff 339 | Owner's Manual - Page 42
Stand Place edge cves( '.1 Butlonlaoles Universal sewing foot 847580 a) Buttonholes with gimp thread Upper and bobbin thread: machine embroidery and darfling cotcn No. 50. Gimp: cotton thread. Upper thread tension normal, bobbin thread tension somewhat stronger (see pages 24 and 25). ii ..- Zigzag - Pfaff 339 | Owner's Manual - Page 43
zigzag lever already again in on 0. de the F: Now make a few fastening stitches ing the work from the machine and cut after remov off the ends b) Buttonholes without Gimp Sewing foot, thread and set ting as before, only without gimp thread. Proceed exactly as described under a). of the gimp - Pfaff 339 | Owner's Manual - Page 44
10 times from hole to hole. Now lever work to 0, from fasten-off with a few the machine and cut stit the Blindstitelzing .t'ith Guide Standard sewing foot 847495 The blindstitching make stitches that only. guide (as are visible pictured) enables you to on one side of the fabric Setting the - Pfaff 339 | Owner's Manual - Page 45
Blind Stitch Guide 847830 Method of working: 1) "sWgW and then to project a3rl1lhe6o"ffufilotlrowbvlieidrntdhtosottfihtcethhiernigghh.etm, atlolowthiengleftht eaghaeimn 3) Raise the sewing foot and place the work under the needle with the projecting part of - Pfaff 339 | Owner's Manual - Page 46
double pattern cam moun ted on stud 27. Rotate the cam control to the left until it indicates "2", The machine will now sew the pattern clearly marked "2" on the cam, When you wish to sew pattern 1 on the other side of the cam, just set the cam control on "1 5 double pattern cams lettered - Pfaff 339 | Owner's Manual - Page 47
homiuchtatebisreisratel.mwohveend you lay some after sewing. cesYCreccoth'uccvtcahrwo,ne2nWgc.c- ifabnMmcegriusa) Fa8hf on Stitthi,ztr wfth T!rin .hsiversal sewing foot 847580 oonvciutnem gfpwaocsilhrhle1eiaso93aon0/ndbd15t2a7sRs8peit"initactacnta(nuhisdtndreeetesar5iaS8gspw)nmu. - Pfaff 339 | Owner's Manual - Page 48
I Se 1 S to 1 PJac C edo Ove w tf I' n fl cbE C fT rioT. The patterns ilTustrated I here represent oniy some of the many fa shion stitches your ma chine will autornatjcaj ly sew. - Pfaff 339 | Owner's Manual - Page 49
By using a twin needle and by sewing with two threads of confrosting colours simul taneously, the scope of the machine is further increased for particu lars see page 49 Fo shion Stitching with the Twin Needle 51 - Pfaff 339 | Owner's Manual - Page 50
Manual Fashion Stitches cpUoentrtiovanenrsdNalob.oseb5w0b.iinngthforeoatd8:4m75a8c0h;inceamemcbornotridoel roynaznidgzdaagr;niunpg PatternNo. Stitch length Needle Position Zickzog Width Lever aajusrment ct an even speea of the machine) 1 1213 I I ci C( 1/64" almost centre left or right I 5(6 - Pfaff 339 | Owner's Manual - Page 51
visible gaps; it is, therefore, essential to set the stitch length almost to 0 (see also page 21). Cording Universal sewing foot 847580 Upper and bobbin thread: machine embroidery and darning cotton No. 50. Use cotton gimp. Upper tension: normal. Bobbin tension: slightly stronger than usual (see - Pfaff 339 | Owner's Manual - Page 52
foot 847580 Upper and bobbin thread: machine em broidery and darning cotton No. 50. Preparatory work: Place the appliqué on the fabric, as indicated in the pattern, and sew down with the zigzag stitch (scale marking 1). Trim away the surplus material close to the line of stitching. For the appliqu - Pfaff 339 | Owner's Manual - Page 53
and bobbin thread: machine em broidery and darning cotton No. 50. Zig zag width: 2. Needle position: left. Detach the sewing foot and lower upper tension. Hold the ends of both threads in your hand, start the machine and turn the hoop evenly around the hole. Finally set the needle positioning lever - Pfaff 339 | Owner's Manual - Page 54
curve seam symbol (third stitch from left on page 48). This pattern stitch serves perfectly for sewing elastic smwmB1tsturhh/eahHa1iriatset6oecaeutn"naribrtndiilfagmaeiyunlnso.latgdfucitoZteoecrfairl9hsgofin/eeeas1uzdwescl2ar"wt.8gs,(l"iwsiCnemmwigfeht(ohiias,etdreyaicnthelkthsgewb:compweion4tamrih - Pfaff 339 | Owner's Manual - Page 55
1/8") special screwdriver 847 262 for piping head needle plate with guide slot for qimp hreod(. /cer and bobbin thread for narrow iping: machine embroidery and darning :otton No. 50; for medium-wide and wide liping: sewing silk. Gimp thread: cotton. (obbin tension: normal. Upper tension: ttNer - Pfaff 339 | Owner's Manual - Page 56
Setting the Distance between Needles The piping head has markings for adjusting to different needle spacings: The lower parts can be adjusted after the two screws on the back of the clamp have been slackened off (right-hand photo). Narrow Piping with piping foot 847 665 Medium-wide Piping with - Pfaff 339 | Owner's Manual - Page 57
holes of the thread tche-up lever and again together through the next thread guide. Now pass one thread each through the eyelets on the piping head and number of piping stitches lengthwise, just let the edge of the sew ing foot slide along the previous row of piping stitches to ensure neat parallel - Pfaff 339 | Owner's Manual - Page 58
Wide piping in thick fabric is done without gimp thread.) Sewing with a gimp thread requires a needle plate with a guide slot in front of the needle hole (see picture on the front edge of the needle plate and pull it up through the guide slot located in front of the needle hole as pictured on page 37 - Pfaff 339 | Owner's Manual - Page 59
should turn the work only half way in the new direction, lower the foot and make one stitch. Now complete the turn and continue to sew in the new direction. Cord piping A cord effect is produced by laying medium wide piping lines quite closely side by side. Piping with. Ordinary Twin - Pfaff 339 | Owner's Manual - Page 60
Maintenance Oiling and Cleaning the Machine is essential ration and for long smooth, trouble-free machine life. ope- Use only approved sewing available at your dealer. machine oil tiiYhnneotgeusrmvsoaahflcoshauilllnddeew.pmoearnkkdiengoitnpaahrrtuoslweretoogfutoelianlrltyhy;eouobieluiansrge - Pfaff 339 | Owner's Manual - Page 61
out the bob bin case or, respectively, unscrew the needle plate to do the necessary cleaning. The hook of your machine is so designed that it will not cause trouble even if the machine is improperly operated. If it still happens that threads get caught in the hook race, turn the handwheel a few - Pfaff 339 | Owner's Manual - Page 62
Oiling points in the arm are accessible sewlight cover. front after part of opening the the ywvaBoiliecwlulefoatnrysaeosekteetcadookpavfimafnegrgatehg2eeo02f2tf)too.hfpteThtecahbokeovetboeAbprc.iuanrtcoeowmvtieahnrtadicteorpydoeaeuns Make any oil bobbin sure that there will on the driving be' - Pfaff 339 | Owner's Manual - Page 63
some paraffin to the rapidly for a minute (not threaded), clean over with Before using the machine and needle areas. the next time, wipe off all surplus oil especially in the hook It may ) (hidden by bobbin winder) Quite often trouble is elimi nated by merely cleaning and oiling. 65 - Pfaff 339 | Owner's Manual - Page 64
1 * * Motor-drive The machine has a belted motor-drive. The belt should never be too tight nor , you should once in a while take off the ventilation plate 31 on the righthand side of the machine by loosening the four fastening screws. The belt should be just so tight that its steel wires keep - Pfaff 339 | Owner's Manual - Page 65
the bulb up wards, turn it to the left and draw it out of the socket. Lntroduce a new bulb in such ci way that the guide studs slide into the slots of the socket. Press the bulb upwards turn it to the right, and it is fixed. 67 - Pfaff 339 | Owner's Manual - Page 66
of Faults Remember: Many machine troubles are caused by non-observance of these instructions. In many cases faulty working of your ma dune can be remedied merely by c!eaning and ciIng. 4. The machine is dirty - clean it. 5. Unsuitable oil has been used - clean the machine with paraffin and oil it - Pfaff 339 | Owner's Manual - Page 67
edge - replace the needle. 2. Knotty, inferior quality thread is being used - use a better quality. 3. The upper thread is incorrectly thread ed - thread the machine correctly (see page 17). 4. The needle is too fine for the thread or fabric - use a thicker needle (see pages 10, 11 and 12). 5. The - Pfaff 339 | Owner's Manual - Page 68
- - - - - The bobbin thread breaks: The machine skips stitches: 1. Knotty, inferior thread is being used - use a better quality, 2. The bobbin thread tDnsion is too case and consult your dealer, 70 5. The thread curs up because it is un suitable for machine sewing - use suitable thread. - Pfaff 339 | Owner's Manual - Page 69
or blunt - replace the needle (see page 10). 5. The needle, instead of entering the needle hole, hits the sewing foot or the needle plate - you are using the wrong sewing foot or (especially when sewing with twin needles) the zigzag width has not been limited (see page 49) or the needle is inserted - Pfaff 339 | Owner's Manual - Page 70
exerts too much pres 2. The feed dog is set too low (normally when sewing the full height of the teeth should protrude from the sure - reduce the pressure following instructions on page 26. needle plate) - after removing the needle plate look up an expert and have the feed dog raised a little - Pfaff 339 | Owner's Manual - Page 71
not un wind evenly because there is dirt lodg ed in the bobbin or between the tensian discs in the upper tension shell - clean the machine where necessary. 4. The needle is blunt or bent - change the needle. The bobbin itinder slips The friction surface is oily - take off the top cover - Pfaff 339 | Owner's Manual - Page 72
.. tfriTOheneiagepusbtlraloiescbfneeysowsmtifrxituenhpcngeftritiiegrofsufneeerfeneoetbsttrmoaaonoYenrdkrodlaueandrtft.utdosamirectmwibhoeeminnrrsaeg.lnnutmTssmehawehbcaheinvcringseroeonsffedso-ewerstaeelfwbaeeserirenetngknhncegfoeyeiwveaelstinrsetaalnnrbmedeewaleoadntwnyttiuaocmsniohsebmmdetoereson
-
 1
1 -
 2
2 -
 3
3 -
 4
4 -
 5
5 -
 6
6 -
 7
7 -
8
-
9
-
10
-
11
-
12
-
13
-
14
-
15
-
16
-
17
-
18
-
19
-
20
-
21
-
22
-
23
-
24
-
25
-
26
-
27
-
28
-
29
-
30
-
31
-
32
-
33
-
34
-
35
-
36
-
37
-
38
-
39
-
40
-
41
-
42
-
43
-
44
-
45
-
46
-
47
-
48
-
49
-
50
-
51
-
52
-
53
-
54
-
55
-
56
-
57
-
58
-
59
-
60
-
61
-
62
-
63
-
64
-
65
-
66
-
67
-
68
-
69
-
70
-
71
-
72
 |
 |
CPFAFFD
339
G.M.
PFAFF
AG.
WERK
KARLSRUHE-DURLACH