Pfaff 339 Owner's Manual - Page 53
techniques
 |
View all Pfaff 339 manuals
Add to My Manuals
Save this manual to your list of manuals |
Page 53 highlights
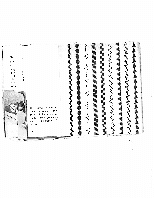
___ Upper and bobbin thread: machine em broidery and darning cotton No. 50. Zig zag width: 2. Needle position: left. Detach the sewing foot and lower the feed dog. Place the hole embroidery plate onto the needle plate from the front in such a way that its spring tongue will go into the corresponding cut-out provided at the front edge of the needle plate. Stretch the material in the hoop and make a tiny cross-cut in the material so that the pin of the embroidery plate passes snugly through it. The hoop must lie flat on the bedpicte of the machine. Draw up the bobbin thread and lower the presser bar lifter to engage the upper tension. Hold the ends of both threads in your hand, start the machine and turn the hoop evenly around the hole. Finally set the needle positioning lever on centre and the zigzag width lever on 0, make a few fastening-off stitches and cut the threads. j The illustration shows in addition to hole 1 other hole embroidery techniques: hole 2 with zigzag width 4; 3 with zigzag width 2 (needle position first left,then right); 4to 7 are variations with zigzag width 2 to 4. Number 6 is a combination of Nos. 2 and 7 in contrasting colours. 55
-
 1
1 -
2
-
3
-
4
-
5
-
6
-
7
-
8
-
9
-
10
-
11
-
12
-
13
-
14
-
15
-
16
-
17
-
18
-
19
-
20
-
21
-
22
-
23
-
24
-
25
-
26
-
27
-
28
-
29
-
30
-
31
-
32
-
33
-
34
-
35
-
36
-
37
-
38
-
39
-
40
-
41
-
42
-
43
-
44
-
45
-
46
-
47
-
 48
48 -
 49
49 -
 50
50 -
 51
51 -
 52
52 -
 53
53 -
 54
54 -
 55
55 -
 56
56 -
 57
57 -
 58
58 -
59
-
60
-
61
-
62
-
63
-
64
-
65
-
66
-
67
-
68
-
69
-
70
-
71
-
72
 |
 |
